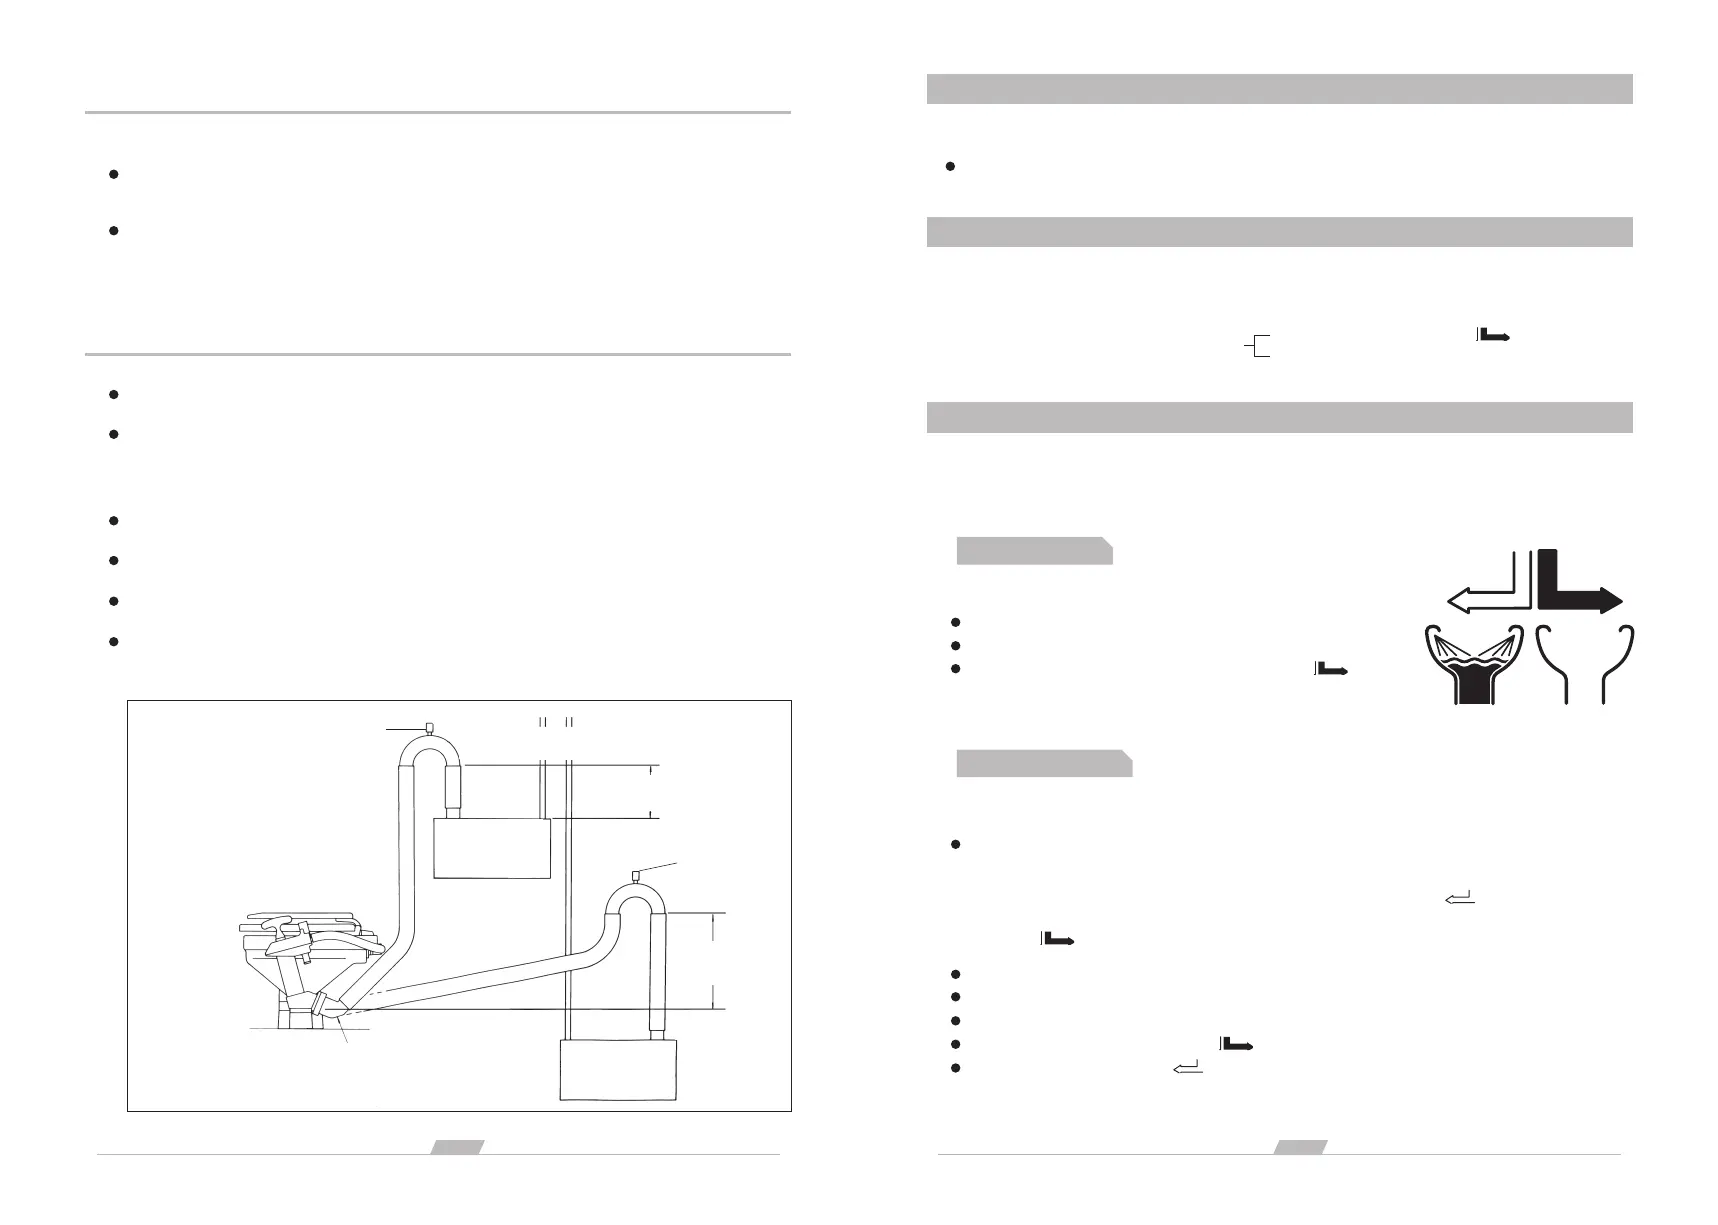
Arrange the outlet hose to form a loop which is at least 20 cm (8") above the highest possible level that the
tank may reach, and fit the Vented Loop at that highest point.
If there is ANY possibility that the discharge elbow may be below the top of the tank at ANY time, a
ventilated anti-syphon loop must be fitted in the outlet pipework to ensure that the contents of the tank do
not syphon out through the bowl.
OPTION 3: TOILET WASTE DISCHARGING INTO HOLDING TANK, TOP OF HOLDING TANK
ABOVE DISCHARGE ELBOW AT ANYTIME. (See Figure 3 below)
YOU MUST fit a 38mm (1-1/2’’) Vented loop fitting
Run the outlet hose up from the discharge elbow to form a loop at least 30cm (12") higher than the
discharge elbow.
This will create a water seal at the Joker Valve that will prevent bad odours from escaping through the
toilet.
OPTION 4: TOILET WASTE DISCHARGING INTO HOLDING TANK, DISCHARGE ELBOW
ALWAYS ABOVE TOP OF HOLDING TANK. (See Figure 3 below)
8
page
7
page
6. TESTING
If the flushing pump is hard to prime half fill the bowl with fresh water.
Refer to the Operating Instructions and follow the procedure "2 Normal use".
7. SAFETY
Ensure that this INSTRUCTION MANUAL reaches the owner, skipper or operator of the craft as
it contains essential safety information.
ON COMPLETION OF INSTALLATION
SHUT THE FLUSH CONTROL
( )
CLOSE BOTH SEACOCKS
OPERATING INSTRUCTIONS
The toilet is one of the most used pieces of equipment on your boat. Correct operation of the toilet is
essential for the safety and comfort of your crew and craft.
Keeping the Flush Control Lever (key 24) in the Shut( ) position,
pump out the warm water.
Half fill the bowl with warm fresh water.
Open inlet and outlet seacocks (and secondary valves if fitted).
After periods without use the toilet may benefit from lubrication.
1. FIRST USE
Before use, ensure that there is enough water in the bowl to prevent the toilet paper becoming compacted
at the bottom of the bowl.
Open inlet and outlet seacocks (and secondary valves if fitted).
2. NORMAL USE
If the bowl is empty, move the Flush Control Lever (key 24) to the Open ( ) position and pump the
handle (key 36) up and down until the flushing pump is primed and water enters the bowl.
Then Shut ( ) the Flush Control.
Use good quality hard or soft household toilet paper, but do not use more than necessary.
Operate the pump with long, smooth strokes for efficient and easy operation.
During use, pump as necessary to keep the contents of the bowl low enough for comfort.
After use, keep the Flush Control Shut ( ) and pump until the bowl is empty.
When the bowl is empty, Open ( ) again, and continue to pump until all waste has either left the boat,
or reached the holding tank (allow 7) complete up/down strokes per metre (yard) length of discharge
pipework).
If you fit a vented loop at the top of the hose loop this will ensure that you can keep some water in the base
of the toilet without risk of it being siphoned away.
Run the outlet hose up from the discharge elbow to form a loop at least 30cm (12") higher than the
discharge elbow.
If you fit a vented loop at the top of the hose loop this will ensure that you can keep some water in the base
of the toilet without risk of it being siphoned away.
If you fit a vented loop at the top of the hose loop this will ensure that you can keep some water in the base
of the toilet without risk of it being siphoned away.
YOU MAY fit a 38mm (1-1/2’’) Vented Loop fitting
All dimensions in millimetres with inch equivalents in brackets.
Figure 3
38mm (1-1/2’’)
VENTED LOOP
HOLDING TANK
VENT PIPES
AT LEAST
20cm (8")
Option 3
Top of Holding Tank
above Discharge
Elbow at any time
OPTIONAL 38mm
(1 1/2") VENTED
LOOP
AT LEAST
30cm (12")
Option 3
Holding Tank below
Discharge Elbow
DISCHARGE
ELBOW