4
SeaStar Manual Jackplate
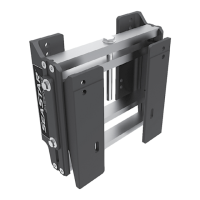
1. PRIOR to mounting the Jackplate to the transom, insert the
engine bolts with washers into the engine side of the Jackplate.
2.
Using connection hardware supplied by or approved by the outboard
engine manufacturer, mount the Jackplate to the transom.
2.2 Mount Jackplate to Boat
The following procedure outlines the process of first mounting the
Jackplate on the boat, followed by installing the engine to the
Jackplate. If desired, the Jackplate can first be installed on the
engine, followed by installation on the boat. The order of installation
may be altered but individual steps must be followed and all
warnings and cautions must be followed.
NOTICE
ENGINE SIDE OF
JACKPLATE
INSERT 4X ENGINE BOLTS AND WASHERS
PRIOR TO MOUNTING JACKPLATE TO TRANSOM
TRANSOM SIDE OF JACKPLATE
Figure 2. Engine bolt insertion.
3. Seal all holes in the transom with an appropriate marine sealant.
 Loading...