EasyManua.ls Logo

Seca 240 User Manual

Seca 240
5 pages
To Next Page IconTo Next Page
Page #1 background imageLoading...
Page #1 background image
8
1. Congratulations!
In the
seca 240
mechanical measuring
rod, you have acquired a highly accurate
and simultaneously sturdy piece of equip-
ment.
seca has been putting its experience at
the service of health for over 150 years
now, and as market leader in many coun-
tries of the world, is always setting new
standards with its innovative develop-
ments for weighing and measuring.
seca 240
measuring rod is used for diag-
nosis and treatment in hospitals and doc-
tors’ surgeries.
The measuring rod
seca 240
is attached
directly to the wall. It has a heel plate to en-
sure that the patient is correctly posi-
tioned. The dual track and the large
surface of the head stop ensure that the
height of individuals can be determined
with precision.
The measuring rod is of a very sturdy con-
struction, and will give you long and relia-
ble service.
2. Safety
Before using the new measuring rod, please take a little time to read the following safety
instructions.
Follow the safety instructions in the in-
struction manual.
Attach the measuring rod only to safe,
solid walls.
Use the assembly material supplied.
When assembling, ensure that screws
are tight and that the rod has been as-
sembled correctly (see “Assembly” on
page 9).
After measuring height, push the slide
unit back up – risk of injury!
Question and Answer IconNeed help?

Do you have a question about the Seca 240 and is the answer not in the manual?

Seca 240 Specifications

General IconGeneral
BrandSeca
Model240
CategoryMeasuring Instruments
LanguageEnglish

Summary

Congratulations

Safety Precautions

General Safety Instructions

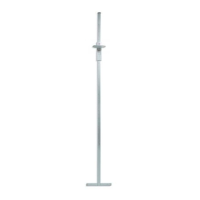
Follow safety guidelines, use secure walls, and supplied assembly material for safe operation.

Before You Start and Assembly

Unpacking and Scope of Supply

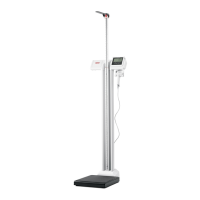
Details the items included in the scope of supply for the measuring rod.

Assembly Instructions - Initial Steps

Initial steps for wall attachment, including selecting location and preparing spacers.

Assembly Instructions - Continued

Detailed Assembly Procedure

Step-by-step guide for marking, drilling, mounting the rod, and ensuring perpendicular alignment.

Operation and Maintenance

Measuring Procedure

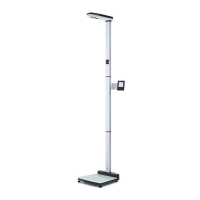
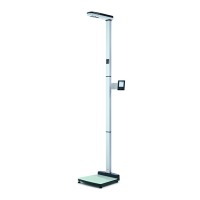
Steps for correct patient positioning and reading height measurements accurately.

Cleaning Guidelines

Instructions for cleaning the measuring rod using recommended agents, avoiding abrasives.

Troubleshooting Common Issues

Guidance on resolving issues like a slipping slide unit by tightening a screw.

Technical Information and Warranty

Technical Data Specifications

Details dimensions, weight, accuracy, measurement range, and graduations.

Disposal Instructions

Guidance on responsible disposal of the measuring rod according to regulations.

Warranty Terms and Conditions

Information on the two-year warranty, exclusions, and claim procedures.

Related product manuals