5
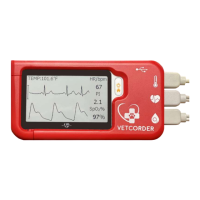
2.5 Result Screen
This device provides powerful measurement functionalities,
including Daily Check, ECG, Oximeter, and Internal
Thermometer. For each measurement, a Result report will be
provided after the measurement is finished. An example is shown
as below.
1. Measured parameters and readings.
2. Trash, replay, and back buttons.
Select to move recording to trash
Select button to re-record.
Press button to go back to the readings screen.
In the Result Screen, if there is no operation for 2 minutes, the
device will automatically return to Standby Screen.
7
3. Getting Started
3.1 Unpacking
Before unpacking, examine the packing case carefully for signs of
damage. If any damage is detected, contact your distributor or
Sentier. If the packing case is intact, open the package and remove
the equipment and accessories carefully. Verify all materials are
present and check for any mechanical damage. Contact Sentier in
case of any problem at 844-VETCORDER.
Warnings and Cautionary Advice
Save the packing case and packaging material as they can be
used if the device must be reshipped.
Register your warranty at www.sentierconnect.com. You will
then be notified via email of any software updates etc.
When disposing of the packaging material, be sure to
observe waste control regulations and keep it out of the
reach of children and animals.
The equipment might be contaminated during storage and
transport. Before use, please verify whether the packages are
intact, especially the packages of single use accessories. In
case of any damage, do not use. Contact Sentier at 844-
VETCORDER for assistance.
3.2 Power On/Off
Press the Power On/Off button to power on the device. Press and
hold Power On/Off button for 2 seconds from the main menu to
power off the device.
3.3 Initial Settings
The first time when the Vetcorder is powered on, you can set up
your Vetcorder monitor step by step. You can also change the
settings in the <Settings> menu.
 Loading...