EN
What is included in the box:
• 1 x Main unit
• 1 x User Manual
• 1 x Quick start guide
• 1 x Power adaptor
• 1x UK AC plug for power adapter
• 1x EU AC plug for power adapter
Panels & Controls
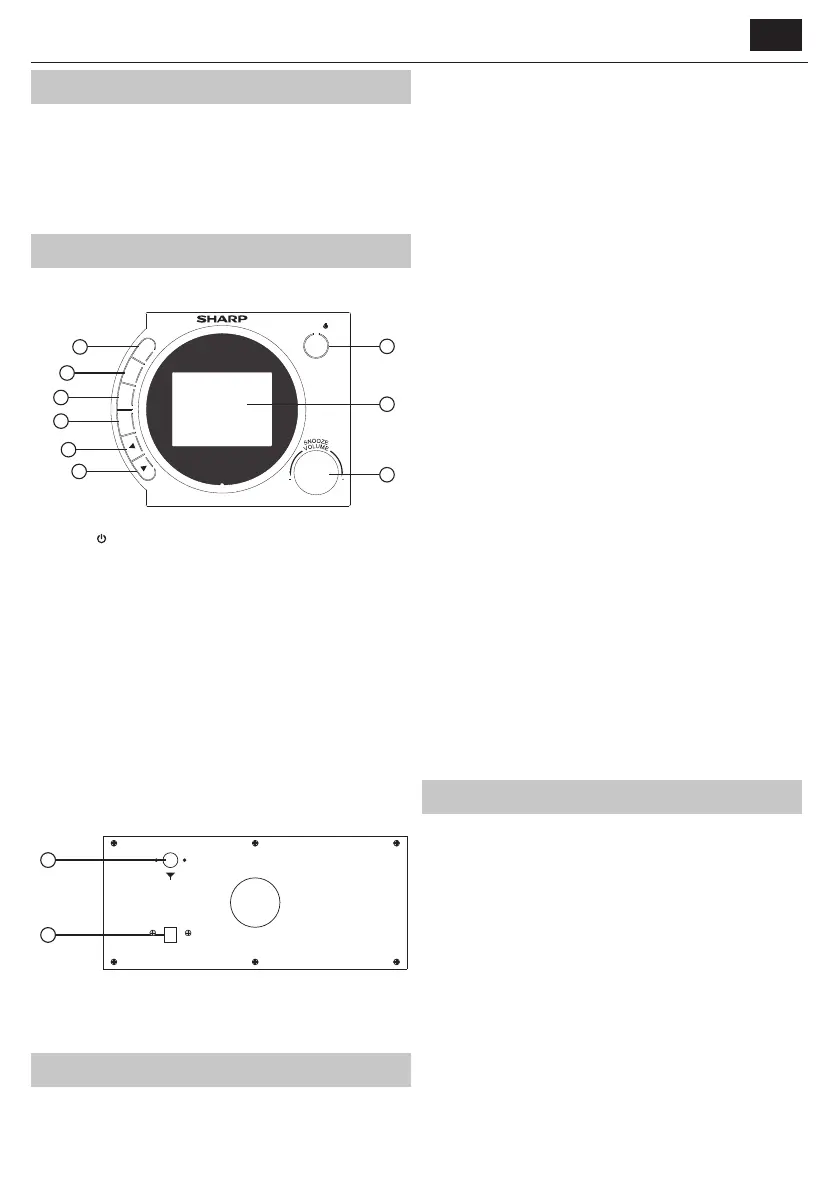
Front Panel
3
4
5
6
1
2
7
8
9
LE
E
P
S
E
S
E
R
T
P
E
N
U
M
F
O
/
I
N
C
A
N
S
T
E
R
N
/
E
MODE/
EQ
1. MODE/ – Press to turn on the radio, or switch to Standby mode, or
change the mode.
2. Volume Knob/EQ/SNOOZE – Use to adjust the volume level, or
change the sound e ects: Classic, Rock, Pop, Jazz, Dance, Live and O ,
or activate the snooze function.
3. SLEEP – Press to activate the sleep timer: o /15/30/45/60/90 minutes.
4. INFO/MENU – Press to view the station information, or enter main
menu setting screen.
5. ENTER/SCAN – Use to con rm the selection, or scan the stations.
6. PRESET – Press to recall the preset stations.
7. PREVIOUS ◄ – Press to go back to the last selection, or decrease the
frequency, or seek the last strongest station.
8. NEXT ► – Press to go forward to the next selection, or increase the
frequency, or seek the next strongest station.
9. DISPLAY SCREEN – To show the information.
Rear Panel
10
11
DC 5V
10. Telescopic Aerial – To receive the FM signal.
11. DC Power Input – DC 5V
General Operating Instructions
Mains Adaptor (supplied with the package)
Connect the mains adaptor to the DC power socket on the rear panel of
the radio.
Get the Best Reception
Extend the telescopic aerial as far as it can go.
Turn On the Radio
Press the MODE/STANDBY button to turn on the radio.
Switch to Standby Mode
When in use, long press the MODE/STANDBY button to enter Standby
mode. Press it again to wake up the radio. The radio will turn into standby
mode automatically if no any operations after 15 minutes.
Adjust the Volume
Rotate the Volume Knob to adjust the volume to a comfortable level.
Listening to the radio at a high volume levels may damage your hearing.
Avoid listening at high volume levels for long periods of time.
The rst time the radio is used
The rst time you turn the radio on it will automatically scan for stations.
During scanning, the screen will display a slide bar that indicates the
progress of the scan and the amount of radio stations that have been
found so far. Once the scan has nished, the radio will play the rst station
it nds.
EQ function
You can change the sound e ect by pressing the Volume Knob in.
Snooze function
When the alarm is sounding in Standby mode, rotate the Volume Knob to
activate the SNOOZE function.
The alarm will sound again after 5 minutes.
Sleep Time
To set the sleep time, repeatedly press the SLEEP button to select from: o ,
15, 30, 45, 60, 90 minutes.
When the set time has passed, the unit will enter sleep mode.
Select Modes
When in use, press the MODE/STANDBY button repeatedly to switch to
your desired mode: DAB/DAB+, FM, Bluetooth.
Station Information
Press the INFO/MENU button to check the station information.
Time Auto Update
The time and date can be updated automatically if the system detects the
RDS signal. If the RDS signal is weak or cannot be detected, the time will
not automatically update.
Main Menu Setting
Long press the INFO/MENU button to enter the main menu setup screen.
Find and enter the <System> screen by pressing the ENTER/SCAN button.
Then use the ◄/► button to cycle through the menu options: <Time
setup>, <Alarms>, <Sleep>, <Language>, <Prune>, <Station Order>,
<Backlight>, <Factory reset>, <SW version>.
NOTE: The <Prune> and < Station Order> are only available in DAB mode.
Select one of the options and then press the ENTER/SCAN button to
access that menu.
Time setup
1. Set clock: 00:00(Hour:Minutes), use the ◄/► and ENTER/SCAN
buttons to set.
2. Set date: 01-01-2018(Day-Month-Year), same as the “set clock” setting.
3. Auto update: <No update> or <From radio>, press ENTER/SCAN
button to con rm.
4. Set 12/24 hour: choose your favorite format.
After you nish the steps above, the time is set up manually.