MX3500N SIMULATION 7 – 108
50-24
Purpose
Adjustment
Function (Purpose)
Used to display the data acquired with the
auto registration adjustment simulation
(SIM50-22).
Section
—
Item
Image quality
Operation/Procedure
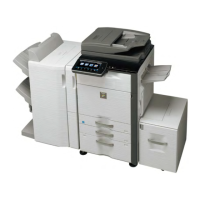
1) When the machine enters Simulation 50-24, the following
screen is displayed.
* Select the kind of display with [NEXT] and [BACK] buttons.
* Specify the color with [K], [C], [M], and [Y] buttons. (Depend-
ing on the selected kind of data, selection of a color button
cannot be made. In that case, the key entry is disabled.)
* If there is a page over [↑], an active display is shown and the
page moves up. If there is no page upward, the display
grays out and the operation is invalid.
If there is a page under [↓], an active display is shown and
the page moves down. If there is no page downward, the
display grays out and the operation is invalid.
* When [CLOSE] button is pressed, the display is shifted to the
copy basic screen of simulation.
* Copying can be performed also by pressing [COLOR]/[BLACK]
key.
<Display content>
1) Registration adjustment confirmation screen
Use [K][C][M][Y] button to display the initial screen (No color
specified/C/M/Y).
Press [NEXT] button to display the next category.
Press [BLACK] button to display the previous category.
2) Phase adjustment status check screen
Press [K][C][M][Y] button to display the initial screen (K/C/M/
Y).
Press [NEXT] button to display the next category.
Press [BACK] button to display the previous category.
3) Sensor calibration status check (No color specification)
Press [K] button to display the initial screen of K.
Press [NEXT] button to display the category.
Press [BACK] button to display the previous category.
4) Sampling status check (1) (KCMY/No color specification)
Press [K][C][M][Y] button to display the initial screen (K/C/M/
Y).
Press [NEXT] button to display the next category.
Press [BACK] button to display the previous category.
5) Sampling status check (2) (KCMY)
Press [K][C][M][Y] button to display the initial screen (K/C/M/
Y).
Press [NEXT] button to display the next category.
Press [BACK] button to display the previous category.
6) Sampling status check (3) (KCMY)
Press [K][C][M][Y] button to display the initial screen (K/C/M/
Y).
Press [NEXT] button to display the next category.
Press [BACK] button to display the previous category.
7) Sampling status check (4) (KCMY)
Press [K][C][M][Y] button to display the initial screen (K/C/M/
Y).
Press [NEXT] button to display the next category.
Press [BACK] button to display the previous category.
8) Sampling status check (5) (KCMY)
Press [K][C][M][Y] button to display the initial screen (K/C/M/
Y).
Press [NEXT] button to display the next category.
Press [BACK] button to display the previous category.
9) Sampling status check (6) (KCMY)
Press [K][C][M][Y] button to display the initial screen (K/C/M/
Y).
Press [NEXT] button to display the next category.
Press [BACK] button to display the previous category.
10) Sampling status check (7) (KCMY)
Press [K][C][M][Y] button to display the initial screen (K/C/M/
Y).
Press [NEXT] button to display the next category.
Press [BACK] button to display the previous category.
11) Temperature correction value check screen (CMY)
Press [C][M][Y] button to display the initial screen (C/M/Y).
Press [NEXT] button to display the next category.
Press [BACK] button to display the previous category.
12) Temperature correction value check screen (No color specifi-
cation)
Press [K] button to display the initial screen (K).
Press [NEXT] button to display the next category.
Press [BACK] button to display the previous category.
13) Error code status check (No color specification)
Press [K] button to display the initial screen (K).
Press [NEXT] button to display the next category.
Press [BACK] button to display the previous category.
Initial screen (Registration adjustment status check screen (No
color specification))
50-27
Purpose
Adjustment
Function (Purpose)
Used to adjust the image loss of scanned
image in the FAX/Scanner mode.
Section
FAX/Scanner
Item
Image quality
Operation/Procedure
1) Use [FAX] button and [SCANNER] button to select the mode.
2) Select the set item with [↑] and [↓] buttons.
The highlighted section of the set value is switched and dis-
played on the set setting area.
* If there is any item over [↑], an active display is made and
item is shifted.
If there is no item over [↑], the display grays out and the
operation is invalid.
If there is any item under [↓], an active display is made and
item is shifted.
If there is no item over [↓], the display grays out and the
operation is invalid.
3) Enter the set value with 10-key.
* Press [C] key to clear the entered values.
4) When [OK] button is pressed, the current entered value is
saved to EEPROM and RAM.
* When [↑], [↓] button, [COLOR], or [BLACK] key is pressed,
the data are saved to EEPROM and RAM.