Do you have a question about the SHERCO 250 SEF RACING and is the answer not in the manual?
Details type, displacement, bore/stroke, compression, fuel, valve timing, and more.
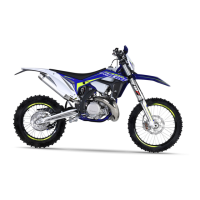
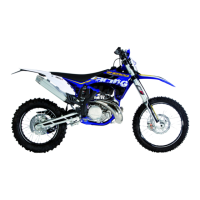
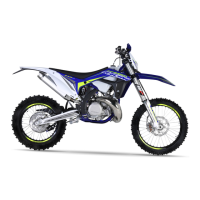
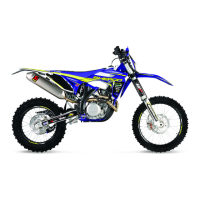
Details frame material, fork type, suspension, brakes, tire size, and weight.
Details compression, rebound, spring, and oil settings for KAYABA and WP forks.
Details low/high-speed compression, rebound, and spring settings for KAYABA and WP shocks.
Step-by-step procedure for detaching the engine from the chassis.
Steps for refitting the engine into the chassis, including torque values.
Steps before dismantling the cylinder head, including engine support.
Procedure for removing the cam chain tensioner.
Steps to remove camshafts and bearing caps.
Procedure for removing the cylinder head and gasket.
How to measure cylinder diameter for wear and out-of-roundness.
Measuring piston diameter, ring groove clearance, and ring end gap.
Checking camshaft journal clearance and runout.
Checking cylinder head flatness and timing chain condition.
Measuring intake and exhaust valve-guide clearances.
Installing piston rings, wrist pin, and clips.
Installing cylinder head bolts, nuts, and gasket.
Setting the timing for the intake and exhaust camshafts.
Installing the camshaft retaining cover and chain tensioner.
Checking and adjusting valve clearances using shims.
Procedure for removing and installing the timing chain.
Steps to disassemble the clutch assembly.
Procedure for removing and inspecting the water pump.
Steps to remove the clutch hub and basket.
Reassembling the clutch hub and related parts.
Steps to remove the ignition case and inspect components.
Procedure for replacing the stator and sensor system.
Steps for removing the rotor and related parts.
Inspecting the freewheel gear and needle bearings.
Reassembling the ignition case after inspection or replacement.
Steps to dismantle the transmission and crankshaft components.
Inspecting gears, shifting forks, and gear selector drum for wear.
Checking crankshaft radial play, lateral movement, and runout.
Inspecting crankcases for wear, cracks, and bearings.
Reassembling the central crankcase with crankshaft and transmission.
How to check and adjust primary shaft side play using shims.
Assembling crankcase halves, gear selector shaft, and oil pump components.
Installing transmission input shaft components and primary drive gear.
Torquing crankshaft and transmission input shaft nuts.
Reinstalling engine top end, cam drive chain, and clutch.
General torque specifications for standard fasteners (M5, M6, etc.).
Torque values for engine-related components.
Torque values for frame and chassis components.
List of materials required for cleaning the injector body.
Steps to remove the injector body from the throttle body.
How to inspect and clean electrical connectors.
Detailed steps for cleaning the injector body.
Procedure for reinstalling the injector body.
How to test the cooling fan operation.
Information about the CDI system wiring.
Procedure to test the fuel pump pressure and supply.
Testing the fall sensor output voltage.
Testing the voltage regulator output and diode bridge.
Checking battery voltage and condition.
Checking MAP sensor output voltage.
Testing TPS sensor output voltage and resistance.
Checking stepper motor coils for continuity.
Measuring injector input voltage.
Testing the starter motor operation.
Checking alternator winding resistance and output voltage.
Testing crankshaft Hall sensor resistance and voltage.
Testing water sensor resistance at different temperatures.
Measuring primary and secondary ignition coil resistance.
Wiring diagram for the homologated light harness.
Wiring diagram for the racing light harness.
Wiring diagram for the main wire harness.
Wiring diagram for the fan wire harness.
Introduction to the Synerject injection system components.
Description of the Exxodiag diagnostic tool and its capabilities.
List of components included in the diagnostic tool kit.
Step-by-step guide to installing the diagnostic software and drivers.
Finalizing the software installation and driver setup.
Accepting license terms and setting up drivers.
Connecting the diagnostic tool cable to the motorcycle and computer.
Steps to connect the diagnostic tool with the keyless ignition system.
Navigating the diagnostic software menu and interface.
Configuring communication, language, and unit system settings.
Checking for and downloading software updates for the diagnostic tool.
Completing the software update process and configuring internet access.
Identifying motorcycle and ECU details like VIN, serial number, hours.
Reading and interpreting engine parameters like RPM, temperature, voltage.
Accessing and viewing stored diagnostic trouble codes.
Understanding default code details, transient vs. permanent, and fan default.
Procedure for clearing diagnostic trouble codes from the ECU.
Testing the ignition coil's functionality.
Testing injectors, fuel pump, fan, and stepper motor.
Process for updating the ECU's injection mapping and calibration.
Downloading calibration files and applying them to the ECU.
How to perform screen prints for technical support.
| Brand | SHERCO |
|---|---|
| Model | 250 SEF RACING |
| Category | Motorcycle |
| Language | English |