19
PRESSURE
CONTROL CALIBRA
TION
USE EXTREME CAUTION WHEN PERFORMING THIS CALIBRA
TION PROCEDURE
to reduce the risk of an
injection
injury or other
serious bodily injury which can result from component rupture, electric shock, fire, explo
-
sion,
or moving parts.
This
procedure sets the sprayer to 2750
psi (190 bar)
MAXIMUM
WORKING PRESSURE.
This
procedure must be performed whenever
micros
-
witch
or pressure control assembly is
removed and re
-
installed
or replaced to be sure the sprayer is properly
calibrated.
Improper calibration can cause the sprayer to over-
pressurize
and
result in component rupture, fire or ex
-
plosion.
It
may also prevent the sprayer from obtaining
the
maximum working pressure which would result in
poor sprayer performance.
NEVER
try to increase the fluid outlet pressure by per
-
forming these calibrations in any other way. Normal
operation
of the sprayer at higher pressures could re
-
sult
in component rupture, fire or
explosion. T
o perform
this adjustment, however, the sprayer pressure must
be
temporarily
increased above the normal working
pressure.
Use
a new 50 foot (15.2 m)
spray hose rated for 3000
psi (210 bar) MAXIMUM WORKING PRESSURE
when
performing this procedure. A used, under–rated
hose
could develop a high pressure leak or rupture.
WARNING
Service T
ools Needed:
D Items
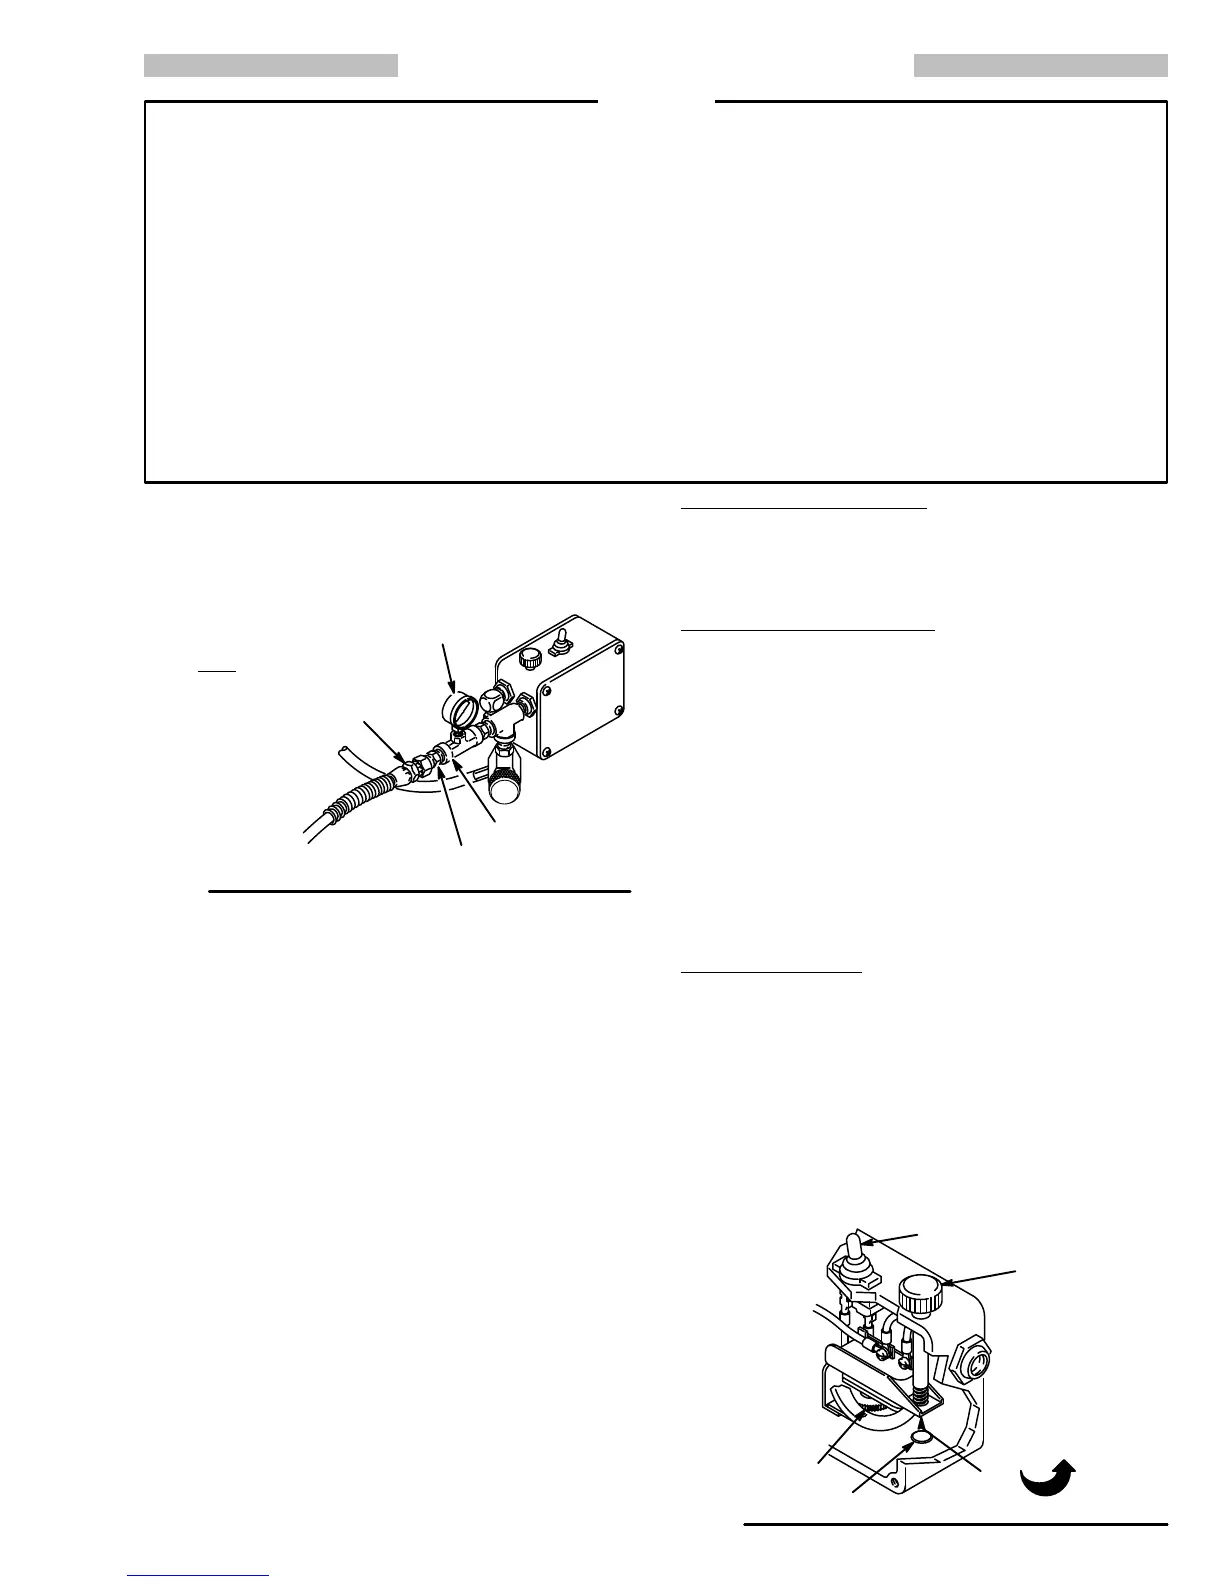
in Fig 1
1 D
5 gallon pail and water
D
Needle valve, P/N
D
3/8 in. socket wrench
102–715 or 103–067
D
Mineral spirits
Fig
1
1
0785
TEE,
104–984
FLUID FILLED
PRESSURE
GAUGE, 102–814
NEW
50 FT
. , 3000 PSI
FLEXIBLE NYLON
AIRLESS SPRA
Y
HOSE, 223–541
NIPPLE, 162–453
1. Relieve
pressure. See page 12.
2. Plumb the pressure control with additional parts as
shown in Fig 11. Connect the needle valve to the
open
end of the hose.
NOTE:
See Fig 12 for the following procedure.
3.
Remove the cover (79) and plug (123).
4. Open the needle valve slightly. Turn the pressure
control
knob (A) to the minimum setting.
5. Plug in and turn on the sprayer. Increase the pres-
sure setting just enough to start the sprayer. Prime
the
hose and purge all air from the system.
6. Open
the needle valve
a little more––enough to allow
the pump to run continuously––and turn the pressure
control knob to maximum. Now, very slowly start to
close
the needle valve, but don’t
close it all the way
.
Observe the pressure at which the pump stalls,
which
should be approximately 2750 psi (190 bar)
.
NOTE: The
slower the pressure is raised, the easier it
is
to note the exact stall pressure. Closing the
needle
valve quickly causes the pressure to rise
too
fast which gives a false reading.
If the pressure is lower than
2750 psi (190 bar)
:
Unplug the sprayer. Relieve pressure. Insert the
socket wrench through the plug hole and untighten
the
pressure adjustment nut 1/8 turn or less, then re
-
peat
steps 5 and 6.
If the pressure is higher than
2750 psi (190 bar)
:
Unplug the sprayer. Relieve pressure. Insert the
socket
wrench through the plug hole and tighten the
pressure
adjustment nut 1/8 turn or less and repeat
steps
5 and 6. Repeat this procedure until the proper
stall
pressure is obtained.
7. Now
check to see at what pressure
the sprayer starts
to
run again after it stalls. Plug in the sprayer
, turn it
on, close the needle valve, and set the pressure at
maximum.
Allow the sprayer to run until it stalls.
8. Open the needle valve very slowly while observing
the pressure gauge. Check to see if the pressure
drops to approximately 2350 psi (164 bar) before
starting
again.
If the pressure is not
2350 psi (164 bar)
:
Shut off and unplug the sprayer, but do not relieve
pressure. Turn the differential wheel (D) just one
notch
and repeat Steps 5 and 6. Check the pressure
drop
again and repeat if necessary
.
NOTE:
Always recheck the stall pressure (steps 5, 6)
if
the dif
ferential wheel was adjusted.
9. Follow
the
Pressure Relief Procedure W
arning
on
page
12. Flush the water out with mineral spirits. Re
-
lieve pressure again. Install the plug (123) and cover
(79).
Remove the test equipment.
Fig 21
ON/OFF
SWITCH
A
B
D
TIGHTEN
C
0750


 To Next Page