Do you have a question about the Shindaiwa AH230 and is the answer not in the manual?
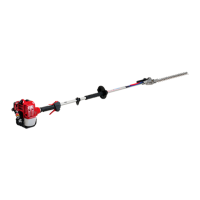
Overview of the Shindaiwa AH230 Articulated Hedge Trimmer, emphasizing its performance and reliability.
Information to prevent serious injury or death.
Information to prevent serious bodily injury.
Information to prevent mechanical damage.
Statements possessing special significance.
Handy information to make the job easier.
The hedge trimmer is not insulated against electrical shock. Maintain distance from lines.
Operational procedures protect users. Follow safety rules and laws. Contact dealer for questions.
Details on specific warning labels attached to the hedge trimmer and their meanings.
Ensure all information labels are undamaged and readable. Replace damaged or missing labels.
Ensure cutter attachment is installed, not cracked, and not contacting anything before starting.
Stop engine immediately if striking an object or if unit becomes tangled. Do not operate damaged equipment.
Be alert for spring-back when cutting tensioned branches to avoid being struck.
Stop unit immediately if it vibrates or shakes. Inspect for broken or missing parts.
Never operate without a muffler. Ensure good ventilation; never run engine indoors due to exhaust fumes.
Ensure all fasteners are tight and stop switch/throttle controls are working properly.
If cutter binds, shut off engine immediately. Ease the bind to free the cutter.
Ensure cutters are correctly adjusted before operating. Never adjust with engine running.
Always ensure handles and guards are attached and secure when using the machine.
Never transport with engine running. Ensure cover is in place and cutter points backward.
Maintain the hedge trimmer as per manual. Never modify or disable safety devices.
Always use genuine Shindaiwa parts. Do not make unauthorized modifications or substitutions.
Never run the engine at high RPM without a load, as this can damage the engine.
When transporting in a vehicle, tie down the trimmer securely to prevent damage and fuel spillage.
Clear work area of trash or hidden debris for good footing. Keep cutters sharp and adjusted.
Keep the articulated hedge trimmer clean. Remove loose vegetation, mud, etc.
Never allow children to use the machine. Avoid operating near bystanders. Be aware of surroundings.
Always wear a hard hat, eye/hearing protection, and sturdy footwear. Wear snug-fitting clothes.
Always operate with both hands firmly gripping the unit. Keep proper footing and do not overreach.
Keep bystanders at least 15 meters away. Swing blades in an arc. Avoid overreaching.
Familiarize yourself with the Shindaiwa AH230 articulated hedge trimmer and its various components.
List of tools included with the unit: spark plug wrench, hex wrench, and spanner.
Before assembling, ensure all required components are present and inspect them for damage.
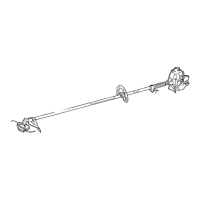
Place powerhead on flat surface, spark plug up. Use 4mm hex wrench to loosen tube clamp screw.
Add grease to splines, slide outer tube into clamp. Rotate to engage splines. Ensure grip hits joint cap.
Ensure ignition switch faces up and throttle lever faces down. Tighten clamp screw firmly.
Remove spark plug cap, loosen cylinder cover knob, lift and remove the cylinder cover.
Connect cable adjuster nuts for throttle cable fit. Connect black ignition wire to red engine wire.
Loop cable assembly to engine top left. Connect S-shaped end of throttle cable to throttle lever.
Loosen throttle cable nuts at fan cover. Adjust until 6 mm free play on throttle trigger is achieved.
Ensure 6 mm free play. At full throttle, trigger should contact stop on throttle body.
Ensure stop switch wires do not interfere with throttle functions. Reposition if necessary.
Press latch release and lock. Pivot cutter assembly to align with outer tube using adjustment lever.
Release latch lock and release. Ensure they return securely to locking position.
Remove cutter blade cover. Engine can now be started. Replace cylinder cover and spark plug cap.
Rotate cutter assembly parallel to tube with engine off. Ensure lock latch and release are secure.
Make sure the scabbard is in place on the cutters before storing or transporting.
Minimize fire risk. Stop engine before refueling. Allow to cool. Open fuel cap slowly.
Use approved containers. Avoid overfilling. Move 3 meters from fueling point before restarting.
Always inspect for fuel leaks before use. Stop using unit immediately if leaks are evident.
Use unleaded gasoline (87+ octane) and premium 2-cycle mixing oil (50:1 ratio).
Avoid fuels with >10% alcohol. Use oils for high-performance 2-cycle engines; avoid generic/outboard oils.
Mix fuel in clean container. Wipe area around cap. Fill tank, replace cap, wipe spills.
Set ignition switch to 'ON'. Press primer bulb until fuel is visible in return tube.
Set choke to CLOSED for cold engine. Move to OPEN after engine starts. Restart if it stops.
Hold outer tube firmly. Pull recoil starter handle slowly until resistance, then quickly to start.
Ensure cutting attachment is clear of obstructions and in the cutting position before starting.
Do not pull recoil starter to the end of its travel to prevent starter damage.
Blades may oscillate when starting. Keep away from cutter assembly. Adjust idle speed if oscillation continues.
If engine fails to start after attempts, move choke to OPEN, pull starter to remove excess fuel.
Allow the engine to idle for two or three minutes to cool down before stopping.
Know how to stop the machine quickly in an emergency. Always be aware of cutter movement after stopping.
Slide the ignition switch to the 'O' or STOP position.
The mixture of the carburetor on this unit cannot be adjusted by the user.
Engine must return to idle. Idle speed must disengage the cutter attachment when trigger is released.
Start engine, warm up. Reduce idle speed counter-clockwise if oscillation occurs. Increase clockwise if stalling.
Standard idle speed is 2,750 (±250) min-1. Use a tachometer for accurate setting.
Hook the strap to the hanger on the outer pipe. Wear strap with hook at your right hand side.
Adjust strap length for comfortable holding and operation of the machine.
In emergency, pull white tab at hook to release machine from strap.
Use lopping shears to cut out thick branches first before using the trimmer.
Cut radially in passes. For vertical cuts, swing blade in an arc. Use both sides of the blade.
Hold blade at 0°-10° angle. Swing horizontally towards hedge outside to sweep cuttings.
Hold shaft upright with 90° blade angle to cut upper surface of a hedge.
Cut close to ground from a standing position for low shrubs.
Ensure engine and cutting attachment are stopped. Disconnect spark plug wire before service.
Check cooling fins, air cleaner for clogging. Clean as necessary. Keep air passages clear.
Clean air cleaner element with soap and water. Ensure it is dry before reinstalling.
Remove dirt/debris from muffler, fuel tank, and cooling air intake to prevent overheating.
Clean debris from cutting attachment. Lubricate blades. Check cutters for damage/adjustment.
Check for loose/missing screws. Ensure cutter attachment is secure. Check for fuel/grease leaks.
Clean spark plug, adjust gap to 0.6-0.7mm. Replace if necessary with NGK BMR6A.
Clean cylinder cover and debris from cylinder cooling fins.
Lubricate gearcase with lithium-base grease using a lever-type gun.
Extract fuel filter, inspect for contamination. Replace if necessary. Inspect fuel line for damage.
Adjust blade shoulder bolts and locknuts for proper clearance (0.25-0.50 mm) between blades.
Clean parts, drain fuel, stabilize fuel. Remove remaining fuel from lines and carburetor.
Pour 3ml of 2-cycle oil into cylinder via spark plug hole. Turn starter to coat interior.
Repair any worn parts before storing. Clean air cleaner element. Store unit in a clean, dust-free area.
Guide to diagnose issues like engine not cranking, no compression, or no spark.
Addresses issues like overheating, rough running, or engine knocking due to fuel or carbon buildup.
Covers symptoms such as poor acceleration, abrupt stopping, excessive vibration, or attachment not rotating.