EasyManua.ls Logo

Siemens ARCADIS Varic - Service Manual

Siemens ARCADIS Varic
30 pages
Print Icon
To Next Page IconTo Next Page
Loading...
ARCADIS
n.a. English
Print No.: SP00-000.841.01.01.02 Doc. Gen. Date: 08.05
Replaces: n.a.
© Siemens AG 2005
The reproduction, transmission or use
of this document or its contents is not
permitted without express written
authority. Offenders will be liable for
damages. All rights, including rights
created by patent grant or registration
of a utility model or design, are
reserved.
These instructions are valid for the replacement of the ON/OFF
assembly, material no. 80 81 932, on ARCADIS Varic systems,
material no. 80 80 017 up to serial no. 10316, and
ARCADIS Orbic systems, material no. 80 81 080 up to
serial no. 20085.
SP
System Manual
Replacement Instructions
Replacement of the ON/OFF Assembly

Other manuals for Siemens ARCADIS Varic

Question and Answer IconNeed help?

Do you have a question about the Siemens ARCADIS Varic and is the answer not in the manual?

Summary

ARCADIS System Manual

ON;OFF Assembly Replacement Instructions

Detailed instructions for replacing the ON/OFF assembly on ARCADIS systems.

General Information and Safety

Notes and Safety Symbols

Explains safety alert symbols like DANGER, WARNING, CAUTION, NOTICE.

Validity of Instructions

Defines the applicability of instructions to specific system models and serial numbers.

General Safety Precautions

Covers general safety warnings, electrical, radiation, and mechanical hazards.

Infection Prevention and Grounding Tests

Details on infection risk, ground wire resistance, and leakage current testing.

Required Resources

Lists necessary documents, tools, and materials for the procedure.

Removing the ON;OFF Assembly

Accessing Internal Components

Steps to open the monitor trolley and gain access.

Disconnecting Relay and ON;OFF Assemblies

Procedures for removing the relay and main ON/OFF assemblies.

Installing the ON;OFF Assembly

Preparations and Wiring Overview

Initial setup, voltage setting, and wiring layout overview.

Cable Connections and Grounding

Connecting power, monitor trolley, and ground wires.

Internal Wiring and Terminal Connections

Wiring PS/2, adapter, D50, and X3 terminals.

System Startup, Tests, and Final Steps

Procedures for system boot-up, programming, ground wire test, and leakage current measurement.

ON;OFF Assembly Circuit Diagram

Provides a schematic extract of the ON/OFF assembly's circuit.

Changes to Previous Version

New Publication Information

Indicates this document is a new publication.

Overview

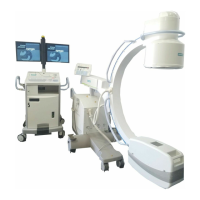
This document outlines the replacement instructions for the ON/OFF Assembly, material number 80 81 932, used in ARCADIS Varic systems (material number 80 80 017 up to serial number 10316) and ARCADIS Orbic systems (material number 80 81 080 up to serial number 20085). It serves as a system manual for maintenance and repair personnel.

Function Description

The ON/OFF Assembly is a critical component responsible for controlling the power supply to the ARCADIS system. It integrates various power connections and control signals necessary for the system's operation, including connections for the main power cable, monitor trolley cable, PC (imaging system), and an optional uninterruptible power supply (UPS). This assembly manages the power flow to different parts of the system, ensuring proper startup and shutdown sequences. It also incorporates safety features such as fuses (F1 and F2) that are crucial for protecting the system from overcurrents, with specific fuse values dependent on the local mains voltage (e.g., 15 A for 200-240 V AC and 20 A for 100-127 V AC). The assembly also handles communication signals, such as the CAN cable for 3D Reconstruction options and PS/2 cable connections.

Usage Features

The ON/OFF Assembly facilitates the basic operation of the ARCADIS system by providing the means to switch it on and off. Its design ensures that power is distributed correctly to all connected components, including the monitor, PC, and other peripherals. The system's startup sequence involves connecting the monitor trolley with the C-arm chassis, plugging in the power, and then switching on the system. The assembly supports a "Power Off Grace Period" parameter, which can be programmed (e.g., to 15 seconds) to allow for a controlled shutdown of the PC (imaging processor) after the C-arm chassis is switched off. This feature ensures data integrity and prevents abrupt power loss to critical components. The assembly's integration with the UPS ensures continuous operation in case of power fluctuations or outages, with specific wiring for UPS input and output power cables.

Maintenance Features

Maintenance of the ON/OFF Assembly primarily involves its replacement and subsequent verification procedures. The instructions detail the steps for safely removing the old assembly, which includes de-energizing the system, disconnecting power plugs (including those for the UPS), removing various covers, and carefully detaching all connected cables and ground wires. Due to its weight, lifting the assembly requires two persons.

Installation of a new ON/OFF Assembly involves several key steps:

  • Preparations: Before installation, the new assembly must be configured to the local mains voltage, and the correct fuse values for F1 and F2 must be verified based on the mains voltage.
  • Wiring: Detailed instructions are provided for connecting the power cable, monitor trolley cable, ground wire, D66.X1 and D66.X5 cables to the PC, and the CAN cable (if the 3D Reconstruction option is present). The replacement and wiring of the PS/2 cable are also covered, emphasizing proper strain relief and secure connections.
  • Terminal Connections: Specific wiring diagrams and tables guide the connection of various components to terminals D50.X2, D50.X11, D50.X4, and X3 on the ON/OFF assembly, ensuring correct power and signal distribution to the live monitor, reference monitor, PC, UPS, and optional printer.
  • Ground Wire Test: A crucial maintenance step after installation is to perform a ground wire resistance test. This test, conducted according to DIN VDE 0751, Part 1, measures the resistance from the power plug's ground wire contact to various touchable parts of the system (e.g., monitor trolley, PC, C-arm chassis). The measured resistance must not exceed 0.2 ohms. Documentation of these values is essential for safety checks.
  • System Leakage Current Measurement: Following the ground wire test, a system leakage current measurement must be performed, especially if primary circuit parts or the ON/OFF assembly itself have been replaced. This measurement, also performed according to DIN VDE 0751, Part 1, ensures that the leakage current does not exceed 2.5 mA. The procedure emphasizes safety precautions, such as preventing access by third parties during direct measurement and ensuring the system is insulated.
  • Startup and Checks: After installation and wiring, the system undergoes a startup sequence, including programming the "Power Off Grace Period." Subsequent checks verify the correct functionality of the ON/OFF switch and the system's shutdown and restart behavior.
  • Concluding Work: Finally, all covers must be closed, ensuring protective ground wire connections make good contact. All measured values from the ground wire and leakage current tests must be documented and filed in the system folder or log book.

The document stresses the importance of observing all safety information, including general electrical safety, radiation safety, and mechanical safety, to prevent injuries, death, or material damage during maintenance procedures. ESD regulations must also be observed when working on the system.

Siemens ARCADIS Varic Specifications

General IconGeneral
TypeMobile C-arm
Image Intensifier9-inch or 12-inch
DICOM CompatibilityYes
Frame RateUp to 30 fps
Focal Spot Size0.3/0.6 mm
MonitorDual 18-inch TFT LCD monitors

Related product manuals