Startup Procedure and Checklist SED2 Variable Frequency Drives
Document Number 155-718
September 14, 2011
Page 4 Siemens Industry, Inc.
HVAC Startup
Procedure for SED2
with Conventional
Bypass Option
Review the Preparing for SED2 VFD Startup section in this document.
Use the following HVAC startup procedure for SED2 VFDs with the Bypass Option. For
startup of SED2 VFDs without the Bypass Option, see the HVAC Startup Procedure for
SED2 without Bypass Option section in this document.
Check Step
( ) 1.
Verify that the electrical supply power lines connect to the input device and that the motor leads
connect to the output terminals of the overload relay. Ensure that all connections are tight; factory
connections may come loose during shipment. Set the thermal mechanical overload for the
bypass panel to the motor’s FLA.
( ) 2.
Record all other connections to the bypass cabinet or the VFD and confirm (if applicable) that the
building management system logic is ready to perform adequately for start, stop, and speed
command functions.
( ) 3. Before applying power, make sure that the following conditions are met:
• The DRIVE/OFF/BYPASS switch is OFF.
• For units with three contactors, the Drive Test ON/OFF switch is OFF.
( ) 4.
Apply power to the drive and bypass package. Make sure that all three phases are present and
that the input voltage is correct for the system being set up. Then move the DRIVE/OFF/BYPASS
switch to the DRIVE position.
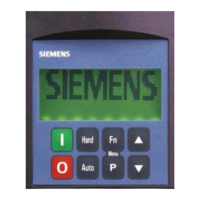
At this time, if the display indicates a fault, press
to reset it.
( ) 5. Verify that the drive display is on.
( ) 6.
Press
to access Parameter r0000 and to enter the SED2 programming mode. From here, you
can access and change Level 1 parameters using
or .
Repeatedly press to advance to Parameter P0010. Press to access the parameter values
level.
Press
to advance to 1. Press to confirm and save the P0010=1 setting. The Quick
Commissioning procedure starts. See the Quick Commissioning Procedure section in this
document for details.
On completion of the Quick Commissioning procedure, continue with Step 7.
( ) 7.
Press
and then
to return to the drive operating mode.
( ) 8.
To start the Drive, press
and then (green start key). The drive will ramp up to “10 HZ”.
Verify that the direction of motor rotation is correct.
NOTE: If the direction of motor rotation is wrong, turn the DRIVE/OFF/BYPASS switch to OFF;
and turn Power Off! Wait for 5 minutes.
Swap wires on the motor terminals (T1(u), T2(v)) or on the output terminals of the
motor overload relay. Tighten the terminal lugs, reapply power, turn
DRIVE/OFF/BYPASS switch to DRIVE; and recheck the direction of motor rotation.
 Loading...