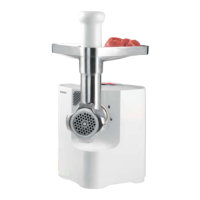
SFW 350 C2
GB
│
IE
│
NI
│
CY
│
7 ■
WARNING! RISK OF INJURY!
► The cross blade 3 is very sharp! Risk of injury!
CAUTION - PROPERTY DAMAGE!
► The appliance will be damaged if the cross blade 3 is inserted the other
way around!
4) Select the required perforated disc !/6.
5) Place your selected cutting disc !/6 into the meat grinder casing so
that the fixings on the cutting disc !/6are located in the openings in the
meat grinder casing .
6) After everything has been correctly assembled, screw the ring clamp .
back on hand-tight.
7) The ready-assembled meat grinder casing is connected by a bayonet
connector to the motor unit :
– Insert the meat grinder casing into the motor unit such that the
arrow on the meat grinder casing lies against the symbol
on the
motor unit . The locking button %presses itself in (Fig. B).
– Lightly press the meat grinder casing in and at the same time turn
the feeding shaft on the meat grinder casing into the middle position
(Fig. B) so that the arrow on the feeding shaft points to the symbol
.
When the meat grinder casing engages, the locking button %
springs out.
– Finally, place the feeding tray on top of the feeding funnel.
– To dismantle it, press the locking button %and turn the feeding funnel
to the right (Fig. B)
. You can now pull the meat grinder casing out.
Assembling the sausage stuffer attachment
Unfold the fold-out side - there you will find the step-by-step illustrations for as-
sembling the appliance.
1) Remove the meat grinder casing as described under “Assembling the
meat grinder”.
2) Dismantle all parts which are fitted to/in the meat grinder casing and
clean them.
3) Coat all metal parts with cooking oil.
4) Put the transport screw , the spring - and the cross blade 3 back into
the meat grinder casing .
5) Insert the coarse perforated disc 6 so that the fixings on the disc 6 are
inside the recesses on the mincer attachment .
6) Then place the sausage filling attachment 0 in front of the coarse perforated
disc 6.

 Loading...