GB
10
i) A badly maintained or connected tool may have delayed ring.Waterintheairsupply,lack
ofoilinthetoolorairsupply,pluswornpartscancauseun-anticipatedoperation
j) Incorrect fasteners not designed or the incorrect size for your tool can cause operator
injury and damage to the tool
k) Do not load fasteners with trigger pulled or safety depressed
l) Be careful when ring fasteners into thin material or at the edge of material. The fasteners
maygostraightthroughormissthematerialandcausedamageorinjurytopeoplenearby
m) Exceeding the maximum recommended air pressure can cause abnormal or unexpected
operation.Neverconnecttoanairsupplythatcouldexceeds200psithiswillcauseairtoolsto
failcatastrophicallyburstingsealsandfailuresinothercomponents
n) Do not attach the tool to a hose and the hose to a compressor with only threaded
connections. Alwaysusequickconnectorssothetoolcanberemovedfromtheairsupply
connection when needed for safe operation
o) Never t a female Quick Connector directly to the leader hose/whip hose or directly to the
tool.Thestoredpressurisedairevenwhendetachedfromthemainairsupplycanoperatethe
toolunexpectedly.
Disconnect air hose from tool when
a) Doing maintenance and inspection
b) Making adjustment to the tool
c) Clearing a jam
d) Ifnotinuse
e) Leaving work area
f) Moving it to another location
g) Handing it to another operator
1. Handle
2. Magazine Hex Screw 5mm
3. Magazine Loading Point
4. Locking Lever
5. Air Inlet
6. Magazine Latch
7. Magazine Hex Screw 5mm
8. Magazine Hex Screw 3mm
9. Safety Catch
10. Depth Adjuster
11. Trigger
12. Exhaust
13. 6mm Hex Key
14. 5mm Hex Key
15. 3mm Hex Key
16. ¼" Male BSP Bayonet Quick Connector
17. Air Tool Oil
Product Familiarisation
Intended Use
Powerfulairframingnailerres50-90mmcollated,clippedheadnails.forroofframing,fencing,
deckingandooring.
Unpacking Your Product
• Carefullyunpackandinspectyourproduct.Fullyfamiliariseyourselfwithallitsfeaturesand
functions
• Ensureallpartsoftheproductarepresentandingoodcondition.Ifanypartsaremissingor
damaged, have such parts replaced before attempting to use this product
Before Use
WARNING: Alwaysdisconnectthetoolfromtheairsupplybeforeadjustmentormaintenance
is carried out.
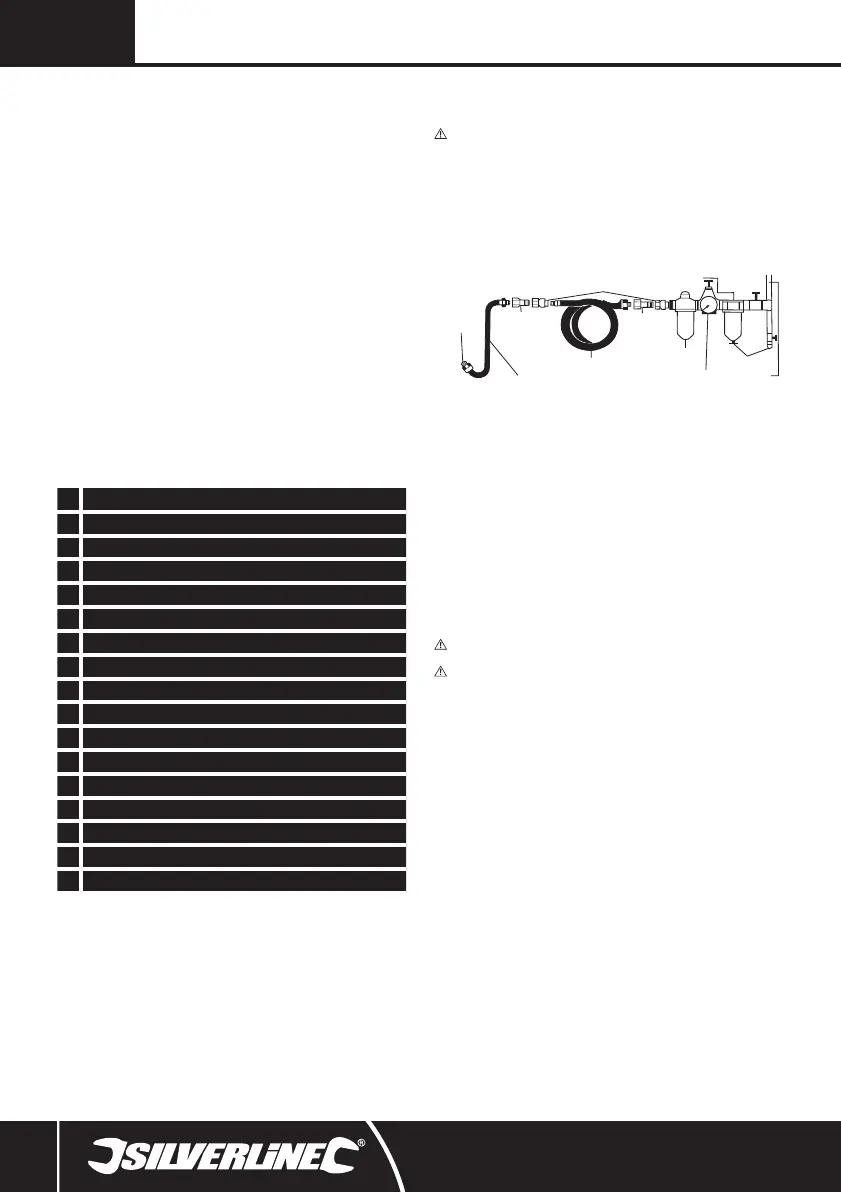
Recommended air supply
• Thistoolshouldbeconnectedtoaclean,dryairsupplywithinlineoilerandwaterseparator
• Donotallowsupplypressuretoexceedthemaximumstated(seespecicationdetails)
• Ensurethatallpartsofthesystem(hoses,couplers,etc)arecorrectlyratedfortheairpressure
to be used
• Ifanautomaticoiler(asperdiagrambelow)isnotused,pourtwodropsofairtooloilintotheair
inlet of the quick connector before each use
TO YOUR
AIR TOOL
LEADER HOSE
NIPPLE
QUICK COUPLER
WATER SEPARATION
OILER
NIPPLE
REGULATOR
DRAIN DAILY
AIR SUPPLY
RECOIL HOSE
• Dirty,wetairwillrapidlycorrodetheinternalworkingpartsofthismachineandwillshortenits
workinglifesignicantly.Watercollectsinthecompressortankandwillcauseseriouscorrosion.
Thetankmustbedrainedonadailybasistopreventwaterbuild-upintheairsupply
Note: Some air tools have built-in regulators which are used to control speed/torque performance.
Whereatooldoesnothaveabuilt-inregulator,thespeed/torquecanstillbeadjustedbyvaryingthe
pressureonyourairsupplyregulator.
Fitting the Quick Connector
• A¼"MaleBSPBayonetQuickConnector(16)issuppliedwiththistool.
• RemovetherubberprotectivecaptoAirInlet(5)tottheQuickConnector
• ApplyingPTFEtapetothescrewthreadswillhelptomaintainanairtightseal.
• ScrewtheQuickConnectorintotheAirInlet(5)(Fig.I)
• Tighten with a suitable spanner (not supplied)
• Airlinesttedwithmatching¼”connectorswillnowcouplewiththistool
IMPORTANT:DONOTovertightentheQuickConnectorasthismaydamagethetool.
Checking the Safety Catch
WARNING:EnsurenonailsorstaplesareloadedinthemagazinebeforecheckingtheSafety
Catch (9).
WARNING: IftheSafetyCatchisfaultyinanywayDONOTUSEthetool.
• TheSafetyCatch(9)shouldmoveinandoutfreelywithnoobstruction
• NormaloperationoftheSafetyCatchpreventsthetoolbeingredwithouttheSafetyCatch
being depressed
• TotesttheSafetyCatchisworkingcorrectly:
1. Connectthetooltotheairsupplyusingthe¼”MaleBSPBayonetQuickConnector(16)
2. CarefullypushtheSafetyCatchagainstapieceofwoodwithoutpullingtheTrigger(11)(Fig.
II).Thetoolmustnotre.Shouldthetoolreitmustberepairedbeforeanyfurtheruse
3. Holdthetoolawayfromthepieceofwood.TheSafetyCatchshouldreturntoitsoriginal
position
4. PulltheTrigger(Fig.III).Thetoolmustnotre.Shouldthetoolreitmustberepairedbefore
anyfurtheruse
Adjusting the Exhaust
• TheExhaust(12)canberotatedtodirecttheowoftheexhaustgases(Fig.IV)
• TheExhaustshouldbepositionedtodirecttheowofexhaustgasesawayfromtheoperator
Loading the magazine
• Toloadthemagazine:
1. SlidetheMagazineLatch(6)totheendofthemagazine,untilitlocksintoposition(Fig.V)
2. InsertfastenersintotheMagazineLoadingPoint(3)ensuringthepointsofthefastenersare
facing toward the workpiece
3. ToreleasetheMagazineLatch,slidetheLatchtowardstheendofthemagazineand
simultaneouslypresstheLockingLever(4)(Fig.VI)
4. KeepholdoftheMagazineLatchandslidetheLatchbackupthemagazinetoloadthe
fasteners
282400_Manual.indd 10 30/08/2019 09:52
 Loading...