EasyManua.ls Logo

Simple Motors Kit 12 - User Manual

Default Icon
7 pages
Print Icon
To Next Page IconTo Next Page
Loading...
Assembly instructions for kit #12 1
This is not a Lego® product even if it contains Lego® bricks and plates. All warranties provided by Simple Motors.
LEGO® is a trademark of the LEGO Group of companies which does not sponsor, authorize or endorse this product.
All rights reserved. 2014 Simple Motors, LLC www.simplemotor.com
Assembly Instructions: Kit #12
Rapid Assembly Basic QuikLock
Reed Switch Motor
1. Insert the motor shaft through the holes in two 2x2 rotor pieces as shown*. Center the
shaft.
2. Add plastic sleeves (washers) to both ends of the shaft. They fit tightly and require some
effort. You may put the sleeve on the table and push the shaft in with the negative end of
the battery. Leave a small gap so the sleeves are slightly above the surface of the knobs.
Question and Answer IconNeed help?

Do you have a question about the Simple Motors Kit 12 and is the answer not in the manual?

Summary

Initial Motor Assembly

Shaft and Rotor Piece Insertion

Insert motor shaft through two 2x2 rotor pieces and center it.

Plastic Sleeve Attachment

Attach plastic sleeves to shaft ends, leaving a small gap.

Magnet Preparation and Rotor Mounting

Prepare Plastic Sleeves

Remove burrs from plastic sleeves with a sharp knife if necessary.

Adhere Sticky Pads to Magnets

Attach double-sided sticky pads to magnets, ensuring the same pole faces outward.

Mount Magnets on Rotor

Center and attach four magnets to the rotor, ensuring no gap between halves.

Electromagnet and Battery Integration

Attach Rotor to Base Plate

Place rotor on base plate and ensure it spins freely, adjusting sleeves if needed.

Prepare Electromagnet Wire Ends

Remove insulation from electromagnet wire tips using sandpaper or a knife.

Mount Electromagnet and Battery Holder

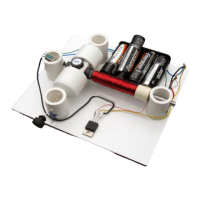
Mount the electromagnet and battery holder onto the base plate.

Wiring and Reed Switch Installation

Connect Electromagnet to Battery

Connect electromagnet wires to the battery, switching if necessary for correct repulsion.

Secure Wire Connections

Trim and twist positive battery wire with the corresponding electromagnet wire.

Install Reed Switch and Wiring

Fasten reed switch to brick, wind wires, and secure wiring to the rotor stand.

Final Testing and Operation

Rotor Spin and Click Test

Spin the rotor by hand to check for clearance and listen for the reed switch click.

Troubleshooting and Tips

Provide a push if the motor doesn't start; consider safety ring or component gluing.

Additional Resources

Visit website for motor principles, troubleshooting, and speed measurement.

Simple Motors Kit 12 Specifications

General IconGeneral
BrandSimple Motors
ModelKit 12
CategoryEngine
LanguageEnglish

Related product manuals