EasyManua.ls Logo

Singer 15-91 - For Sewing; To Turna Corner; To Remove the Work

Singer 15-91
23 pages
Print Icon
To Next Page IconTo Next Page
To Previous Page IconTo Previous Page
Loading...
17
TO
PREPARE
FOR
SEWING
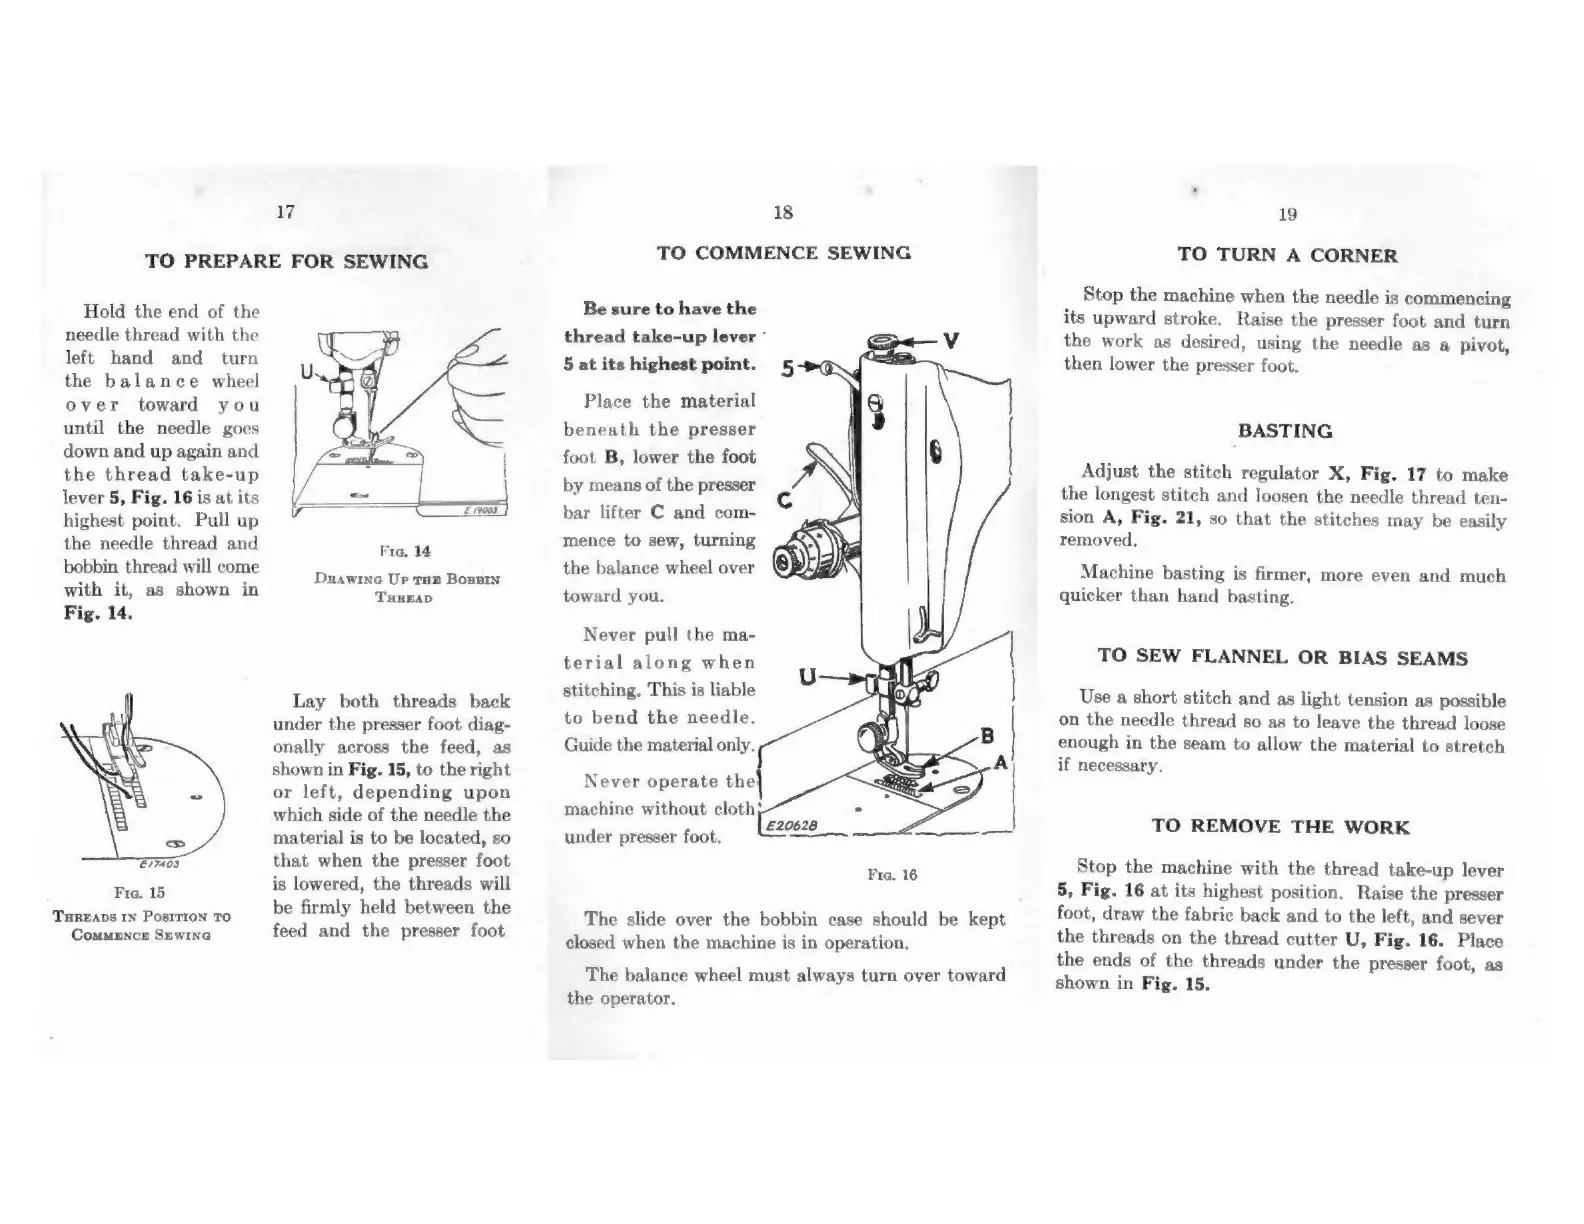
Hold
the
end
of
the
needle
thread
with
the
left
hand
and
turn
the
balance
wheel
over
toward
you
until
the
needle
goes
down
and
up
again
and
the
thread
take-up
lever
5,
Fig.
16
is
at
its
highest
point.
Pull
up
the
needle
thread
and
Fra,
14
bobbin
thread
will
come
é 5
Drawine
Up
Tae
Bonpin
with
it,
as
shown
in
Temas
Fig.
14.
Lay
both
threads
back
under
the
presser
foot
diag-
onally
across
the
feed,
as
shown
in
Fig.
15,
to
the
right
or
left,
depending
upon
which
side
of
the
needle
the
material
is
to
be
located,
so
that
when
the
presser
foot
is
lowered,
the
threads
will
be
firmly
held
between
the
feed
and
the
presser
foot
Fia.
15
THREADS
IN
PosITION
TO
Commence
Sewina
18
TO
COMMENCE
SEWING
Be
sure
to
have
the
thread
take-up
lever
*
5
at
its
highest
point.
Place
the
material
beneath
the
presser
foot
B,
lower
the
foot
by
means
of
the
presser
bar
lifter
C
and
com-
mence
to
sew,
turning
the
balance
wheel
over
toward
you.
Never
pull
the
ma-
terial
along
when
stitching.
This
is
liable
to
bend
the
needle.
Guide
the
material
only.
Never
operate
the
machine
without
cloth;
under
presser
foot.
Fre.
16
The
slide
over
the
bobbin
case
should
be
kept
closed
when
the
machine
is
in
operation,
The
balance
wheel
must
always
turn
over
toward
the
operator.
19
TO
TURN
A
CORNER
Stop
the
machine
when
the
needle
is
commencing
its
upward
stroke.
Raise
the
presser
foot
and
turn
the
work
as
desired,
using
the
needle
as
a
pivot,
then
lower
the
presser
foot.
BASTING
Adjust
the
stitch
regulator
X,
Fig.
17
to
make
the
longest
stitch
and
loosen
the
needle
thread
ten-
sion
A,
Fig.
21,
so
that
the
stitches
may
be
easily
removed,
Machine
basting
is
firmer,
more
even
and
much
quicker
than
hand
basting.
TO
SEW
FLANNEL
OR
BIAS
SEAMS
Use
a
short
stitch
and
as
light
tension
as
possible
on
the
needle
thread
so
as
to
leave
the
thread
loose
enough
in
the
seam
to
allow
the
material
to
stretch
if
necessary.
TO
REMOVE
THE
WORK
Stop
the
machine
with
the
thread
take-up
lever
5,
Fig.
16
at
its
highest
position,
Raise
the
presser
foot,
draw
the
fabric
back
and
to
the
left,
and
sever
the
threads
on
the
thread
cutter
U,
Fig.
16.
Place
the
ends
of
the
threads
under
the
presser
foot,
as
shown
in
Fig.
15.