EasyManua.ls Logo

Singer 15-91 - NEEDLES AND THREADS

Singer 15-91
23 pages
Print Icon
To Next Page IconTo Next Page
To Previous Page IconTo Previous Page
Loading...
23
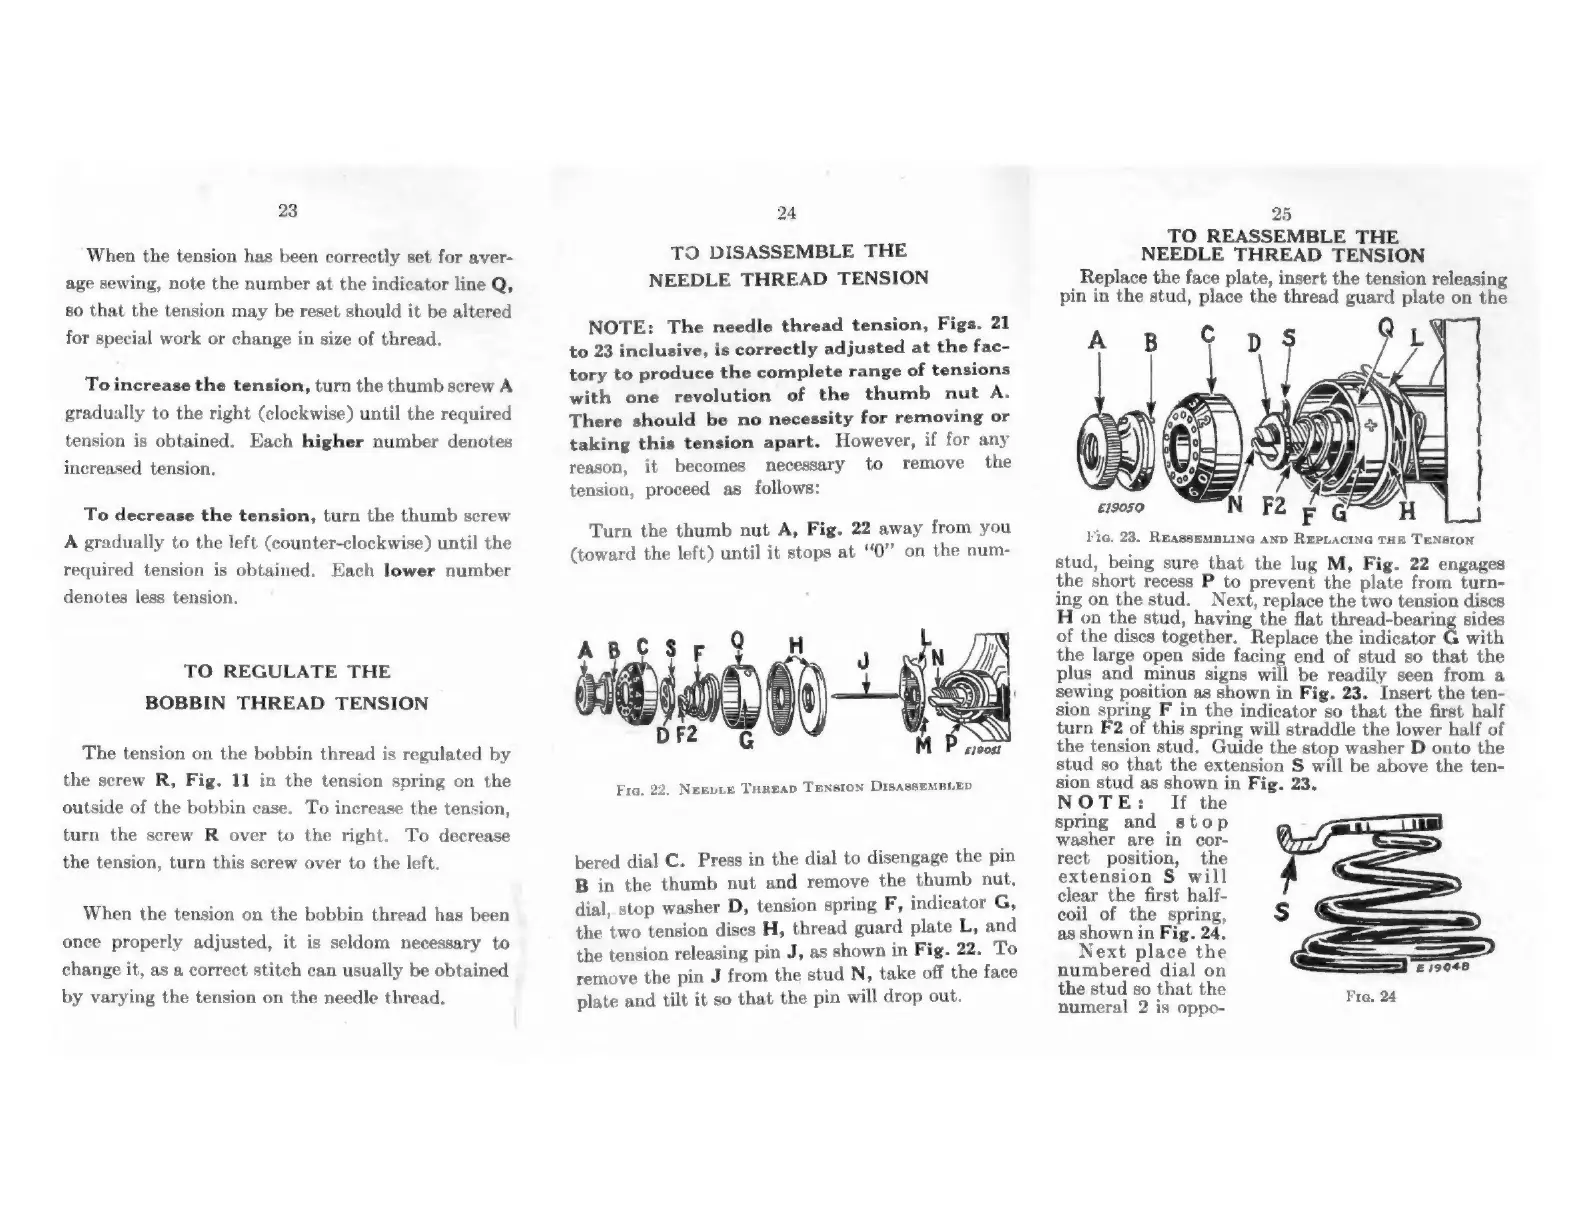
When
the
tension
has
been
correctly
set
for
aver-
age
sewing,
note
the
number
at
the
indicator
line
Q,
so
that
the
tension
may
be
reset
should
it
be
altered
for
special
work
or
change
in
size
of
thread.
Toincrease
the
tension,
turn
the
thumb
screw
A
gradually
to
the
right
(clockwise)
until
the
required
tension
is
obtained.
Each
higher
number
denotes
increased
tension.
To
decrease
the
tension,
turn
the
thumb
screw
A
gradually
to
the
left
(counter-clockwise)
until
the
required
tension
is
obtained.
Each
lower
number
denotes
less
tension.
TO
REGULATE
THE
BOBBIN
THREAD
TENSION
The
tension
on
the
bobbin
thread
is
regulated
by
the
screw
R,
Fig.
11
in
the
tension
spring
on
the
outside
of
the
bobbin
case.
To
increase
the
tension,
turn
the
screw
R
over
to
the
right.
To
decrease
the
tension,
turn
this
screw
over
to
the
left.
When
the
tension
on
the
bobbin
thread
has
been
once
properly
adjusted,
it
is
seldom
necessary
to
change
it,
as
a
correct
stitch
can
usually
be
obtained
by
varying
the
tension
on
the
needle
thread.
24
TO
DISASSEMBLE
THE
NEEDLE
THREAD
TENSION
NOTE:
The
needle
thread
tension,
Figs.
21
to
23
inclusive,
is
correctly
adjusted
at
the
fac-
tory
to
produce
the
complete
range
of
tensions
with
one
revolution
of
the
thumb
nut
A.
There
should
be
no
necessity
for
removing
or
taking
this
tension
apart.
However,
if
for
any
reason,
it
becomes
necessary
to
remove
the
tension,
proceed
as
follows:
Turn
the
thumb
nut
A,
Fig.
22
away
from
you
(toward
the
left)
until
it
stops
at
“0”
on
the
num-
Fre.
22.
Neepie
Tureap
Tension
DIsass—EMBLED
bered
dial
C.
Press
in
the
dial
to
disengage
the
pin
B
in
the
thumb
nut
and
remove
the
thumb
nut,
dial,
stop
washer
D,
tension
spring
F,
indicator
G,
the
two
tension
dises
H,
thread
guard
plate
L,
and
the
tension
releasing
pin
J,
as
shown
in
Fig.
22.
To
remove
the
pin
J
from
the
stud
N,
take
off
the
face
plate
and
tilt
it
so
that
the
pin
will
drop
out.
25
TO
REASSEMBLE
THE
NEEDLE
THREAD
TENSION
Replace
the
face
plate,
insert
the
tension
releasing
pin
in
the
stud,
place
the
thread
guard
plate
on
the
Vig.
23.
REassEMBLING
AND
REPLACING
THE
TENSION
stud,
being
sure
that
the
lug
M,
Fig.
22
engages
the
short
recess
P
to
prevent
the
plate
from
turn-
ing
on
the
stud.
Next,
replace
the
two
tension
discs
H
on
the
stud,
having
the
flat
thread-bearing
sides
of
the
dises
together.
Replace
the
indicator
G
with
the
large
open
side
facing
end
of
stud
so
that
the
plus
and
minus
signs
will
be
readily
seen
from
a
sewing
position
as
shown
in
Fig.
23.
Insert
the
ten-
sion
spring
F
in
the
indicator
so
that
the
first
half
turn
F2
of
this
spring
will
straddle
the
lower
half
of
the
tension
stud.
Guide
the
stop
washer
D
onto
the
stud
so
that
the
extension
S
will
be
above
the
ten-
sion
stud
as
shown
in
Fig.
23.
NOTE:
If
the
spring
and
stop
washer
are
in
cor-
rect
position,
the
extension
S
will
clear
the
first
half-
coil
of
the
spring,
$
*
as
shown
in
Fig.
24.
Next
place
the
numbered
dial
on
the
stud
so
that
the
numeral
2
is
oppo-
£19048
Fre.
24