EasyManua.ls Logo

Singer 15-91 - TO OPERATE THE MACHINE

Singer 15-91
23 pages
Print Icon
To Next Page IconTo Next Page
To Previous Page IconTo Previous Page
Loading...
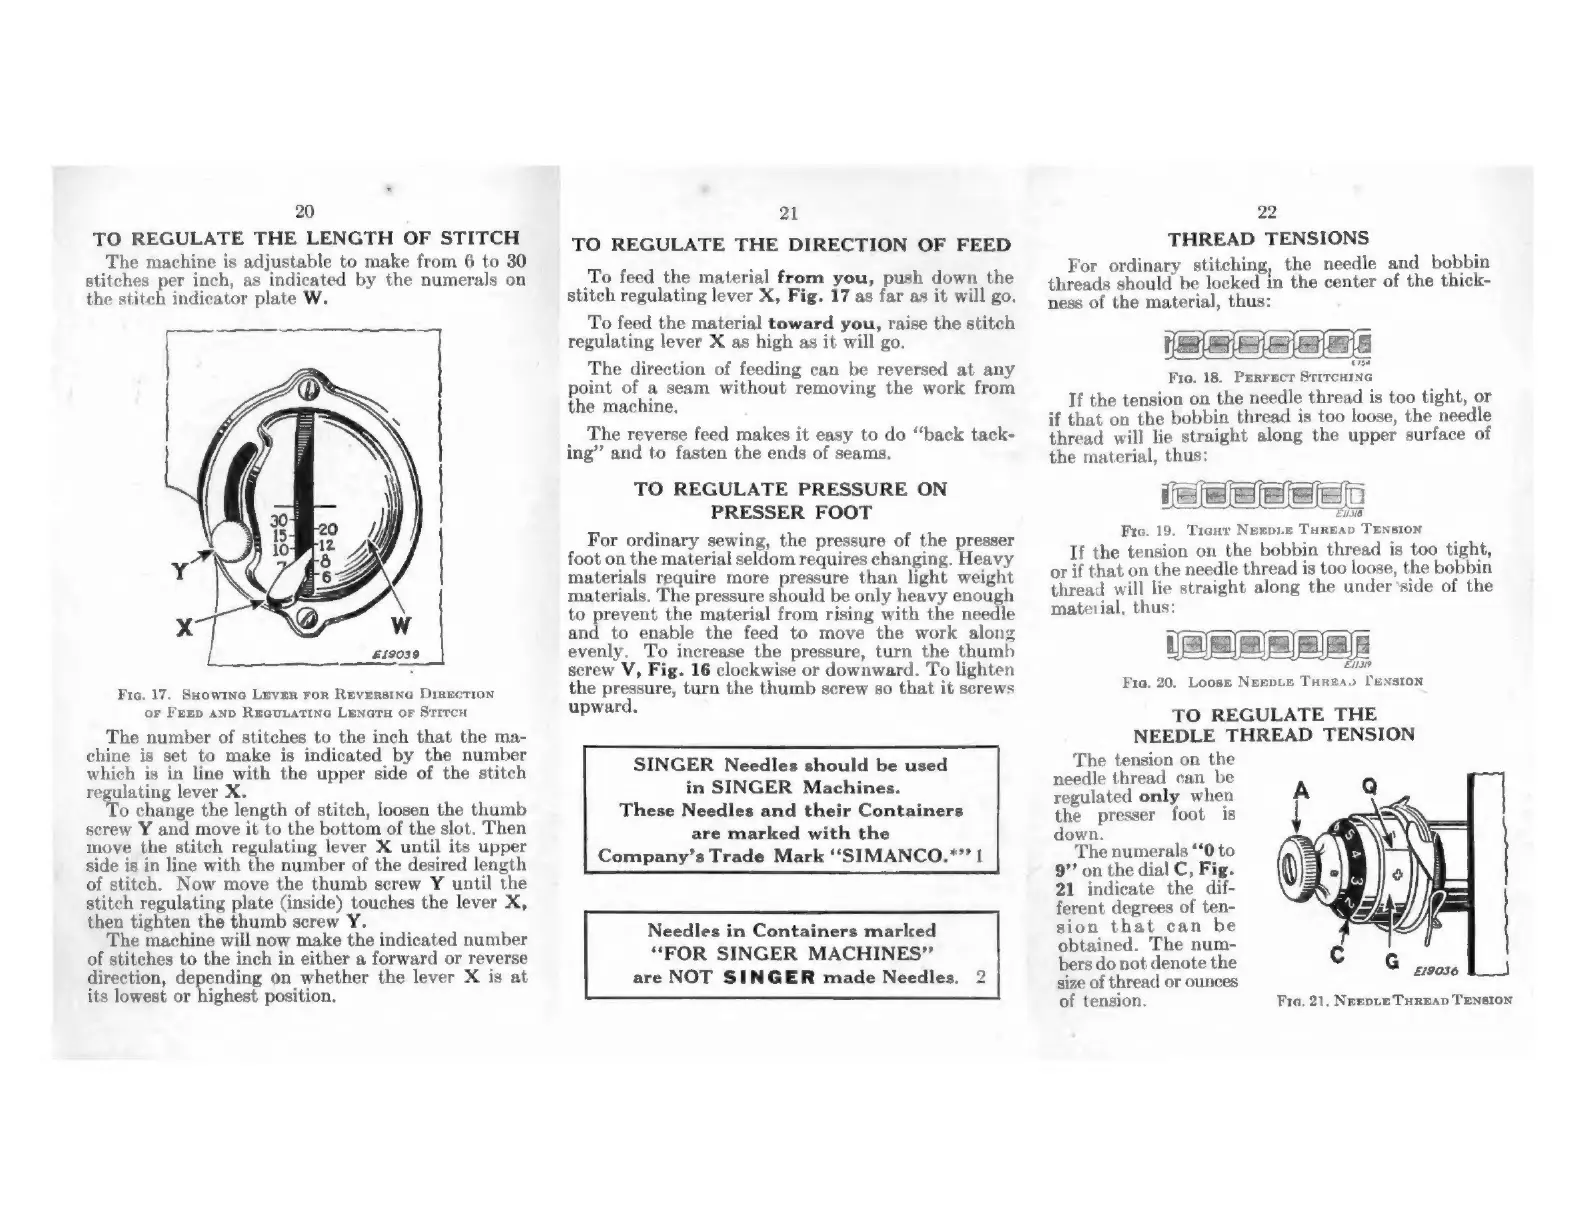
20
TO
REGULATE
THE
LENGTH
OF
STITCH
The
machine
is
adjustable
to
make
from
6
to
30
stitches
per
inch,
as
indicated
by
the
numerals
on
the
stitch
indicator
plate
W.
Ww
£19039
Fig.
17.
SHowrne
Lever
ror
Reverstne
Direction
or
Freep
anp
Reeuuatine
Leneru
or
Strrcw
The
number
of
stitches
to
the
inch
that
the
ma-
chine
is
set
to
make
is
indicated
by
the
number
which
is
in
line
with
the
upper
side
of
the
stitch
regulating
lever
X.
To
change
the
length
of
stitch,
loosen
the
thumb
screw
Y
and
move
it
to
the
bottom
of
the
slot.
Then
move
the
stitch
regulating
lever
X
until
its
upper
side
is
in
line
with
the
number
of
the
desired
length
of
stitch.
Now
move
the
thumb
screw
Y
until
the
stitch
regulating
plate
(inside)
touches
the
lever
X,
then
tighten
the
thumb
screw
Y.
The
machine
will
now
make
the
indicated
number
of
stitches
to
the
inch
in
either
a
forward
or
reverse
direction,
depending
on
whether
the
lever
X
is
at
its
lowest
or
highest
position.
21
TO
REGULATE
THE
DIRECTION
OF
FEED
To
feed
the
material
from
you,
push
down
the
stitch
regulating
lever
X,
Fig.
17
as
far
as
it
will
go.
To
feed
the
material
toward
you,
raise
the
stitch
regulating
lever
X
as
high
as
it
will
go.
The
direction
of
feeding
can
be
reversed
at
any
point
of
a
seam
without
removing
the
work
from
the
machine,
:
The
reverse
feed
makes
it
easy
to
do
‘“‘back
tack-
ing”
and
to
fasten
the
ends
of
seams.
TO
REGULATE
PRESSURE
ON
PRESSER
FOOT
For
ordinary
sewing,
the
pressure
of
the
presser
foot
on
the
material
seldom
requires
changing.
Heavy
materials
require
more
pressure
than
light
weight
materials,
The
pressure
should
be
only
heavy
enough
to
prevent
the
material
from
rising
with
the
needle
and
to
enable
the
feed
to
move
the
work
along
evenly.
To
increase
the
pressure,
turn
the
thumb
screw
V,
Fig.
16
clockwise
or
downward.
To
lighten
the
pressure,
turn
the
thumb
screw
so
that
it
screws
upward.
SINGER
Needles
should
be
used
in
SINGER
Machines.
These
Needles
and
their
Containers
are
marked
with
the
Company’s
Trade
Mark
‘“‘SIMANCO.*’’
|
Needles
in
Containers
marked
“FOR
SINGER
MACHINES”
are
NOT
SINGER
made
Needles.
2
22
THREAD
TENSIONS
For
ordinary
stitching,
the
needle
and
bobbin
threads
should
be
locked
in
the
center
of
the
thick-
ness
of
the
material,
thus:
758
Fie.
18.
Perrecr
StrrcHine
Tf
the
tension
on
the
needle
thread
is
too
tight,
or
if
that
on
the
bobbin
thread
is
too
loose,
the
needle
thread
will
lie
straight
along
the
upper
surface
of
the
material,
thus:
Fie.
19.
Tiagur
Nerpie
Tureap
Tension
If
the
tension
on
the
bobbin
thread
is
too
tight,
or
if
that
on
the
needle
thread
is
too
loose,
the
bobbin
thread
will
lie
straight
along
the
underside
of
the
material,
thus:
Ena
Fra.
20.
Loose
Negepie
Tareay
Pension
TO
REGULATE
THE
NEEDLE
THREAD
TENSION
The
tension
on
the
needle
thread
can
be
regulated
only
when
the
presser
foot
is
down.
The
numerals
‘‘0
to
9”’
on
the
dial
C,
Fig.
21
indicate
the
dif-
ferent
degrees
of
ten-
sion
that
can
be
obtained.
The
num-
bers
do
not
denote
the
size
of
thread
or
ounces
of
tension.
Fria,
21,
Neepie
THREAD
TENSION