EasyManua.ls Logo

Singer 281-30 - User Manual

Singer 281-30
26 pages
Print Icon
To Next Page IconTo Next Page
Loading...
SINGER
281-30

Other manuals for Singer 281-30

Question and Answer IconNeed help?

Do you have a question about the Singer 281-30 and is the answer not in the manual?

Summary

MACHINE OVERVIEW AND FEATURES

General Features

Common features of Class 281 sewing machines.

Class 281 Machine Varieties

Lists and describes specific models like 281-5 and 281-6.

MACHINE MODEL SPECIFICATIONS

Puller and Needle Feed Models

Details specific features of 281-20, 281-23, 281-22, and 281-24 models.

INSTALLATION

Machine Base and Oil Reservoir Setup

Instructions for positioning the machine on its base and oil reservoir.

Knee Lifter Mechanism Setup

Steps for assembling and adjusting the knee lifter.

LUBRICATION PROCEDURES

Oil Flow Regulator Adjustment

How to check and adjust the oil flow regulator for proper lubrication.

Sewing Hook Filter and Wick Maintenance

Instructions for inspecting and cleaning the sewing hook filter and wick.

CLEANING AND THREADING GUIDELINES

Machine Cleaning Procedures

Methods for cleaning the sewing hook and exterior.

Thread Selection and Twist

Guidance on choosing thread and determining thread twist.

NEEDLE INSTALLATION AND THREADING

Needle Selection by Model

Specifies needle types and sizes for different 281 models.

Setting the Needle Correctly

Step-by-step guide for inserting and positioning the needle.

Upper Threading Procedure

Instructions for threading the upper part of the sewing machine.

UPPER THREADING DETAILS

Needle Threading Process

Detailed diagrams and steps for threading the needle.

LOWER THREADING AND BOBBIN HANDLING

Bobbin Removal and Threading

Steps for removing, threading, and replacing the bobbin case.

ADJUSTING TENSION AND PRESSURE

Needle and Bobbin Thread Tension

How to properly adjust tension for needle and bobbin threads.

Presser Foot and Roller Presser Pressure

Adjusting pressure for presser foot and specific roller pressers.

STITCH LENGTH REGULATION

Stitch Length Adjustment for 281-5

Procedure for setting stitch length on model 281-5.

Stitch Length Adjustment for 281-6

Procedure for setting stitch length on model 281-6.

Stitch Length Adjustment for 281-20;281-23

Procedure for setting stitch length on models 281-20 and 281-23.

ADVANCED STITCH LENGTH AND TRIMMER OPERATION

Stitch Length Adjustment for 281-22;281-24

Procedure for setting stitch length on models 281-22 and 281-24.

Preventing Stitch Length Tampering

Methods to prevent unauthorized changes to stitch length settings.

Operating the Trimmer (Model 281-5)

Instructions for engaging and using the trimmer on model 281-5.

FACE PLATE AND NEEDLE POSITIONING (Model 281-5)

Face Plate Removal and Replacement

Steps for safely removing and reinstalling the face plate on model 281-5.

Positioning Needle in Throat Plate

Ensuring correct needle alignment within the throat plate cutting bar.

Setting the Trimming Margin

How to adjust the distance from the trim edge to the stitch line.

UPPER KNIFE SETTINGS AND SHARPENING (Model 281-5)

Setting Upper Knife to Cutting Bar

Aligning the upper knife in relation to the throat plate cutting bar.

Adjusting Upper Knife Height

Procedure for setting the correct height of the upper knife.

Sharpening the Upper Knife

Guidelines for maintaining the correct bevel on the upper knife.

NEEDLE BAR AND BUSHING SETTINGS

Needle Positioning vs. Throat Plate;Feed Dog

Ensuring correct needle alignment relative to throat plate and feed dog.

Setting Lower Needle Bar Bushing

Procedure for setting the lower needle bar bushing on specific models.

Setting Needle Bar Height (No Timing Mark)

Adjusting needle bar height without using timing marks.

NEEDLE BAR TIMING AND HEIGHT ADJUSTMENT

Setting Timing-Indicator Pin (281-22;281-24)

Adjusting the timing pin for specific needle feed models.

Setting Needle Bar Height with Timing Mark

Using timing marks to set needle bar height on various models.

MACHINE TIMING AND HOOK CLEARANCE

Timing the Sewing Hook

Procedure for synchronizing the sewing hook with machine movements.

Setting Needle-Hook Point Clearance

Adjusting the gap between the needle and hook point.

HOOK CLEARANCE AND POSITION FINGER SETTINGS

Adjusting Needle-Hook Point Clearance (Continued)

Fine-tuning the gap between needle and hook point.

Setting the Position Finger Clearance

Adjusting clearance between position finger and bobbin case holder.

NEEDLE GUARD ADJUSTMENT

Correct Needle Guard Relationship

Ensuring proper alignment of the needle guard to prevent hook contact.

Adjusting Needle Guard for Large Needles

Modifying the needle guard for use with larger needle sizes.

CHECK SPRING AND FEED DOG ADJUSTMENTS

Setting Check Spring Height

Adjusting the vertical position of the check spring.

Setting Check Spring Tension

Adjusting the tension of the check spring.

Centralizing Feed Dog Sidewise

Adjusting the feed dog's lateral position within the throat plate slots.

FEED DOG HEIGHT AND CENTRALIZATION

Centralizing Feed Dog Lengthwise

Adjusting the feed dog's front-to-rear position.

Setting Feed Dog Height (Wash and Wear)

Adjusting feed dog height for wash and wear fabrics (1/32 inch).

Setting Feed Dog Height (Other Fabrics)

Adjusting feed dog height for other fabrics (3/64 inch).

FEED DOG AND PRESSER BAR ADJUSTMENTS

Feed Dog Height Adjustment Notes

Considerations for balancing feed dog height with presser foot pressure.

Available Feed Eccentric Stop Screws

List of stop screws for limiting stitch length.

Setting Presser Bar Height

Adjusting clearance for the presser bar assembly.

TENSION RELEASER AND FEED WHEEL SERVICE

Adjusting Needle Thread Tension Releaser

Procedure for adjusting the needle thread tension releaser.

Changing the Feed Wheel (Machine 281-23)

Steps to replace the feed wheel on model 281-23.

Changing Upper Feed Roller (Machine 281-30)

Steps to replace the upper feed roller on model 281-30.

FEED ROLLER AND FEED SYNCHRONIZATION

Setting Upper Feed Roller Height (Machine 281-20)

Adjusting the height of the upper feed roller on model 281-20.

Timing the Top Feed Eccentric

Synchronizing top-feed movement with bottom-feed motion.

LOWER ROLLER AND FEED ROLLER BRAKE SERVICE

Changing the Lower Roller (Machine 281-30)

Steps for replacing the lower feed roller on model 281-30.

Adjusting Upper Feed Roller Brake

Procedure for adjusting the brake on the upper feed roller.

Overview

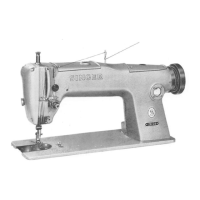
The Singer 281-30 series of machines are high-speed, single-needle, lockstitch sewing machines designed for a wide range of materials, from lightweight to heavy-weight fabrics. This series includes various models such as puller-feed, needle-feed, and top-gripper machines, as well as models capable of simultaneous trimming and stitching. All machines in this series are designed to produce outstanding straight-line stitching on a variety of wash-and-wear, synthetic, and natural fabrics.

General Features:

  • Stitch Type: Federal stitch type 301.
  • Hook System: Balanced, air-cooled, rotating hook with a horizontal axis. A lint wiper is integrated to prevent lint and abrasive matter from accumulating on the hook.
  • Feed Mechanism: Drop feed with a pendant link feed and a feed leveling hinge pin, which maintains a longer feeding cycle.
  • Shaft Bearings: Three plain superfinished bearings support the arm shaft.
  • Lubrication: Fully automatic lubricating system with an oil flow window for easy monitoring by the operator.
  • Knee Lifter: Integral with the machine base and oil reservoir.
  • Lighting: Independent light fixture mount.
  • Thread Handling: Improved needle thread guard and other thread handling parts.
  • Tension System: Disc tension.
  • Pulley: Machine pulley 147139 for a 3/8 inch V-belt.
  • Workspace: 11 inches of space to the right of the needle.

Machine Varieties and Technical Specifications:

Machine 281-5, Vertical Trimmer:

  • Fabric Suitability: Medium to heavy-weight fabrics.
  • Needle Bar Stroke: 1-13/64 inches.
  • Presser Bar Lift: 5/16 inch.
  • Knife Bar Stroke: 5/16 inch.
  • Maximum Stitch Length: 5-1/2 stitches per inch with regular fittings.
  • Needle: Catalog 1515 (16x95).
  • Bed-raising Plate: Sets flush with the top of the throat plate.
  • Trimming Margin: Regularly fitted to trim 1/8 inch from the line of stitching. An extra cutting bar and presser foot are supplied for 3/16 inch. When specified, machines can be fitted for 1/16, 3/32, 5/32, 3/16, or 1/4 inch trim margins. For 1/4 inch trim, two sets of this size are supplied.
  • Speed: 5000 stitches per minute.

Machine 281-6, Top Gripper:

  • Fabric Suitability: Lightweight to medium-weight fabrics, ideal for collar and cuff operations.
  • Feed Mechanism: Top-driven gripper feed, intermittently driven by linkage actuated through a countershaft. The countershaft is driven by an eccentric on the arm shaft, which is adjustable for optimum top and bottom feed synchronization. The top feed grips the fabric simultaneously with the bottom feed and travels with it during the feeding motion, then returns to its raised position for the next grip-feeding movement.
  • Needle Bar Stroke: 1-3/16 inches.
  • Presser Bar Lift: 3/16 inch.
  • Maximum Stitch Length: 5-1/2 stitches per inch with regular fittings.
  • Needle: Catalog 1955.
  • Speed: 5000 stitches per minute.

Machine 281-20, Close-coupled Puller Feed:

  • Fabric Suitability: Lightweight to medium-weight fabrics.
  • Needle Bar Stroke: 1-13/64 inches.
  • Presser Bar Lift: 5/16 inch.
  • Maximum Stitch Length: 5-1/2 stitches per inch with regular fittings.
  • Needle: Catalog 1955.
  • Puller Feed: Close-coupled puller feed, 1-9/16 inches behind the needle. The feed roll is intermittently actuated by an eccentric on the arm shaft through a countershaft and linkage to a combination one-way clutch and double bearing unit in the feed roller. The eccentric is independently adjustable to synchronize the feed roller's motion with the feed dog. The lower roller is an idler follower with a self-lubricated core.
  • Speed: 5000 stitches per inch.

Machine 281-22, Needle Feed:

  • Fabric Suitability: Lightweight to medium-heavy weight fabrics.
  • Needle Bar Stroke: 1-13/64 inches.
  • Presser Bar Lift: 5/16 inch.
  • Maximum Stitch Length: 10 stitches per inch with regular fittings.
  • Needle: Catalog 1955.
  • Feed Mechanism: Compound feed mechanism, combining needle feed and drop feed, ensuring positive feeding of two or more plies of material.
  • Stitch Regulation: Improved stitch regulating mechanism, where the needle feed regulator can be locked to permit simultaneous adjustment of needle feed and drop feed.
  • Speed: 5000 stitches per minute.

Machine 281-23, Side-wheel Puller Feed:

  • Fabric Suitability: Light to medium weight fabrics.
  • Needle Bar Stroke: 1-13/64 inches.
  • Presser Bar Lift: 5/16 inch.
  • Maximum Stitch Length: 5-1/2 stitches per inch with regular fittings.
  • Needle: Catalog 1955.
  • Puller Feed: Side-wheel feed roll, independently adjustable to synchronize its motion with the feed dog.
  • Speed: 5000 stitches per minute.

Machine 281-24, Needle Feed:

  • Fabric Suitability: Light to medium weight fabrics.
  • Needle Bar Stroke: 1-9/64 inches.
  • Presser Bar Lift: 9/32 inch.
  • Maximum Stitch Length: 10 stitches per inch with regular fittings.
  • Needle: Catalog 1361 (88x9).
  • Feed Mechanism: Compound feed mechanism, combining needle feed and drop feed, ensuring positive feeding of two or more plies of material.
  • Stitch Regulation: Improved stitch regulating mechanism, where the needle feed regulator can be locked to permit simultaneous adjustment of needle feed and drop feed.
  • Speed: 5500 stitches per minute.

Usage Features:

  • Installation: The machine base and oil reservoir fit into a standard table cut-out without bolting. Shims may be used to ensure the base is level for accurate oil level indication. The machine head rests on a cork gasket and is not fastened, allowing it to be tilted back on its hinge pins.
  • Knee Lifter: Shipped assembled to the base, except for the knee plate and lifter lever. The rock shaft needs to be slid forward, and the lifter lever attached. The stop screw is adjusted to allow minimal play before lifting the presser bar, and the rear stop dog is set to allow maximum presser bar lift.
  • Needle Selection: The size of the needle depends on the weight of the thread and type of material. Left twist thread is recommended for the needle, while either left or right twist thread can be used in the bobbin.
  • Threading: Clear instructions are provided for upper threading and bobbin threading, including how to remove and replace the bobbin case.
  • Tension Adjustment: Needle thread tension and bobbin thread tension are adjustable to ensure correct stitch setting. The presser foot pressure is also adjustable to ensure proper material feeding.
  • Stitch Length Regulation: Stitch length can be adjusted, but never while the machine is running. Specific procedures are outlined for each machine model, often involving depressing a button and turning the machine pulley.
  • Trimmer Operation (Machine 281-5): The vertical trimmer is engaged by pushing down on a lever and raised by pushing in a button on the face.

Maintenance Features:

  • Lubrication: Before operation, the oil reservoir must be filled to the HIGH MARK with SINGER OIL "TYPE A" or "TYPE C" (for minimum fabric staining). Additives are not recommended. The oil flow regulator controls lubrication to the sewing hook, and its setting can be adjusted if oil flow is erratic. Regular checks of oil flow are crucial to prevent damage.
  • Cleaning: Lint and waste should be regularly removed from around the sewing hook, feed rows, and throat plate using a short bristle brush. The machine can be tilted back to access the oil pump body, where accumulated foreign particles can be removed with a magnet wrapped in a clean rag.
  • Needle Setting: Needles must be inserted as far as possible into the needle bar with the long groove to the left and the eye in line with the arm of the machine.
  • Needle Positioning (Machines 281-22 and 281-24): The needle should not contact the throat plate or feed dog. Its front-to-rear position can be adjusted by loosening a pinch screw in the needle bar frame.
  • Needle Bar Height Setting: The lower needle bar bushing height is critical. For compound feed machines, it's integral. For others, a specific gauge distance from the throat plate seat to the bottom of the lower needle bar bushing is required. The needle bar height itself is set by loosening the clamping screw and adjusting the needle bar until the needle stop aligns with the specified gauge distance.
  • Timing the Machine: This involves adjusting the radial position of the sewing hook relative to the needle bar and thread take-up lever. The hook point should be at the center of the needle when the needle bar is at its lowest point and rising to the lower timing mark. Clearance between the needle and hook point should be about 0.005 inch.
  • Position Finger Setting: Clearance between the position finger and bobbin case holder should be 0.018 to 0.022 inch to allow thread to pass easily.
  • Needle Guard Stringing: The needle guard on the bobbin case holder prevents the needle from contacting the hook or bobbin case. If large needles cause deflection, a small amount of metal may need to be removed from the needle guard using emery cloth.
  • Check Spring Height and Tension: The check spring's height and tension are adjustable to ensure proper thread take-up during the sewing cycle.
  • Feed Dog Centralization: The feed dog should move midway between the sides of the throat plate slots and maintain equidistant movement from front and rear edges. Sidewise adjustment is made by loosening clamp screws on the feed bar carrier and crank.
  • Feed Dog Height Setting: The height of the feed dog teeth above the throat plate is adjustable (1/32 inch for wash-and-wear, 3/64 inch for other materials) by turning the hinge pin eccentric.
  • Feed Eccentric Stop Screws: Different stop screws are available to limit the maximum stitch length, preventing the machine from exceeding the capacity of its fittings.
  • Presser Bar Height Setting: A slight clearance between the guide and lifting bracket is needed when the presser foot rests on the throat plate. The presser bar's position is adjusted to center the needle in the needle slot.
  • Needle Thread Tension Releaser Adjustment: Ensures tension is fully released when the presser foot is raised.
  • Changing Feed Wheel (Machine 281-23): Involves removing cover screws, spur gears, and withdrawing the feed wheel. The new feed wheel is placed, and spur gears are reinstalled with screws bearing on the shaft's flats.
  • Changing Upper Feed Roller (Machine 281-30): Requires removing the face plate, retaining rings, and connecting stud to replace the feed roller. The lettering on the feed roller clutch must be on the operator's left side for proper feeding direction.
  • Upper Feed Roller Brake Adjustment (Machine 281-30): The upper feed roller bracket has a one-way indexing clutch. If the roller oscillates, the pressure applied to the brake needs to be checked and adjusted by tightening a screw.
  • Trimming Margin Setting (Machine 281-5): The trimming margin is determined by the throat plate cutting bar. To change it, the slide screw is loosened, the throat plate slide moved, and the cutting bar and presser foot are changed as required.
  • Upper Knife Setting (Machine 281-5): The upper knife's position relative to the throat plate cutting bar is adjusted to ensure it is as close as possible to the cutting bar without striking it. Its height is also adjusted to bring the highest point of the cutting edge approximately 1/64 inch below the top surface of the throat plate cutting bar.
  • Sharpening Upper Knife (Machine 281-5): When sharpening, a 10° bevel must be maintained to ensure correct engagement of upper and lower knives.

Singer 281-30 Specifications

General IconGeneral
BrandSinger
Model281-30
CategorySewing Machine
LanguageEnglish

Related product manuals