OPERATING INSTRUCTIONS….cont
Note: Before starting the boosting procedure is advisable to perform a fast
charge with the maximum current for 10 - 15 minutes prior to attempting the
boost start.
TECHNICAL SPECIFICATIONS
Note: Always make sure the mains supply is of the correct voltage and the correct fuse, type
and rating, is used.
Note: Due to the input current required to run the starter / charger, it is advisable not to use
an extension lead.
Note: If an extension lead is necessary in order to reach the mains supply; The cross section
should be checked so that it is of sufficient size so as to reduce
the chances of voltage drops; Always fully unwind the lead during use.
ELECTRICAL CONNECTION...cont
Connect the POSITIVE (Red) clip from the battery charger to the POSITIVE (POS, P, +, Red)
ungrounded post of the battery.
Connect the NEGATIVE (Black) clip to the vehicle chassis or engine block away from the battery.
Do not connect the clip to the carburetor, fuel lines or sheet-metal body parts. Connect to a
heavy gauge metal part of the frame or engine block.
The starter / charger should then be connected to the mains supply and switched ON with the
main on/off switch.
Positive Earth Grounded Vehicles
Connect the NEGATIVE (Black) clip from the battery charger to the NEGATIVE (NEG, N, -, Black)
ungrounded post of the battery. Connect the positive (+) (red) lead to the correct voltage
terminal on the starter / charger depending on the voltage of the battery to be charged (12V or
24V).
Connect the POSITIVE (Red) clip to the vehicle chassis or engine block away from the battery.
Do not connect the clip to the carburetor, fuel lines or sheet metal body parts. Connect to a
heavy gauge metal part of the frame or engine block. Switch ON the starter charger using the
mains on/off switch
Select the Boost Start Function using the selector key 3. The corresponding Boost LED 4 will light.
Press the Start/Stop key 11, the display 5 will show the letters "RDY" and Boost LED will flash.
After you have selected this process, the starter charger won't give energy to the car until the until it detects load
on the battery.
Go into the car, turn the ignition key and try to turn over the engine.
The starter charger will give energy to the car for 4 seconds without over-loading the voltage security value. The
display will view the battery voltage.
If the boost did not start the engine, you may try again after 15 seconds.
Wait until the letters "RDY" are shown again on the display
If necessary, perform a fast charge for 10/15 minutes.
In the event that the battery is damaged (short circuit or broken elements) the boosting will not be performed by
the starter charger, so your car will not be damaged by an incorrect boost.
Once the vehicle is started, the battery charger will automatically stop giving current.
Hold Start/Stop key to stop the process.
Turn the charger off using the mains switch 2.
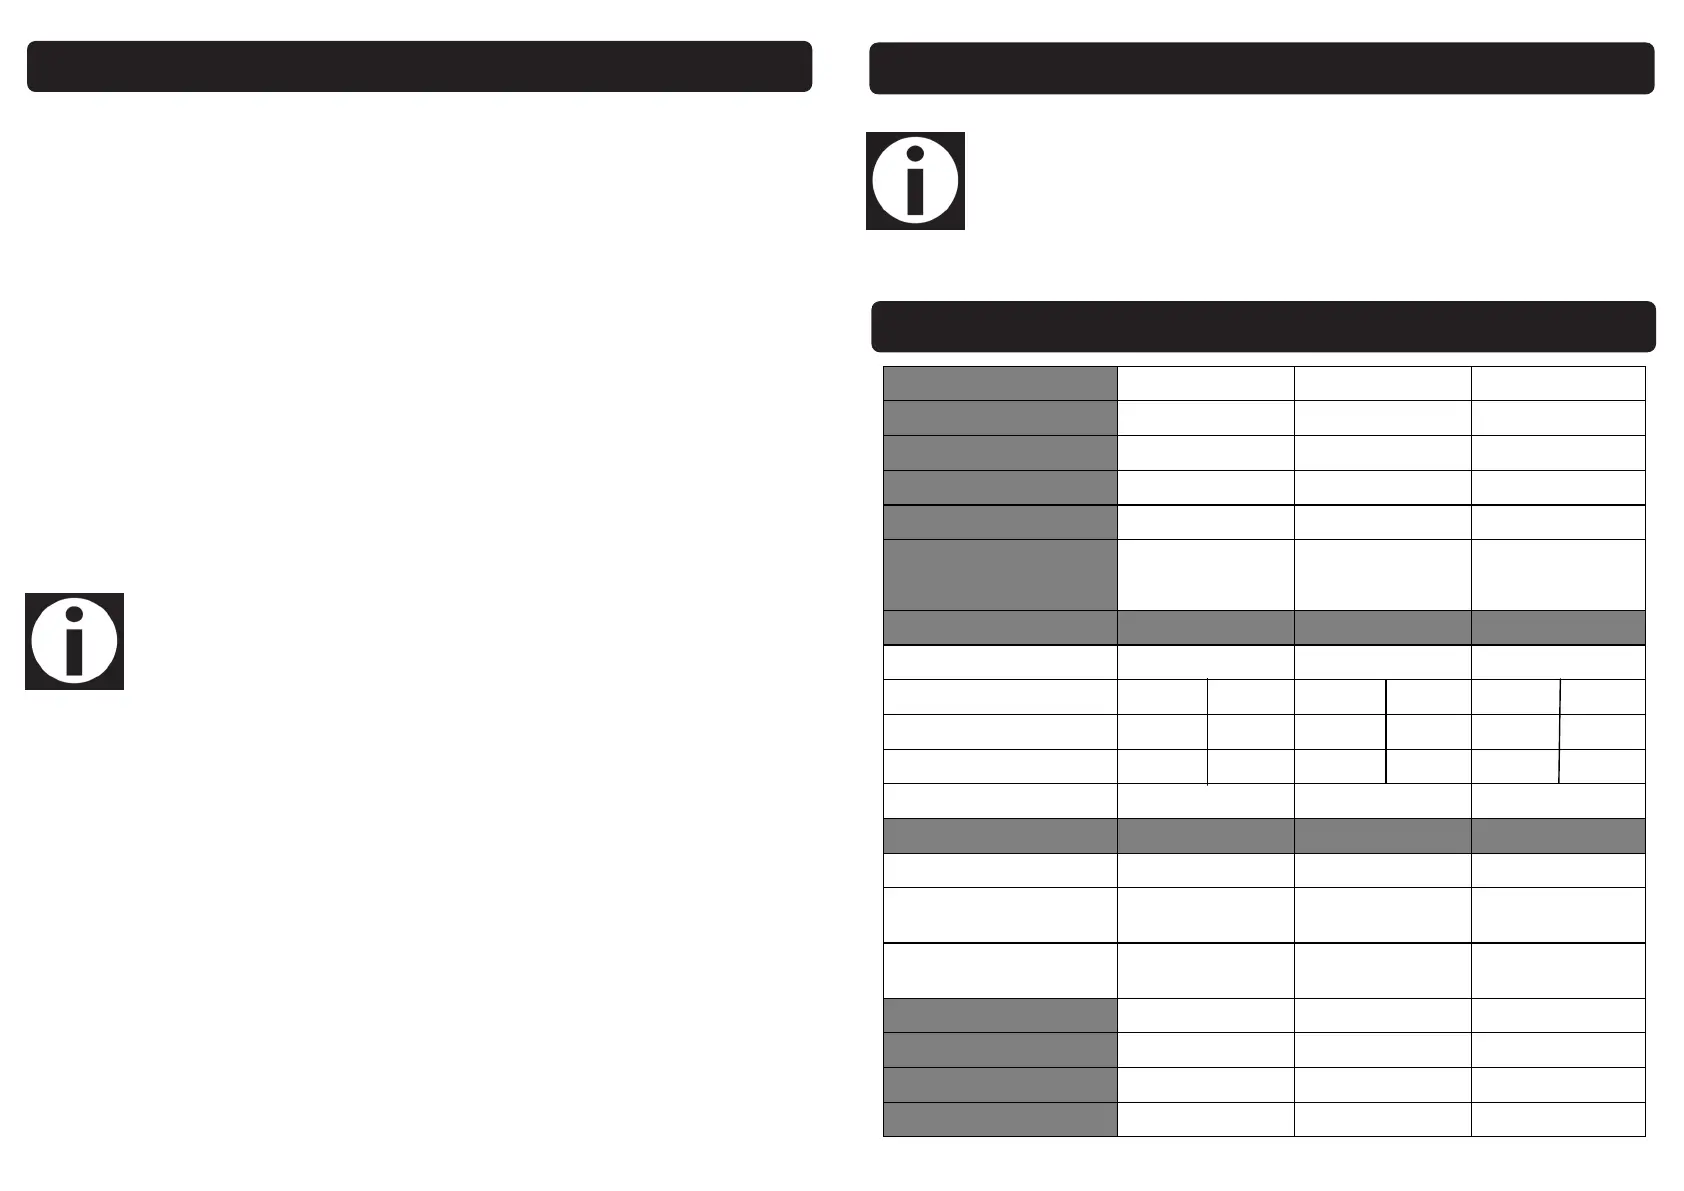
Item No. 05545 05546
05548
Model PWT5500 PWT6500 PWT9500
Supply 230V 50Hz 230V 50Hz 230V 50Hz
Baery Voltage 12 & 24v 12 & 24v 12 & 24v
Internal Fuse 120A 200A 300A
Funcons
4 Charging & Boost
4 Ch
arging & Boost
4 Char
ging,
Boost & Support
CHARGING:
Charging Input - connuous 1000was 1320was 2200was
Battery Voltage 12v 24v 12v 24v 12v 24v
Max Charging Current 45A 22.5A 55A 27.5A 100A 50A
Ave Charing Current 30A 15A 36A 18A 70A 35A
Max Battery Capacity
Battery Capacity
450Ah 540Ah 1000Ah
BOOSTING:
Boosng Input - 3secs 5kW 6kW 10kW
Max Boost Current -
Fully Discharged Baery
300A
380A 580A
Max Boost Current -
Medium Charged Baery
200A 260A 400A
Protecon IP20 IP20 IP20
Product Dimensions 260 x 415 x 650mm 260 x 415 x 650mm 320 x 485 x 745mm
Boxed Dimensions 280 x 355 x 595mm 280 x 355 x 595mm 330 x 395 x 790mm
Weight - GW/NW 18.5 / 17.6kg 21.8 / 20.9kg 35 / 33.5kg
 Loading...