6
ENGLISH
WARNING:
Fire or Explosion Hazard.
Can cause property damage, severe injury or death.
Follow these instructions completely.
1. Turn off gas supply at the appliance service valve before installation, and perform a Gas
Leak Test after the installation is completed.
2. Always install the sediment trap in the gas supply line to prevent contamination of the gas
control.
3. Do not force the control knob. Use only your hand to turn the knob. If the knob does not
move by hand, the valve should be replaced by a trained service technician.
CAUTION
Electrical shock or equipment damage hazard.
Can shock individuals or short equipment circuitry.
Make sure to disconnect all electrical supplies before beginning the installation process.
CAUTION
Never apply a jumper wire between valve coil terminals, as this will damage the millivolt
operator.
IMPORTANT
- These gas controls ship with anti-contamination seals over inlets and outlets.
- Do not remove the seals until ready for connection to piping.
- Appliance manufacturer’s instructions supercede any instructions listed in this instruction book.
INSTALL PIPING TO THE GAS VALVE
All piping must comply with local codes and ordinances or with the National Fuel Gas code (ANSI
Z223.1 NFPA No. 54) whichever applies. Tubing installation must comply with approved standards and
practices. Use appropriately sized fittings when connecting aluminum tubing to the pilot outlet.
1. Use new, clean and correctly reamed pipe free from
burrs, chips, debris and any foreign matter. When
tubing is used, make sure the ends are square and
clean. All tubing bends must be smooth and without
deformation.
2. Run pipe or tubing to the valve. If tubing is used,
obtain a tube-to-pipe coupling to connect the tubing
to the valve.
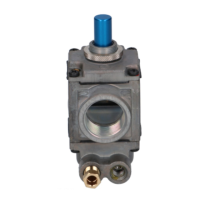
3. Install sediment trap (Drip Leg) in the supply line to
the gas valve
3” MIN.
GAS SUPPLY
TO CONTROL
INLET
DRIP LEG (DOWN)