STEP 3 - DRILLING HOLES IN THE KILN FLOOR
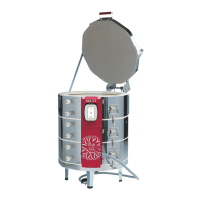
Locate and mark the center of the kiln fl oor.
Use Diagram #1 as a guide to drill the appropriate hole(s) in the kiln
Important: The holes in the fl oor must fi t within a 1 1/2”
diameter circle at the center of the fl oor.
Use an electric drill with the correct size bit. Drill slowly, keeping
the drill straight. Precision and care are important to avoid drilling
an oversize hole or chipping of the fl oor underside.
STEP 4 - DRILLING HOLES IN THE KILN LID
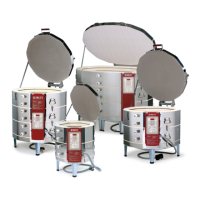
Measure the thickness of the kiln sidewall fi re brick and add 1” to
this measurement. This will be the distance from the outside edge
of the kiln that your holes will be drilled.
Space the holes evenly around the kiln lid but no closer to the edge
than the distance above. Because the holes introduce room tem-
perature air into your kiln, they must not be clustered together or
directly above the thermocouple.. Refer to diagram #2 for proper
hole location and spacing.
Drill the holes in the lid using the same method as used for the
Vacuum out any brick dust from inside your kiln caused during the drilling.
Placement of holes in kiln floor
Placement of holes in kiln lid