13
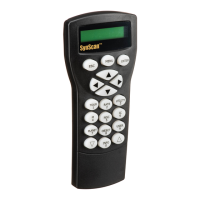
4. Now the screen will display “Point scope to RR ZZ.Z’ TT.T’ ”, which means point the telescope
to RR region, the exact azimuth is ZZ.Z degree and the exact altitude is TT.T degree. Users
can use the direction keys on the SynScan hand controller to move the mount and point
the telescope to the 1
st
alignment star selected in the previous step. Center the 1
st
align-
ment star in the FOV of the nder scope or the red dot nder, and then press ENTER key
to proceed to the next step.
PART III : ALIGNMENT
5. Now the screen will display “Ctr. Star NNNN”, where the NNNN is the name of the selected
1
st
alignment star. The star should have been in the FOV of the telescope. User can use
the direction keys to center it in the eyepiece and then press the ENTER key to proceed to
the next step.
Aligning the 2
nd
Star:
Cancellation During Aligning Process:
1. If the 1
st
alignment star is not a planet, the LCD screen will display “Choose 2
nd
Star”; other-
wise, it will display “Choose 1
st
Star”.
2. Use the scrolling keys to browse through a list of star names and press ENTER key to pick
the one on the screen as the 2
nd
alignment star. The mount will then automatically slew and
point the telescope towards the 2
nd
alignment star in the sky.
3. After the mount stops, the hand control will give a long beep and will display “Use dir. keys
to center object”. Now the telescope should point rather closely to the 2
nd
alignment star
(generally, in the FOV of the nder scope).
4. Now users can use the direction keys to move the telescope to align with the 2
nd
alignment
star. That is, center the 2
nd
alignment star in the FOV of the nder scope, and then center
it in the FOV of the telescope’s eyepiece. Press ENTER key to conrm the centering of the
star and proceed to the next step. Generally, users can use Rate 5 or 6 to center the star
in nder scope and use Rate 2 or 3 to center the star in the telescope’s eyepiece.
5. If the 1
st
alignment star is not a planet, the SynScan hand controller will now display “Align-
ment Successful”. Press ENTER to complete the alignment process.
6. If the 1
st
alignment star is a planet, the SynScan hand controller will display “Choose 2
nd
Star”. Repeat from Step 2 to complete the alignment process.
1. While the mount is slewing in alignment process, users may press the ESC key to stop the
mount. The hand controller screen will display “Mount stopped. Press any key…”
2. Press any key and the SynScan hand controller will ask the user to select another align-
ment star.
3. Press the ESC key again; the LCD screen will display “Exit Alignment? 1) YES 2) NO”. Press
key 1 to exit the alignment process; press key 2 to go back to choose an alignment star.
If the telescope has clutches on its axes, user can loosen the clutches to move the mount
manually to point the telescope to the target.