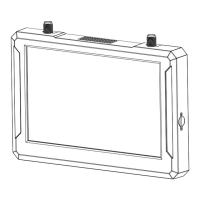
The SKYZONE M5F is a 5-inch FPV monitor designed for drone enthusiasts, integrating a high-brightness LCD with a SteadyView Fusion Receiver. This monitor aims to provide a stable and clear video feed by merging two signals, effectively reducing image tearing and rolling. Its user-friendly interface, featuring a classic Skyzone UI and a control wheel, simplifies navigation and operation. The device is versatile in its power options, supporting a single 18650 battery for easy replacement and also compatible with 2-6S LiPo batteries, making it convenient for field use.
Technical Specifications:
- Screen: 5-inch 900 Lum High brightness LCD
- Resolution: 800x480
- Receiver: 5.8GHz 48 CH SteadyView Fusion Receiver
- Language: Chinese/English
- Power: DC 6.5-25.2V / USB 5V / 18650 Lion battery
- Power Consumption: 12V/520mA (6.24W)
- DVR: MJPEG 60FPS, supports SD cards up to 128GB
- Endurance: 1.5 hours (with a 16850, 3000mAh battery)
- Sensitivity: -98dBm ± 1dBm
- Antenna Port: 2 x SMA-K, 50ohm
Band/Channel Table:
The monitor supports a wide range of 5.8GHz frequencies across multiple bands (A, B, E, F, R, L), totaling 48 channels. For example:
- Band A: 5865M, 5845M, 5825M, 5805M, 5785M, 5765M, 5745M, 5725M
- Band B: 5733M, 5752M, 5771M, 5790M, 5809M, 5828M, 5847M, 5866M
- Band E: 5705M, 5685M, 5665M, 5645M, 5885M, 5905M, 5925M, 5945M
- Band F: 5740M, 5760M, 5780M, 5800M, 5820M, 5840M, 5860M, 5880M
- Band R: 5658M, 5695M, 5732M, 5769M, 5806M, 5843M, 5880M, 5917M
- Band L: 5362M, 5399M, 5436M, 5473M, 5510M, 5547M, 5584M, 5621M
Usage Features:
Quick Start Guide:
- Install antennas and an 18650 battery.
- Short press the power button, then hold for 3 seconds to power on.
- To power off, short press the power button, then hold for 3 seconds.
Band/Channel/Receiver Mode Setting:
- Channel/Band Selection: Press the wheel to enter channel setting mode. Roll the wheel to change the channel. Press the wheel again to switch to Band setting mode, then roll to change the Band.
- Receiver Mode Selection: After selecting the Band, press the wheel again to choose between Diversity or Mix mode. The RF setting mode will exit automatically after 3 seconds of no wheel operation.
- Auto Search: Hold the wheel to open the search menu. Press the wheel to start auto-search. After scanning all frequencies, the receiver will lock onto the strongest signal. Roll the wheel to manually select channels. Hold the right wheel to exit searching. Note: Auto-search may not always be accurate, and manual selection might be necessary.
Receiver Modes:
- MIX1: Provides basic fusion processing to reduce excessive circuit intervention on the picture.
- MIX2: Improves synchronization stability, especially with weak signals, maximizing synchronization and video lock.
- MIX3: Enhances the synchronization signal based on MIX2, maximizing video image stability and compatibility with other display devices. In this mode, video signal brightness is reduced.
- DIV (Diversity): Fusion processing is turned off. The receiver operates in traditional diversity mode, selecting audio and video signals from the channel with the highest RSSI intensity.
Brightness Adjustment:
- Roll the wheel to adjust the screen brightness.
- Press the Menu button to open the menu. Roll the wheel to navigate, and press to select.
Mode Options:
- RF Normal: Standard 48-channel receive mode.
- RF Racing: Receiver operates only on RaceBand.
- AVIN: Enables AV input. Supports NTSC and PAL system formats with automatic switching. The receiver module automatically turns off to save power.
- Playback: Allows reviewing DVR files.
Playback Controls:
- In playback mode, roll the wheel to select a DVR file. Short press the wheel to play/pause.
- When playing, roll the right wheel for fast forward or fast backward.
- Press the REC button to exit DVR playback.
Setting Options:
- Image Settings: Choose from standard, bright, vivid, soft, or 3 customized profiles. Adjust brightness, contrast, saturation, hue, and sharpness. Customized profiles (User 1/2/3) allow changes, while pre-set files do not.
DVR (Digital Video Recorder):
- Recording: Press the REC button to start/stop recording.
- Storage: Built-in MJPEG encoding. Requires a Class10 SD card (up to 128GB), formatted to FAT32. Format SD card via the system menu.
- Recording Modes: Video recording works in both RF Mode and AV IN Mode.
- Audio Recording: By default, audio recording is enabled. It can be turned off in the system menu to record only video.
- Automatic Recording: When enabled, recording starts automatically upon video signal detection.
- <Auto&Follow>: DVR starts recording when a video signal is present and stops 30 seconds after the signal is lost. If the signal returns, recording restarts.
- : Manual recording start (press REC button). DVR stops 30 seconds after signal loss but restarts automatically if the signal returns. Press REC again to manually stop and save space.
- Cyclic Recording: Option to overwrite older recordings when storage space is full.
- Video File Length: Files are automatically divided into multiple segments. Length can be set to 5, 10, 20, or 30 minutes (default is 30 minutes per file).
- Power Loss Protection: Sudden power disconnection during recording may damage the DVR file.
Display Settings:
- OSD Time: Set top bar OSD display time, disable OSD timeout, or keep OSD always on.
- RSSI Position: Adjust the vertical position of the RSSI indicator.
- Screen Luminance: 8 stages (default is 5). Avoid setting too high unless the image is dim.
- Aspect Ratio: Change between 4:3 or 16:9.
- Power Supply: Select battery type (2S-6S) for accurate battery capacity display.
- Voltage Calibration: Adjust voltage within ±0.9V range. Use a multimeter to measure loaded battery voltage and adjust via the shuttle wheel.
- RSSI Calibration: Remove antennas, turn off VTX, then select "yes" to calibrate RSSI. The monitor will beep upon completion.
- System Language: English or Chinese.
- Time and Date: Adjust monitor's time and date. Press REC button to exit setting.
- Fan Speed: Adjust fan speed (16 stages).
- Factory Reset: Reset all settings to factory defaults.
- Firmware Updates:
- VRX Update: Update VRX firmware by copying it to the SD card.
- DVR Update: Update DVR firmware by copying it to the SD card.
- System Version: Displays monitor firmware, DVR firmware, and serial number.
Maintenance Features:
Firmware Update:
The manufacturer states that the content of this manual is subject to change, and users should download the latest version from www.skyzonefpv.com.