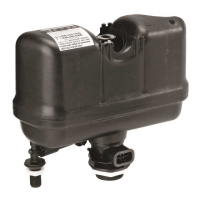
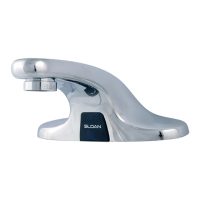
The document describes the Sloan FLUSHMATE® III Flushometer-Tank System, specifically the 503 Series, an Ultra-Low Fixture (ULF) category product designed for water-saving toilets.
Function Description:
The FLUSHMATE® III is a flushometer-tank system that provides a turbo-charged flushing action for effective bowl cleaning while consuming less than 1.6 gallons (6 liters) of water per flush. Unlike traditional gravity-fed toilets, this system uses compressed air inside the tank to create a powerful flush. This design ensures positive bowl extraction, eliminating the need for double flushing. The stronger flushing action improves drainline carry and leaves the bowl cleaner. It also features a large water spot, which helps reduce the frequency of cleaning, and a non-sweating tank enclosure. The system prevents water leakage between flushes, contributing to its water-saving capabilities.
Important Technical Specifications:
- Model Series: 503 Series
- Water Consumption: Less than 1.6 gallons per flush (6 Lpf)
- Recommended Static Pressure Range: 20 P.S.I. to 125 P.S.I.
- Components:
- Lower Supply Group w/Hose (BL100504-3): Includes Supply Shank with Screen, Pressure Regulator w/Back Check, and Relief Valve.
- Upper Supply Group w/Hose (BU100505): Includes Air Inducer and Vacuum Breaker.
- Flush Valve Cartridge Assembly (C-100500): Features an Actuator w/setscrew.
- Vessel: The core component where water and compressed air are stored.
- Discharge Extension w/Drain
- Name Plate w/Serial Number
- Patents: Manufactured under one or more U.S. patents including 3,817,279; 3,817,286; 3,817,489; 3,820,171,754; and 4,233,698, with other foreign patents pending.
- Manufacturing Location: Made with pride in the U.S.A.
Usage Features:
- Installation: The FLUSHMATE® III installs similarly to other water closets. Users should follow the fixture manufacturer's instructions for assembling the tank to the bowl. Before connecting the supply line, it's crucial to flush the supply line clean by running water into a bucket until it flows clear. After connection, check for leaks and adjust the actuator as needed for either pushbutton or trip lever units, ensuring proper clearance (approximately 1/8" gap between the rod and actuator).
- Troubleshooting - Water Runs On/Will Not Shut Off:
- Verify the supply stop is fully open.
- Check the Supply Shank Screen for obstructions.
- Adjust the Actuator to ensure it does not interfere with the flush. For pushbutton units, loosen the setscrew and rotate the actuator for 1/8" clearance. For trip lever units, gently lift the actuator rod to observe 1/8" gap.
- Inspect the Flush Valve Cartridge Assembly: Turn off water, flush, remove the cartridge using pliers, and check "O" Rings and seating area for wear. Reinstall by inserting, turning counter-clockwise until an audible click, then clockwise until two black threads show, and continue turning until water stops. Do not overtighten.
- If the tank continues to run, push lightly on the Flush Valve Actuator. If it stops, tighten the cartridge. If it still runs, loosen the cartridge. Adjust in quarter to half-turn increments.
- Troubleshooting - Weak or Sluggish Flush:
- Check water pressure (20-125 psi recommended).
- Remove tank cover, trip actuator, and observe water flow for debris.
- Check Air Inducer for sufficient air draw: Place 2-3 drops of water in the orifice of the Air Inducer cap and flush. If water is drawn in, it's functioning. If not, it needs cleaning.
- To clean Air Inducer: Turn off water, trip actuator, unscrew cap, clean thoroughly, reassemble (hand-tighten), turn on water, wait for refill, and retest. Replace Upper Supply Assembly if still not functioning.
- Check Flush Valve Cartridge for leaks: Turn off water, drain vessel, pour water onto Cartridge Housing area. If bubbles appear from the center, replace the cartridge.
- Check Lower Supply: Turn off water, relieve pressure, remove supply line, check supply shank screen for obstructions, clean with a small brush if necessary. Reattach supply line. If issues persist, replace the entire Lower Supply group.
- Check water line pressure, bowl trapway obstruction, drain obstruction, and proper drain ventilation. Consult a professional if these conditions exist. If drain and vent are clear, replace the Lower Supply Assembly.
- Troubleshooting - No Flush:
- Check water pressure (20-125 psi).
- Check Air Inducer for sufficient air draw (refer to "Weak or Sluggish Flush" section).
- Review Flush Valve Cartridge and Lower Supply checks (refer to "Weak or Sluggish Flush" section).
- Replace the Flush Valve Cartridge. NEVER use lubricant on the "O" Ring.
- Troubleshooting - Relief Valve Discharging: This indicates a malfunction in the Lower Supply Group (component #1), requiring replacement.
Maintenance Features:
- General Safety: Always turn off the water supply and trip the actuator to relieve pressure in the vessel before servicing any component.
- Cleaning: NEVER use lubricants on any components unless specified. NEVER use corrosive chemicals or household cleaners on FLUSHMATE® products or in the china tank, as this voids the warranty.
- Replacement Procedure for Lower Supply:
- Turn off water, flush fixture, disconnect water supply from shank.
- Remove china tank from bowl by removing nuts/washers.
- Unscrew plastic locknut holding shank to tank bottom, remove tank-to-bowl gasket.
- Unscrew plastic nut holding vessel to tank bottom, carefully remove vessel from tank.
- Remove Lower Supply Assembly by pulling downward. DO NOT WIGGLE SIDE TO SIDE to avoid breaking the post.
- Cut the hose just above the barbed fitting (approx. 1/4" above clamp) on the Lower Supply. Discard old unit.
- Insert new Lower Supply into hose and secure with new Hose Clamp.
- Push new Lower Supply onto the post using an upward motion.
- Reassemble vessel to china tank, tighten, reconnect water supply, and check for leaks.
- Winterizing (for summer homes/cottages/cabins):
- Tank Procedure: Turn off water supply, remove tank cover. Push actuator to flush and discharge water. Disconnect supply line coupling nut from Lower Supply under tank housing. Collect any dripping water. Remove Supply Shank and drain water from tank bottom into a bucket. Push down on actuator, then pull up momentarily to allow air into the vessel.
- Bowl Procedure: After flushing the vessel, remove remaining water from the bowl or add 1 pint to 1 quart of antifreeze or RV antifreeze to the water remaining in the bowl. Refer to fixture manufacturer's instructions for bowl winterization.
- Warranty: Sloan FLUSHMATE® warrants the flushometer tank operating system to be free of defects in material and workmanship for five (5) years from the date of installation. This warranty covers replacement of defective parts, but not labor or transportation costs.
- Conditions: Warranty requires a completed registration card mailed within 30 days of installation. Proper installation, operation, and maintenance as outlined in instructions are required. Warranty is void if water supply pressures exceed 125 psi or are less than 20 psi.
- Limitations: Service and repairs must be performed by authorized representatives or with specific company approval. Unauthorized repairs, alterations, or use of chemical disinfectants/corrosive household cleaners on FLUSHMATE® products or in the china tank will void the warranty. Proof of purchase is required.
- Exclusions: The company is not liable for incidental or consequential damages, damages from improper installation, neglect, abuse, or alteration. Implied warranties are limited to five years.
- Contact: For warranty service or technical assistance, call 1-800-533-3450 (or 248-446-5300 outside North America) or write to Sloan Valve Company.