5 Mounting
SMA Solar Technology AG
Installation ManualSBxx-1SP-US-41-IA-xx-1028
9. Secure the Conection Unit horizontally using screws
and washers.
10. Check whether the Connection Unit is firmly positioned.
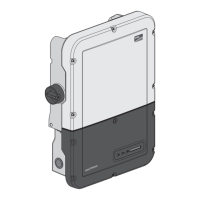
11. Plug the Power Unit into the Connection Unit. Make
sure that the screw holes on the left and right sides
of the PowerUnit are directly over those of the
ConnectionUnit; and the cables protruding from the
PowerUnit must not be pinched.
12. Tighten two screws on the right and left side of the
PowerUnit (TX25) (torque: 6Nm ± 0.3 Nm (53in-
lb ± 2.65in-lb)).
13. Pull the ribbon cable used to connect the
communication assembly to the PowerUnit into the
ConnectionUnit, and plug it into the jack on the
communication assembly.
COM
SPS
AC-out
D-IN
SPS
A B
M1
X1 X2
M2
ANT.
FCC ID: SVF-KP20
IC: 9440A-KP20
ENGLISH
 Loading...