Do you have a question about the Smeg SI2M7643DW and is the answer not in the manual?
This document outlines the safety information, installation instructions, product description, daily use, care and cleaning, troubleshooting, and energy efficiency of the Smeg SI2M7643DW induction hob.
Before installing and using the appliance, it is crucial to read the provided instructions carefully. The manufacturer is not responsible for any injuries or damages resulting from incorrect installation or usage. Always keep the instructions in a safe and accessible location for future reference.
This appliance can be used by children aged 8 years and above, and persons with reduced physical, sensory, or mental capabilities, or lack of experience and knowledge, if they have been given supervision or instruction concerning safe use and understand the hazards involved. Children between 3 and 8 years of age, and persons with very extensive and complex disabilities, should be kept away unless continuously supervised. Children under 3 years of age should also be kept away unless continuously supervised. Do not allow children to play with the appliance. All packaging should be kept away from children and disposed of appropriately. Keep children and pets away from the appliance during operation and cooling, as accessible parts can become hot. If the appliance has a child safety device, it should be activated. Cleaning and user maintenance should not be performed by children without supervision.
The appliance and its accessible parts become hot during use, so care must be taken to avoid touching heating elements. Do not operate the appliance with an external timer or separate remote-control system. Unattended cooking on a hob with fat or oil can be dangerous and may result in fire. Never try to extinguish a fire with water; instead, switch off the appliance and cover the flame with a lid or a fire blanket. The cooking process must be supervised, and short-term cooking processes must be continuously supervised. Do not store items on the cooking surfaces due to fire danger. Metallic objects like knives, forks, spoons, and lids should not be placed on the hob surface as they can become hot. Do not use a steam cleaner to clean the appliance. After use, switch off the hob element using its control and do not rely on the pan detector. If the glass ceramic surface is cracked, switch off the appliance and unplug it from the mains. If connected directly via a junction box, remove the fuse to disconnect power. In either case, contact an Authorized Service Centre. If the supply cord is damaged, it must be replaced by the manufacturer, an authorized service, or similarly qualified persons to avoid a hazard. Only use hob guards designed by the manufacturer or indicated in the instructions for use as suitable, or hob guards incorporated in the appliance. Inappropriate guards can cause accidents.
Only a qualified person should install this appliance to avoid injury or damage. Remove all packaging and follow the installation instructions. Maintain minimum distance from other appliances and units. Handle the appliance carefully as it is heavy, using safety gloves and enclosed footwear. Seal cut surfaces to prevent moisture and swelling. Protect the bottom of the appliance from steam and moisture. Do not install the appliance next to a door or under a window to prevent hot cookware from falling. Each appliance has cooling fans on the bottom. If installed above a drawer, do not store small pieces or paper that could be pulled in and damage the cooling system. Maintain a minimum distance of 2 cm between the bottom of the appliance and drawer contents.
All electrical connections must be made by a qualified electrician. The appliance must be earthed. Before any operation, ensure the appliance is disconnected from the power supply. Verify that the rating plate parameters are compatible with the mains power supply. Ensure correct installation; loose or incorrect wiring can cause terminals to overheat. Use the correct mains cable and prevent it from tangling. Ensure shock protection is installed and use the strain relief clamp on the cable. Prevent the mains cable or plug from touching hot appliance parts or cookware. Do not use multi-plug adapters or extension cables. If the mains plug or cable is damaged, contact an Authorized Service Centre. Shock protection for live and insulated parts must be secured without tools. Connect the mains plug only after installation, ensuring it remains accessible. If the mains socket is loose, do not connect the plug. Always pull the mains plug, not the cable, to disconnect. Use correct isolation devices: line protecting cut-outs, fuses, earth leakage trips, and contactors. The electrical installation must have an isolation device allowing disconnection from the mains at all poles, with a contact opening width of at least 3 mm.
Remove all packaging, labeling, and protective film before first use. This appliance is for household use only; do not modify its specifications. Ensure ventilation openings are not blocked. Do not leave the appliance unattended during operation. Set the cooking zone to "off" after each use and do not rely on the pan detector. Avoid placing cutlery or saucepan lids on hot cooking zones. Do not operate with wet hands or when in contact with water. Do not use the appliance as a work or storage surface. If the surface is cracked, immediately disconnect from the power supply to prevent electrical shock. Pacemaker users should maintain a minimum distance of 30 cm from induction cooking zones during operation. Hot oil may splash when food is added. Fats and oils can release flammable vapors when heated; keep flames or heated objects away from them. Vapors from very hot oil can cause spontaneous combustion. Used oil with food remnants can cause fire at lower temperatures. Do not place flammable products or wet items near or on the appliance. Avoid keeping hot cookware on the control panel or hot pan covers on the glass surface. Do not let cookware boil dry. Be careful not to drop objects or cookware on the appliance, as this can damage the surface. Do not activate cooking zones with empty or no cookware. Do not place aluminum foil on the appliance. Cookware made of cast iron, aluminum, or with a damaged bottom can scratch the glass/glass ceramic; always lift these objects when moving them. This appliance is for cooking purposes only, not for room heating.
Clean the appliance regularly to prevent surface material deterioration. Deactivate and allow it to cool before cleaning. Disconnect from the electrical supply before maintenance. Do not use water spray or steam. Clean with a moist soft cloth and neutral detergents. Avoid abrasive products, abrasive cleaning pads, solvents, or metal objects. Scratches or dark stains on the surface do not affect hob operation. Use a special cleaner and scraper for the glass. Immediately remove melted plastic, plastic foil, sugar, and sugary foods to prevent damage, being careful to avoid burns. Remove limescale rings, water rings, fat stains, and shiny metallic discoloration when the hob is sufficiently cool, using a moist cloth and non-abrasive detergent, then wipe dry. For shiny metallic discoloration, use a solution of water with vinegar.
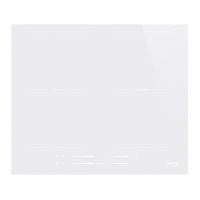
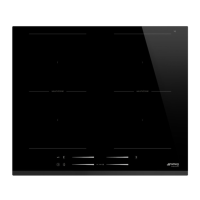
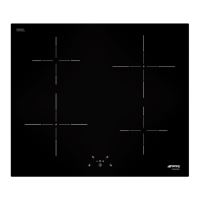
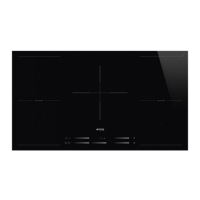
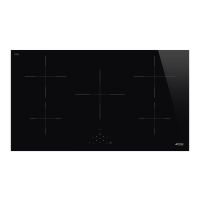
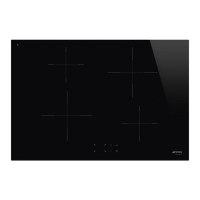
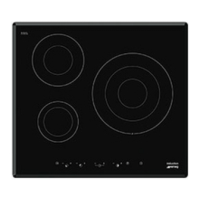
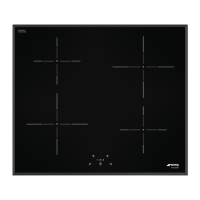
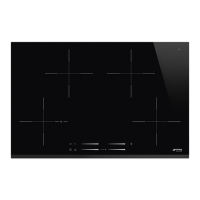
The cooking surface features induction cooking zones and a control panel. The control panel includes sensor fields for ON/OFF, Lock/Child Safety Device, Pause, MultiZone, heat setting display, timer indicators, timer display, TIMER selection, +/- for time adjustment, and a control bar for heat setting. Heat setting displays indicate deactivated zones, operating zones, pause, accelerator, power function, malfunctions, Eco-Heat (3-step residual heat indicator), lock/child safety device, incorrect/too small cookware, and automatic switch-off.
Activating and Deactivating: Touch the ON/OFF sensor field for 1 second to activate or deactivate the hob. Automatic Switch Off: The hob deactivates automatically if all cooking zones are deactivated, no heat setting is set after activation, something is spilled or placed on the control panel for more than 10 seconds (an acoustic signal sounds, and the hob deactivates; remove the object or clean the panel), the hob gets too hot (e.g., a saucepan boils dry; allow to cool before reuse), incorrect cookware is used (symbol F appears, zone deactivates after 2 minutes), or a cooking zone is not deactivated or heat setting changed (symbol appears, hob deactivates). The Heat Setting: To set or change the heat setting, touch the control bar at the desired setting or slide your finger along it. Using the Cooking Zones: Place cookware in the center of the selected zone. Induction zones automatically adapt to cookware dimensions. Large cookware can be used on two cooking zones simultaneously. Cookware must cover the centers of both zones for optimal performance. MultiZone: This function connects two cooking zones to operate as one when the pot covers their centers. Set the heat setting for one zone, then touch the MultiZone sensor field to activate. To deactivate, touch the MultiZone sensor field again. Accelerator: Activates the zone at the highest setting initially, then continues at the desired heating setting for faster cooking. The cooking zone must be cold to activate. Power Function: Provides more power to induction cooking zones for a limited time, then automatically reverts to the highest heat setting. Refer to "Technical data" for details.
Cookware: Induction zones use a strong electromagnetic field for rapid heating. Use suitable cookware. Cookware is suitable if water boils quickly on the highest setting, and a magnet sticks to its bottom. The bottom should be thick and flat. Ensure pan bases are clean and dry. Cookware Material: Correct materials include cast iron, steel, enamelled steel, stainless steel, and multi-layer bottom with a correct manufacturer marking. Incorrect materials include aluminum, copper, brass, glass, ceramic, and porcelain. Cookware Dimensions: Induction zones adapt to cookware bottom dimensions. Efficiency relates to diameter; smaller diameters receive less power.
Recycle materials with the symbol. Put packaging in relevant containers. Help protect the environment and human health by recycling waste electrical and electronic appliances. Do not dispose of appliances marked with the symbol with household waste. Return the product to your local recycling facility or contact your municipal office.
| Type | Induction |
|---|---|
| Number of Cooking Zones | 4 |
| Control Type | Touch Control |
| Power Levels | 9 |
| Boost Function | Yes |
| Timer | Yes |
| Color | White |
| Total Power | 7.4 kW |
| Installation Type | Built-In |
| Safety Features | Child Lock, Overheat Protection |