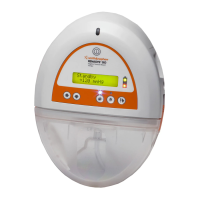
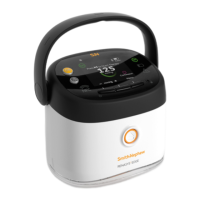
The RENASYS® EDGE System is a Negative Pressure Wound Therapy (NPWT) system designed for wound care. It is a compact, portable device with a user-friendly interface, featuring a therapy screen, various control buttons, and a disposable canister.
Function Description
The primary function of the RENASYS® EDGE System is to apply negative pressure to wounds, which helps promote healing by removing exudate, reducing edema, increasing blood flow, and promoting granulation tissue formation. The system offers both continuous and intermittent therapy modes, allowing healthcare professionals to tailor treatment to specific wound needs.
Important Technical Specifications
The device features a therapy screen that displays key information such as the set target pressure (in mmHg), therapy status (e.g., "Press to Start Therapy," "Progressing to target pressure," "Target pressure achieved"), and battery life. The pressure levels can be adjusted using dedicated plus (+) and minus (-) buttons, with examples showing selectable pressures like 80, 100, 125, and 150 mmHg.
The system includes several LEDs for status indication: an "OK Green LED" illuminates when the pump is working correctly, and "Alarm and battery warning LEDs" indicate issues or low battery. The device is powered by an internal battery, with icons indicating full charge, low battery, critical low battery, and charging status. Battery life is displayed on the screen, for example, "22hr" or "59m."
The disposable canister is an integral part of the system, collecting wound exudate. The device includes a "Canister release button" for easy replacement.
Usage Features
Power On and Start Therapy:
- Switch On the pump: The power button is located on the front of the device.
- Select the prescribed negative pressure level: Use the "+" or "-" buttons to adjust the mmHg setting.
- Press the button to start/pause the therapy: The play/pause button initiates or pauses the treatment.
- When the pump is working correctly: The "OK light" will illuminate, indicating active therapy. The screen will show "Progressing to target pressure" and then "Target pressure achieved."
Installing a New Canister:
- Ensure therapy is paused or the pump is Off.
- Remove the paper tape around the canister tubing and release tubing to full length.
- Position the canister so that the tubing is facing the rear of the pump, then align the pump over the canister.
- Push down on the pump until a "click" is heard from the release button, securing the canister.
- Remove the caps from both quick-click connectors and push them together until they click. Ensure the connection is facing the rear of the pump, then align the pump over the canister.
- Start therapy by pressing the play/pause button.
Dressing Kit Application (RENASYS-F Foam and -G Gauze with Soft Port):
Clean and Debride:
- Debride any devitalized or necrotic eschar tissue.
- Cleanse the wound and pat dry.
- Protect periwound skin from moisture and adhesive using a skin sealant, allowing it to dry fully.
- Apply a non-adherent wound contact layer if desired, trimming a single layer across the wound bed.
Dressing Wound with Foam:
- Cut foam dressing to fit the wound size and shape, placing it into the wound without overpacking. Foam should completely fill the wound cavity; stacking may be necessary for deep wounds.
- Precaution: Count and record the number of foam pieces to ensure all are removed during dressing changes, minimizing retention risk.
- Cut foam loosely; do not force or tightly pack.
- Do not place foam into blind or unexplored tunnels.
- For tunnels of known depth, cut foam longer than the tunnel to ensure direct contact.
- Do not cut foam directly over the wound cavity to avoid fragments.
- Rub edges of foam away from the open wound to remove loose fragments after cutting.
Dressing Wound with Gauze:
- Apply a layer of saline-moistened gauze to the wound bed. Unfold remaining gauze and loosely fill the wound cavity without overpacking.
- Precaution: Count and record the number of gauze pieces.
- Gauze may be used as a filler in weight-bearing locations or for moderate to heavy drainage, but foam is generally recommended for better fluid and vacuum transfer.
Applying RENASYS Soft Port:
- While holding the transparent film, expose one side of the adhesive backing by removing a single panel and applying it over the wound.
- Cover wound filler with transparent film, removing remaining adhesive panels to seal, then the top stabilization panel.
- Note: Avoid stretching or pulling the transparent film to minimize tension or trauma to periwound skin.
- Overlap film edges by a minimum of 7.5cm/3in when using multiple pieces.
- Cut a circular opening (no less than 2cm/3in in diameter) in the center of the film, over the wound filler. Remove loose film.
- Remove the adhesive backing panel from the RENASYS Soft Port dressing and align directly over the hole in the transparent film. Use gentle pressure to anchor the Soft Port.
- Smooth the dressing down while removing the RENASYS Soft Port stabilization frame.
- Secure the RENASYS Soft Port to the patient according to institutional protocol. Ensure the aeration disc (near the orange quick-click connector) is not covered or occluded.
- Connect the RENASYS Soft Port to the canister tubing by pushing the orange quick-click connectors together until an audible click indicates a secure connection.
- Activate the RENASYS pump at the prescribed therapy level. The finished dressing should be fully compressed, firm to the touch, and leak-free.
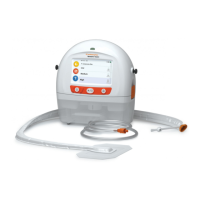
User Interface and Controls:
- Carry handle: For easy portability.
- Play/pause button: To start or stop therapy.
- Mute alarm button: To silence alarms temporarily.
- NFC sensor: Linked to online resources for quick access to information.
- Recessed lock/unlock button: To prevent accidental changes to settings.
- Multifunctional buttons: For menu navigation and other controls.
Maintenance Features
The device provides various alerts and alarms to inform the user about its status and potential issues, facilitating timely maintenance and troubleshooting:
Alerts:
- Resume therapy / Therapy paused too long: Indicates therapy has been paused for an extended period.
- Low Battery / Recharge device: Prompts the user to recharge the device.
- Moderate air leak / Therapy may be restricted: Suggests a minor air leak that might affect therapy effectiveness.
Alarms:
- Blockage / Therapy may be restricted: Indicates an obstruction in the tubing or dressing.
- Canister full / Therapy may be restricted: Signals that the disposable canister needs to be replaced.
- Critical Low Battery / Recharge the device: A more urgent battery warning.
- Pump too hot / Therapy stopped: Indicates the device is overheating and has stopped therapy.
- Canister not detected / Therapy may be restricted: The canister is not properly installed or detected.
- Critical air leak / Therapy may be restricted: A significant air leak affecting therapy.
- Battery failure / Device running on external power: Indicates an issue with the internal battery, requiring external power.
- System failure / Therapy stopped: A critical system malfunction.
Icons and Symbol Glossary:
The device uses a comprehensive set of icons for easy understanding of its status and functions:
- Pump buttons: Play/Pause, Mute, Canister Release, Recessed Lock/Unlock, Three Multifunction buttons.
- Pump lights: System OK, Battery Warning, Alarm/Alert, External Power Indicator.
- Battery icons: Full Charge, Low, Critical Low, Charging, Full Charged, Battery Failure.
- Therapy screen icons: Y-Connector Mode, Intermittent Mode, Continuous Mode.
- Status bar icons: Paused, System OK, Alarm/Alert, Critical Air Leak, Moderate Air Leak, Blockage, Canister Missing, System Failure/High Vacuum, Pump Too Hot Alert, Pump Too Hot Alarm, Paused Too Long, Canister Full, Locked, Bluetooth On, Muted.
For detailed product information, including indications for use, contraindications, effects, precautions, warnings, and important safety information, users should consult the product's Instructions for Use (IFU) prior to use. Additional resources such as customer care contacts, troubleshooting videos, and basic operation videos are available via a QR code.