Do you have a question about the Smiths Medical CADD and is the answer not in the manual?
Conserves battery power when the pump is idle.
Provides additional screen-specific instructions.
Instructions for inserting AA or rechargeable batteries.
Steps to turn on the pump and complete self-tests.
Choose the desired therapy from the available options.
Select the patient qualifier for the chosen therapy.
Choose the specific drug for the selected therapy.
Review patient-specific parameters before proceeding.
Adjust patient-specific delivery parameters.
Procedure for attaching and securing a new cassette.
Steps for safely removing a cassette from the pump.
Resetting the volume after cassette changes or during use.
Procedure to prime tubing after cassette change or without.
Viewing pump operational and delivery reports.
Configuring security for priming and delayed starts.
Indicates unrecoverable hardware or software error.
Critical alarm; pump stops and requires immediate action.
Significant alarm; pump may pause, requires acknowledgement.
Minor alarm; pump continues with limited disruption.
Non-critical message displayed briefly in the status bar.
Addresses pump power loss and related alarms.
Procedure for clearing air in the fluid path.
Action required when battery is depleted and pump stops.
Indicates low battery level; advises replacement.
Resolving blockages between the pump and patient.
Indicates a low fluid level in the reservoir.
Pump stopped due to zero reservoir volume.
Resolving blockages between the reservoir and pump.
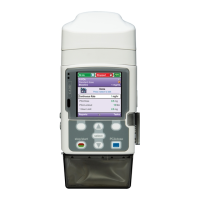
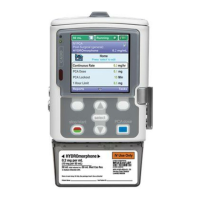
The CADD®-Solis VIP is an ambulatory infusion pump designed for controlled delivery of fluids to a patient. This device is intended for use in various clinical settings, providing flexibility and mobility for patients requiring continuous or intermittent infusions.
The primary function of the CADD®-Solis VIP pump is to deliver fluids, such as medications, nutrients, or other solutions, to a patient at a controlled rate and volume. It supports multiple therapy types, including Epidural, IV PCA, Epidural PCA, and Peripheral Nerve Block, allowing for a wide range of clinical applications. The pump is equipped with a display that shows critical information such as infusion volume, therapy type, and status (e.g., "Stopped"). Indicator lights provide quick visual cues about the pump's operational status. A keypad allows for user interaction, enabling clinicians to program and adjust settings. The device also features a remote dose cord jack, which can be used for patient-controlled analgesia (PCA) where the patient can administer a bolus dose within pre-set limits. Power is supplied by either four AA batteries or a rechargeable battery pack, offering portability, and it can also be connected to an AC power source via an AC power jack and USB port.
The CADD®-Solis VIP pump is designed with several features to facilitate ease of use and patient safety during operation.
Powering On and Off: To power on the pump, the user presses and holds the power switch. The pump then performs self-tests and emits six beeps upon completion, after which the home screen is displayed, indicating readiness for use.
Unlocking the Pump: For security, the pump can be unlocked either with a security code or a physical pump key. When using a code, the user presses the up or down arrow keys to select the first digit, then presses "Select" to advance to the next digit, repeating the process for all digits before pressing "Select" or "Accept Value." If using the key, it is inserted into the lock and turned counterclockwise.
Setting Up for a New Patient: This process involves several steps to ensure accurate and safe delivery. First, fresh batteries or a rechargeable pack are inserted, and the pump is powered on. From the home screen, the user navigates through "Tasks," "View Advanced Tasks," and "Start New Patient." A warning screen will appear, indicating that this action will overwrite all existing delivery settings. After confirming, the keypad is unlocked. The user then selects the desired therapy, qualifier, and drug using the arrow keys and "Select" button. Finally, the settings are reviewed and confirmed, and patient-specific parameters are checked and accepted.
Editing Individual Delivery Settings: The pump allows for modification of patient-specific parameters related to the infused drug, within limits established in the protocol. To edit settings, the pump must first be stopped if it is running. From the "Tasks" menu, "View Delivery Settings" is selected. The desired setting is highlighted using the arrow keys, and "Select" is pressed. If prompted, the keypad is unlocked. The new value is then selected using the arrow keys and saved. Any additional settings can be modified by scrolling through them. Note that editing settings in "Step" or "Taper" mode will reset the infusion to the beginning.
Attaching a Cassette: The cassette, which contains the fluid and tubing, is crucial for delivery. To attach it, the tubing is clamped, and the cassette latch is opened. The cassette hooks are inserted into the hinge pins at the bottom of the pump, and the cassette is swung into the latch position. The pump is then placed upright on a firm, flat surface, and pressure is applied to the latch side to ensure the cassette fits tightly. The cassette latch is then lifted into the closed position. If resistance is met, the cassette should be unlatched and the process repeated. Proper attachment is verified by ensuring the top of the cassette aligns evenly with the bottom of the pump. To secure the cassette, the pump key is inserted into the lock and turned clockwise.
Removing a Cassette: Before removal, the pump must be stopped, and the tubing clamped. If the cassette is locked, the pump key is used to turn the lock counterclockwise to the unlocked position. The cassette latch is then pushed down until the cassette detaches.
Resetting the Reservoir Volume: This can be done after attaching a new cassette or without changing the cassette. When a new cassette is attached, the pump will prompt the user to reset the reservoir volume. If not changing the cassette, the pump must be stopped, and "Reset Reservoir Volume" is selected from the "Tasks" menu. The pump will then ask for confirmation to reset the volume.
Priming the Tubing: Priming ensures that air is removed from the tubing before connecting to the patient. The pump must be stopped, the tubing disconnected from the patient, and clamps open. If a cassette is attached after power-on, a "Prime Tubing?" screen appears, prompting the user to select "Yes" and then "Prime." If no cassette is changed, "Prime Tubing" is selected from the "Tasks" menu. Priming continues until air is removed or a set volume (10mL or 20mL for high volume sets) is delivered, at which point "Stop Priming" is selected.
Reports: The pump can generate reports on its operation, which can be viewed at any time, whether the pump is running or stopped. From the "Tasks" menu, "View Reports" is selected, and then the desired report is chosen.
Patient Permissions: This feature allows clinicians to control certain patient-facing functionalities, such as priming security and delayed start security. These settings can be toggled on or off, with the option to require a security code for activation.
The CADD®-Solis VIP pump incorporates several features to assist with maintenance and troubleshooting, primarily through its alarm system and informational messages.
Screensaver: To conserve battery power, the pump activates a screensaver after 30 seconds of inactivity in edit mode or if no keypad buttons are pressed. The display goes blank, and any keypad button (except the PCA dose key in PCA mode) will reactivate it.
Blue Text: The display uses blue text to provide additional instructions or information relevant to the current screen, guiding the user through operations.
Alarms: The pump is equipped with a comprehensive alarm system to alert users to potential issues, categorized by priority:
Informational Message: These messages appear in the status bar without stopping the pump. They may sound for five seconds or be silent, requiring no acknowledgment. An example is "Cassette Locked."
Troubleshooting: The manual provides guidance for common issues:
These features collectively ensure that the CADD®-Solis VIP pump is not only effective in delivering infusions but also user-friendly and equipped with robust safety and maintenance mechanisms.
| Manufacturer | Smiths Medical |
|---|---|
| Display | LCD screen |
| Infusion Modes | Continuous, Intermittent |
| Infusion Volume Range | 0.1 mL to 9999 mL |
| Alarms | Occlusion, air-in-line, low battery |
| Compatibility | Compatible with various |