EasyManua.ls Logo

Smoke hollow TC3718 User Manual

Smoke hollow TC3718
29 pages
To Next Page IconTo Next Page
Page #1 background imageLoading...
Page #1 background image
Grill
TC3718
Tools needed for assembly:
Phillips screwdriver, Pliers or Adjust-
able Wrench
If you smell gas:
1. Shut off gas to the appliance.
2. Extinguish any open flames.
3. Open lid.
4. If odor continues, keep away from
the appliance and immediately call
your fire department.
Failure to follow these instructions could
result in fire or explosion which could
cause property damage, personal injury
or death.
DANGER
1. Never operate this appliance unat-
tended.
2. Never operate this appliance within
10 ft (3.0 m) of any structure, com-
bustible material or other gas cylin-
der.
3. Never operate this appliance within
25 ft (7.5 m) of any flammable liquid.
4. Do not fill cooking vessel beyond
maximum fill-line.
5. Never allow oil or grease to get hot-
ter than 400°F or 200°C. If the tem-
perature exceeds 400°F (200°C) or
if oil begins to smoke, immediately
turn the burner or gas supply OFF.
6. Heated liquids remain at scalding
temperatures long after the cooking
process. Never touch cooking appli-
ance until liquids have cooled to
115°F (45°C) or less.
7. If a fire should occur, keep away
from the appliance and immediately
call your fire department. Do not at-
tempt to extinguish an oil or grease
fire with water.
Failure to follow these instructions could
result in fire or explosion which could
cause property damage, personal injury
or death.
DANGER
Conforms to ANSI STD Z21.58-2015/ CSA 1.6-2015
OUTDOOR COOKING GAS APPLIANCE
Question and Answer IconNeed help?

Do you have a question about the Smoke hollow TC3718 and is the answer not in the manual?

Smoke hollow TC3718 Specifications

General IconGeneral
BrandSmoke hollow
ModelTC3718
CategoryGrill
LanguageEnglish

Summary

Grill Overview and Safety

General Operation Safety Precautions

Key safety rules for operating the grill.

Gas Leak Emergency Procedure

Steps to take if a gas leak is detected.

Assembly Tools Required

Lists the tools required for assembling the grill.

Important Usage Warnings

Outdoor Use and Enclosure Restrictions

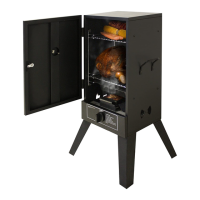
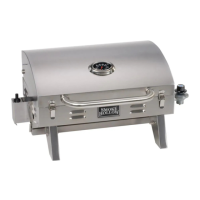
Grill is for outdoor use only, not in enclosures.

Flammable Liquids and Storage

Avoid flammable liquids nearby and store cylinders properly.

LP Gas Cylinder Requirements

Specifics for the LP gas cylinder needed for operation.

California Proposition 65 Notice

Warning regarding chemicals known to cause cancer or birth defects.

Pre-Assembly Preparations

Unpacking and Parts Check

Instructions for unpacking and verifying all parts are present.

Assembly Assistance

Recommendation to have a friend help move the heavy grill.

Comprehensive Safety Guidelines

Installation and Cylinder Safety

Codes, cylinder requirements, storage, and hose safety.

Operational Safety and Clearances

Safe clearances, unattended use, hot surfaces, and fire handling.

Critical Safety Warnings

General Operation Dangers

Hazards related to outdoor use, unattended operation, and fuel.

Handling Hot Surfaces and Fires

Warnings about hot surfaces, grease fires, and proper handling.

Operation in Wind and Post-Use Safety

Precautions regarding wind, moving the grill, and post-use heat.

Ash and Charcoal Handling

Safe procedures for handling hot coals and ashes.

Grill Parts Identification

Component Diagram and Parts List

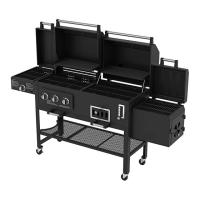
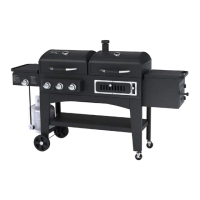
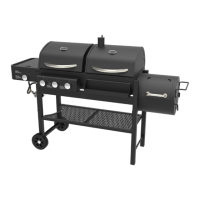
Visual and textual lists of all grill components and their part numbers.

Hardware Pack Details

Inventory of all hardware included for assembly.

Assembly: Leg Installation

Step 1 & 2: Left and Right Leg Assembly

Attaching the left and right legs to the grill cabinet.

Assembly: Cart and Bottom Shelf

Step 3 & 4: Cart Brackets and Bottom Shelf

Assembling cart front/rear brackets and the bottom shelf.

Step 5: Cart Right Bracket

Attaching the cart right bracket to the legs.

Assembly: Wheels and Cylinder Support

Step 6: Wheel Assembly

Installing the wheels, caps, and axle pins.

Step 7: LP Gas Cylinder Support Brace

Attaching the support brace for the LP gas cylinder.

Assembly: Burners and Control Panel

Step 8 & 9: Burners and Cross-over Tubes

Installing burners and connecting them with crossover tubes.

Step 10: Control Panel Assembly

Attaching the control panel assembly and connecting the igniter wire.

Assembly: Control Panel Continued

Step 10 Continued: Control Panel Valve Alignment

Ensuring valve alignment within the burner tubes for the control panel.

Assembly: Tray, Plate, and Damper

Step 11, 12, 13: Condiment Tray, Division Plate, Air Damper

Assembling condiment tray, middle division plate, and air damper.

Assembly: Charcoal Tray and Side Burner

Step 14 & 15: Charcoal Tray Brackets and Side Burner Panel

Attaching charcoal tray brackets and the side burner control panel.

Assembly: Side Burner Shelf

Step 16: Side Burner Shelf Assembly - Part 1

Initial steps for attaching the side burner shelf assembly to the cabinet.

Assembly: Side Burner Shelf Continued

Step 16 Continued: Side Burner Shelf Assembly - Part 2

Completing the side burner shelf installation including grates.

Assembly: Side Shelf

Step 17 & 18: Side Shelf Control Panel and Assembly

Attaching the side shelf control panel and the side shelf assembly.

Assembly: Gas Grill Lid

Step 19: Gas Grill Lid Components

Installing heat indicator, lid handle, and heat shield on the gas grill lid.

Assembly: Charcoal Grill Lid

Step 20: Charcoal Grill Lid Components

Assembling smoke stack, heat indicator, and lid handle on the charcoal grill lid.

Assembly: Lid Hinges and Windscreen

Step 21 & 22: Lid Hinge Assemblies

Attaching hinge assemblies to the gas and charcoal grill lids.

Step 23: Windscreen Installation

Attaching the windscreen to the hinge assemblies.

Assembly: Grease Cup and Charcoal Tray

Step 24: Grease Cup and Hook Installation

Installing the removable grease cup and hook.

Step 25: Charcoal Tray Placement

Placing the charcoal tray onto its supporting brackets.

Assembly: Racks and Grids

Step 26: Warming Racks Installation

Installing the warming racks onto the grill lids.

Step 27: Burner Heat Tents Placement

Positioning heat tents over the burners.

Step 28: Cooking Grids Placement

Placing the cooking grids into their positions.

Assembly: Controls and Cylinder Retainer

Step 29: Control Knob Attachment

Attaching the control knob to the valve stem.

Step 30: LP Gas Cylinder Retainer Installation

Installing the wire retainer for the LP gas cylinder.

Assembly Completion

Final Assembly Check

Confirmation that the grill assembly is now complete.

Operating Instructions

Connecting the LP Gas Cylinder

Steps for safely connecting the gas cylinder and performing leak tests.

Lighting the Grill

Procedures for igniting the grill burners correctly.

Care and Cleaning

Guidelines for maintaining and cleaning the grill parts.

Troubleshooting Common Issues

Solutions for common problems like burner ignition or flame color.

Curing Process

Initial steps to cure both the gas and charcoal grill components.

Charcoal Cooking Methods

Instructions for cooking with charcoal using direct heat.

Limited Warranty Information

Warranty Coverage and Claims

Details on warranty coverage, exclusions, and how to make a claim.

Related product manuals