1.##Remove#the#aluminum#welding#wire#
#and#torch#assembly#if#installed.#
#
2.##Remove#the#aluminum#drive#roller#by#loosening#the#set#screw.###
#
3.##Install#the#steel#drive#roller#with#the#.030”#V-groove#toward#the##
inside#of#the#welder#and#@ghten#the#set#screw.#
#
4.##Install#the#brass#tube#in#the#torch#housing.#Push###
the#tube#into#the#housing#
and#stop#just#short#of#the#
drive#roller.#
#
5.##Install#the#steel#torch.###
#
#
#
6.##Install#the#enclosed#steel#.030”#wire#and#feed#it#into#the#guide#tube#and#then#into#the#
torch#liner.#######
#
#
#
#
7.##Be#sure#that#the#steel#wire#is#aligned#in#the#roller#grove#and##
close#the#drive#arm.#
#
8.##Set#the#synergic#curve#for#.030”#steel#75/25#gas#mix.#(Fe#.030”#AR#25#CO2).#
#
9.##Install#the#flow#regulator#to#a#tank#of#75%#Argon#/#25%#CO2##
and#adjust#the#flow#to#30#CFH.#
#
10.##Set#your#material#thickness#and#you#are#ready#to#weld.#
#
#####
#
#
#
#
##
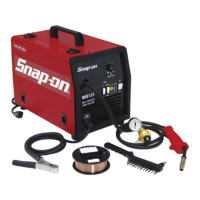
MIG1855'
STEEL'TORCH'INSTALLATION'
 Loading...