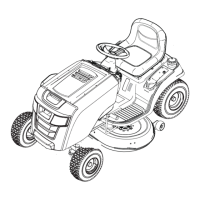
22
A
B
C
Servicing the Air Filter
NOTICE: Do not use pressurized air or solvents to clean the
lter. Pressurized air can damage the lter and solvents will
dissolve the lter.
1. Remove the fasteners (A, Figure 11) and the air lter
cover (B).
2. To remove the lter (C), lift the end of the lter and then
pull the lter o the intake (D).
3. Remove the pre-cleaner (E), if equipped, from the lter.
4. To loosen debris, gently tap the lter on a hard surface. If
the lter is excessively dirty, replace with a new lter.
5. Wash the pre-cleaner in liquid detergent and water.
Then allow it to thoroughly air dry. Do not oil the pre-
cleaner.
WARNING
Fuel and its vapors are extremely flammable and
explosive.
Fire or explosion can cause severe burns or
death.
• Never start or run the engine with the air cleaner
assembly or air filter removed.
Figure 11
WARNING
Running engine produces heat. Engine parts,
especially muffler, become extremely hot.
Severe thermal burns can occur on contact.
Combustible debris, such as leaves, grass, brush,
etc. can catch fire.
• Allow muffler, engine cylinder and fins to cool before
touching.
• Remove visible debris from engine compartment.
WARNING
Replacement parts must be the same position as
the original parts or re could result.
To service the muffler, see an authorized dealer.
D
E
6. Assemble the dry pre-cleaner to the lter.
7. Install the lter on the intake. Push the end of the lter
into the base as shown. Make sure lter ts securely in
the base.
8. Install air lter cover and secure with fasteners.
NOTE: Replace pre-cleaner/cartridge when dirty or
damaged.
Pre-Cleaner Cleaning
1. Wash in soapy water with liquid detergent.
2. Squeeze dry in clean cloth.
Cartridge Cleaning
Tap gently on at surface to remove light debris. Do not
attempt to clean cartridge.
 Loading...