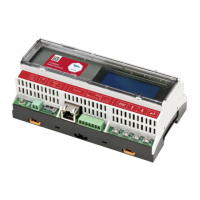
Connectors
Micro-USB: Connection to the power supply. This port can also
be used for connecting to a computer for advanced
configuration or SW upgrade.
Ethernet: Connecting the SolarEdge gateway to the SolarEdge
monitoring portal through an Ethernet switch/router. The
Ethernet switch/router should be connected to the Internet.
DIP Switches
Two DIP switches are located at the side of the gateway. They are
used for internal configuration; therefore, their position should not
be changed.
Configuration Button
The configuration button is used for the following:
Discovery of slave devices and associating them to the home
gateway
Diagnosis of communication problems
► To use the configuration button:
Short press: Pressing the configuration button for 5-10
seconds and releasing it - discover slaves (device
discovery)
Long press: Pressing the configuration button for more
than 10 seconds and releasing it - start diagnostics mode