1-6
27
Hookups and Settings
Controlling TVs with the remote
You can adjust the remote control’s signal to
control your TV.
Notes
•Depending on the TV, some or all of the buttons below
may not work for the TV.
• If you enter a new code number, the code number
previously entered will be erased.
•When you replace the batteries of the remote, the code
number may be reset to the default setting. Set the
appropriate code number again.
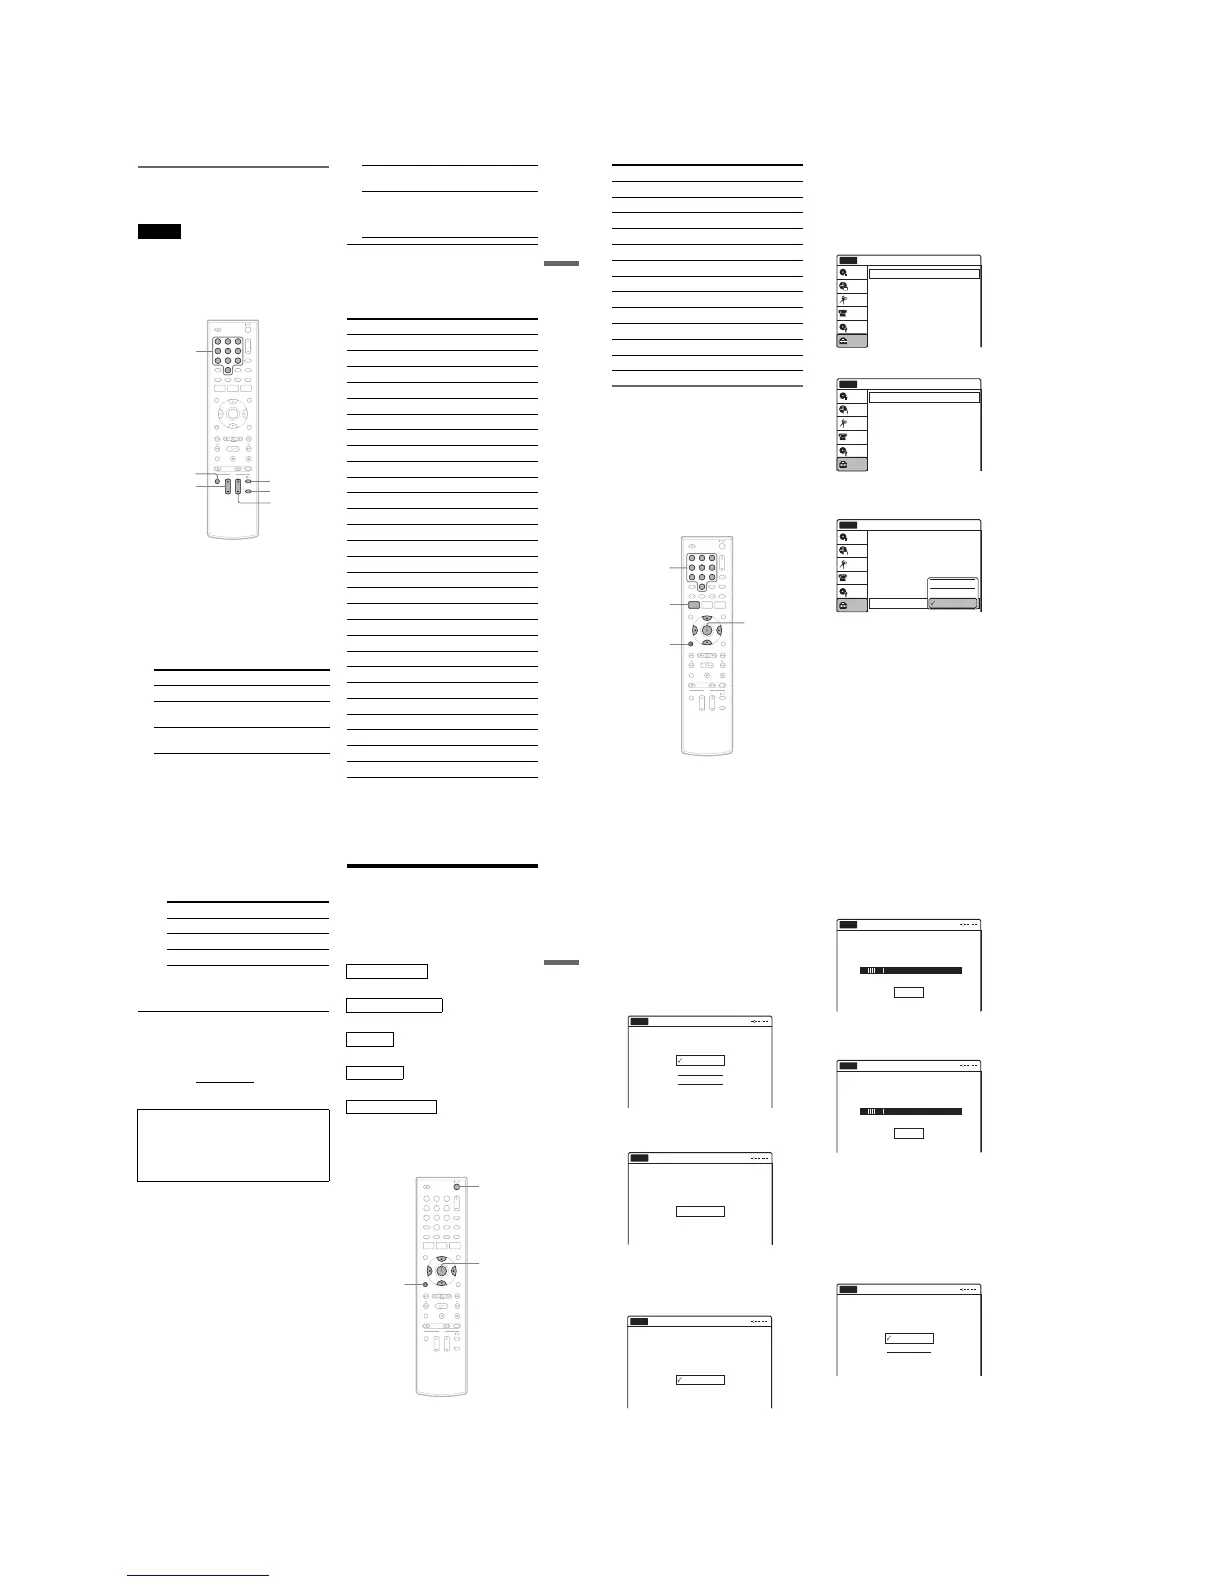
1 Hold down TV "/1 located at the bottom of
the remote.
Do not press "/1 at the top of the remote.
2 With TV "/1 pressed down, enter your
TV’s manufacturer code (see below) using
the number buttons.
3 Release TV "/1.
The following buttons are for TV.
Code numbers of controllable TVs
If more than one code number is listed, try
entering them one at a time until you find the one
that works with your TV.
Press To
TV "/1 Turn your TV on or off
TV VOL +/– Adjust the volume of
your TV
TV CH +/– Select the channel on
your TV
11 22 33
44 55 66
77 88
00
99
Number
buttons
TV INPUT
TV VOL +/–
TV DIGITAL/
ANALOG
TV CH +/–
TV "/1
TV INPUT Switch your TV’s input
source
TV DIGITAL /
ANALOG
Select the broadcast on a
Sony TV that can switch
between digital and
analog
Manufacturer Code number
Sony 01 (default)
Akai 04
AOC 04
Centurion 12
Coronado 03
Curtis-Mathes 12, 14
Daewoo 04, 22
Daytron 03, 12
Fisher 11
General Electric 04, 06, 10
Hitachi 02, 03, 04
J.C.Penney 04, 10, 12
JVC 09
KMC 03
LG/Gold Star 03, 04, 17
Magnavox 03, 04, 08, 12, 21
Marantz 04, 13
MGA/Mitsubishi 04, 12, 13, 17
NEC 04, 12
Panasonic 06, 19
Philco 02, 03, 04, 08
Philips 08, 21
Pioneer 06, 16
Portland 03
Proscan 10
Quasar 06, 18
Radio Shack 05, 10, 14
RCA 04, 10
,continued
28
If you have a Sony DVD player or
more than one Sony DVD recorder
If the supplied remote interferes with your other
Sony DVD recorder or player, set the command
mode number for this recorder and the supplied
remote to one that differs from the other Sony
DVD recorder or player after you have completed
“Step 7: Easy Setup.”
The default command mode setting for this
recorder and the supplied remote is DVD 3.
1 Check that Easy Setup (page 29) has been
finished. If Easy Setup has not been
finished, first perform Easy Setup.
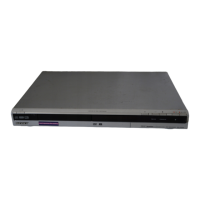
2 Press SYSTEM MENU.
The System Menu appears.
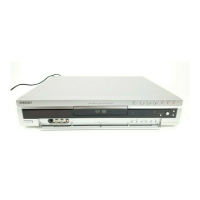
3 Select “Setup,” and press ENTER.
4 Select “Options,” and press ENTER.
5 Select “Command Mode,” and press
ENTER.
6 Select a command mode (“DVD 1,” “DVD
2,” or “DVD 3”), and press ENTER.
7 Set the command mode for the remote so it
matches the command mode for the
recorder you set above.
Follow the steps below to set the command
mode on the remote.
A Hold down ENTER.
Sampo 12
Samsung 03, 04, 12, 20
Sanyo 11, 14
Scott 12
Sears 07, 10, 11
Sharp 03, 05, 18
Sylvania 08, 12
Teknika 03, 08, 14
Toshiba 07, 18
Wards 03, 04, 12
Yorx 12
Zenith 14, 15
Manufacturer Code number
11 22 33
44 55 66
77 88
00
99
SYSTEM
MENU
M/m/</,,
ENTER
O RETURN
Number
buttons
10:10 AM
Tuner Preset
Clock Set
Video
Audio
Features
Options
Easy Setup
Setup
Disc Setting
Edit
Title List
Timer
Setup
No Disc
DV/ D8 Dubbing
Options
Language
Parental
Digital Wide Control
Caption Service
Caption Setting
Front Display
Command Mode
Factory Setting
: 16:9
: Off
: Auto
: DVD 3
10:10 AM
Setup
Disc Setting
Edit
Title List
Timer
No Disc
DV/ D8 Dubbing
Options
10:10 AM
Setup
Disc Setting
Edit
Title List
Timer
No Disc
Language
Parental
Digital Wide Control
Caption Service
Caption Setting
Front Display
Command Mode
Factory Setting
: 16:9
: Off
: Auto
: DVD 3
DV/ D8 Dubbing
DVD 1
DVD 2
DVD 3
29
Hookups and Settings
B While holding down ENTER, enter the
command mode code number using the
number buttons.
C Hold down both the number buttons and
ENTER at the same time for more than
three seconds.
To return to the previous display
Press O RETURN.
To check the command mode for the recorder
Press x (stop) on the recorder when the recorder
is turned off. The command mode for the recorder
appears in the front panel display.
Step 7: Easy Setup
Follow the steps below to make the minimum
number of basic adjustments for using the
recorder. If you do not complete Easy Setup, it
will appear each time you turn on your recorder.
Settings are made in the following order.
m
m
m
m
m
1
Turn on the TV.
2 Press "/1.
The recorder turns on.
Command Mode Code number
DVD1 number button 1
DVD2 number button 2
DVD3 number button 3
If the command mode for the recorder has not
been changed, set the command mode for the
remote to the default setting of DVD3. If the
command mode for the remote is changed to
DVD1 or DVD2, you will be unable to operate
this recorder.
OSD Language Setup
Tuner and Channel Setup
Clock Setup
TV Type Setup
Audio Connection Setup
Finished!
11 22 33
44 55 66
77 88
00
99
M/m/</,,
ENTER
O RETURN
"/1
,continued
30
3 Switch the input selector on your TV so that
the signal from the recorder appears on
your TV screen.
“Initial setting necessary to operate the DVD
recorder will be made. You can change them
later using setup.” appears.
•If this message does not appear, select “Easy
Setup” in the “Setup” display to run Easy
Setup (page 88).
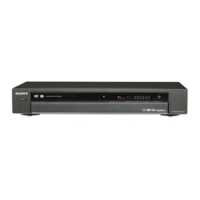
4 Press ENTER.
The setup display for selecting the language
used in the on-screen display appears.
5 Select a language, and press ENTER.
The display to confirm scanning appears.
6 Press ENTER.
The setup display for channel setting appears.
7 Select whether or not you have a cable
connection.
If you use an antenna only (no cable TV),
select “Antenna.”
For all other connections, select “Cable.”
8 Press ENTER.
The Tuner Preset function automatically starts
searching for all of receivable analog channels
and presets them.
After searching for analog channels is
complete, receivable digital channels are then
searched for automatically.
•This may take 40 minutes or more to
complete.
•If you press ENTER during search for
channels, the recorder will stop searching
for channels and advance the next step.
To set analog channels manually, see page 77.
After the Tuner Preset is finished, the setup
display for clock setting appears.
9 Select a method for setting the clock.
English
Français
Español
Easy Setup
Select the screen language.
No Disc
Easy Setup
No Disc
Press [ENTER] to start scanning
Digital and Analog channels.
Start
Select the way in which you will receive
channels.
Antenna
Cable
Easy Setup
No Disc
Searching for receivable Analog channels.
Please wait.
Easy Setup
No Disc
Stop
Searching for receivable Digital channels.
Please wait.
Allow 40+ minutes for completion.
To stop searching, press [Enter].
Easy Setup
No Disc
Stop
Select a method for setting the clock.
If you select "Auto", this recorder will look
for a time signal when you turn it off.
Auto
Manual
Easy Setup
No Disc