EasyManua.ls Logo

Sony TA-AX390 - User Manual

Sony TA-AX390
8 pages
Print Icon
To Next Page IconTo Next Page
Loading...
SONY
3-750-168-21
(1)
negated
stereo
Amplifier
Operating
Instructions
Before
operating
the
unit,
please
read
this
manual
thoroughly
and
retain
it
for
future
reference.
Owner’s
Record
The
model
and
serial
numbers
are
located
at
the
rear.
Record
these
numbers
in
the
spaces
provided
below.
Refer
to
them
whenever
you
call
upon
your
Sony
dealer
regarding
this
product.
Model
No.
To
prevent
fire
or
shock
hazard,
do
not
ex-
‘pose
the
unit
to
rain
or
moisture.
Serial
No.
CAUTION
RISK
OF
ELECTRIC
SHOCK
DO
NOT
OPEN
CAUTION:
TO
REDUCE
THE
RISK
OF
ELECTRIC
SHOCK,
DO
NOT
REMOVE
COVER
(OR
BACK).
NO
USER-SERVICEABLE
PARTS
INSIDE.
REFER
SERVICING
TO
QUALIFIED
SERVICE
PERSONNEL.
This
symbol
is
intended
to
alert
the
user
to
the
presence
of
uninsulated
“dangerous
voltage”
within
the
prod-
uct’s
enclosure
that
may
be
of
suffi-
cient
magnitude
to
constitute
a
risk
of
electric
shock
to
persons.
This
symbol
is
intended
to
alert
the
user
to
the
presence
of
important
operating
and
maintenance
(servicing)
instructions
in
the
literature
accompa-
nying
the
appliance.
©
1989
by
Sony
Corporation
Precautions
On
safety
©
Operate
the
unit
only
on
120
V
AC,
60
Hz.
¢
Should
any
solid
object
or
liquid
fall
into
the
cabinet,
unplug
the
unit
and
have
it
checked
by
qualified
personnel
before
operating
it
any
further.
¢
Unplug
the
unit
from
the
wail
outlet
if
it
is
not
to
be
used
for
an
extended
period
of
time.
To
disconnect
the
cord,
pull
it
out
by
grasping
the
plug.
Never
pull
the
cord
itself.
On
installation
e
Place
the
unit
on
a
level
surface.
¢
Do
not
install
the
unit
near
heat
sources
such
as
radiators
or
air
ducts,
or
in
a
place
subject
to
direct
sunlight,
excessive
dust,
mechanical
vibration
or
shock.
e
Good
ventilation
is
essential
to
prevent
internal
heat
build-
up
in
the
unit.
Place
the
unit
in
a
location
with
adequate
air
circulation.
Do
not
place
the
unit
on
a
soft
surface.
On
cleaning
Clean
the
cabinet
periodically
with
a
soft
dry
cloth.
If
the
stains
are
difficult
to
remove,
use
a
cloth
moistened
with
a
mild
detergent
solution.
Do
not
use
solvents
such
as
alcohol,
benzine
or
thinner,
since
they
will
damage
the
finish.
On
repacking
Do
not
throw
away
the
carton
and
packing
materials.
It
makes
an
ideal
container
in
which
to
transport
the
unit.
If
you
have
any
questions
or
problems
concerning
your
unit
that
is
not
covered
in
this
manual,
please
consult
your
nearest
Sony
dealer.
For
detailed
precautions,
see
the
leaflet
“IMPORTANT
SAFEGUARDS”.

Other manuals for Sony TA-AX390

Question and Answer IconNeed help?

Do you have a question about the Sony TA-AX390 and is the answer not in the manual?

Summary

Operating Instructions and Owners Record

Owners Record Details

Record model and serial numbers for dealer reference.

Precautions and Safety Warnings

General Safety Precautions

Operate safely, avoid liquids, unplug when unused.

Installation and Cleaning Guidelines

Proper placement, ventilation, and cleaning methods for the unit.

Front Panel Parts Identification

Front Panel Controls Overview

Identify system power, equalizer, volume, and speaker selectors.

Front Panel Connections and Sensors

Locate headphones jack and remote control sensor.

Additional Front Panel Features

Identify function selectors, DBFB, and balance controls.

Remote Commander Setup

Installing Remote Batteries

Use AA batteries and understand battery life and leakage prevention.

Remote Commander Button Functions

Overview of buttons for power, functions, and playback operations.

Listening to a Program Source

Selecting the Speaker System

Connect and select speaker systems A, B, or A+B for output.

Tape Recording Operations

Selecting Program Source for Recording

Choose a source other than TAPE for recording.

Tape Recording Steps

Playing the Program Source

Play the selected audio source before initiating recording.

Setting Tape Deck Mode for Recording

Prepare the tape deck for the recording process.

System Connections

Amplifier Connection Diagram

Visual guide for connecting components like tape decks, tuners, and speakers.

Speaker and Cable Guidelines

Notes on speaker impedance and cable types for optimal performance.

Audio Adjustments

Volume and Balance Control

Adjust sound level and relative speaker output strength.

Sound Quality Tuning with EQ and DBFB

Use DBFB and graphic equalizer for bass and tone adjustments.

Headphone Listening Setup

Connect headphones to the unit for personal listening.

Troubleshooting and Specifications

Troubleshooting Common Audio Issues

Resolve problems such as no audio, channel issues, or noise.

Technical System Specifications

Details on power output, distortion, input sensitivity, and general specs.

Overview

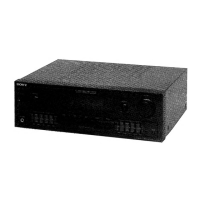
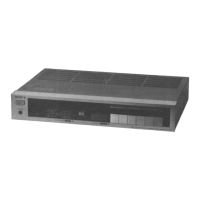
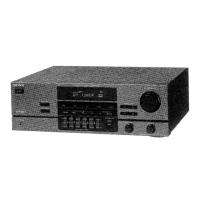
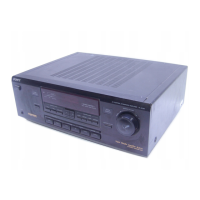
The Sony Integrated Stereo Amplifier TA-AX390/TA-AX391 is a central component for an audio system, designed to amplify sound from various sources and deliver it to speakers or headphones. It features a range of controls for sound adjustment and input selection, making it suitable for a comprehensive home audio setup.

Function Description

The primary function of this amplifier is to take audio signals from different sources—such as a turntable, CD player, tuner, tape deck, or VCR—and amplify them to drive speakers or headphones. It acts as the hub for your audio components, allowing you to select which source you want to listen to and control the overall volume and sound characteristics.

Key features include:

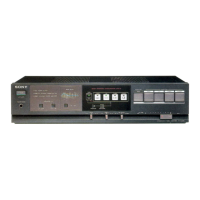
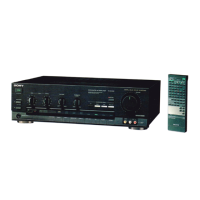
  • System Power Switch: Controls the main power to the amplifier.
  • Function Selectors: Allow you to choose the audio source you wish to listen to (e.g., VIDEO, TAPE, CD, TUNER, PHONO).
  • Volume Control: Adjusts the overall loudness of the audio output.
  • Speakers Selector: Enables you to choose which set of speakers (A, B, A+B) to use, or to turn them off for headphone listening.
  • Headphones Jack: A stereo phone jack for private listening with headphones.
  • 5-Band Graphic Equalizer Controls: Provides detailed control over specific frequency ranges (100 Hz, 330 Hz, 1 kHz, 3.3 kHz, 10 kHz), allowing you to customize the sound quality to your preference, room acoustics, or program material.
  • DBFB (Dynamic Bass Feedback) Switch and Indicator: This feature enhances bass frequencies, especially at lower volume levels, to provide a richer sound experience.
  • Balance Control: Adjusts the relative strength of the right and left speaker outputs, useful for correcting imbalances in sound stage.
  • Spectrum Analyzer Display: A visual representation of the audio frequencies being played, offering a dynamic display of the sound.
  • Remote Control Sensor: Allows the amplifier to receive commands from a compatible remote commander, offering convenient operation from a distance.

The amplifier supports recording from any program source to a connected tape deck. It's important to note that when recording, the BALANCE, VOLUME, GRAPHIC EQUALIZER controls, and the DBFB switch do not affect the recorded sound, ensuring a pure signal capture.

Usage Features

Operating the TA-AX390/TA-AX391 is straightforward, designed for ease of use within a home audio system.

Initial Setup:

  1. Placement: The unit should be placed on a level surface, away from heat sources, direct sunlight, excessive dust, mechanical vibration, or shock. Good ventilation is crucial to prevent internal heat buildup; avoid placing it on a soft surface that could block vents.
  2. Connections: All audio components (turntable, CD player, tuner, tape decks, VCR) connect to their respective input jacks (PHONO IN, CD IN, TUNER IN, VIDEO AUDIO IN, TAPE IN). Speaker cords connect to the speaker terminals, ensuring correct polarity (red for right, white for left). The AC power cord should be connected last, after all other connections are secure and the unit is off. The cable connectors should be fully inserted to prevent hum and noise.
  3. System Control: The amplifier includes CONTROL S and SYSTEM CONTROL connectors, allowing for integrated remote control functionality with other compatible Sony audio components, such as a tape deck or tuner. This enables a unified control experience for the entire audio system.
  4. AC Outlets: The unit provides switched AC outlets for powering other audio components with power consumption less than the indicated wattage. These outlets are controlled by the amplifier's POWER switch. Caution is advised against connecting high-wattage home appliances to these outlets.

Listening to a Program Source:

  1. Power On: Turn on the SYSTEM POWER switch.
  2. Speaker Selection: Use the SPEAKERS selector to choose your desired speaker system (A, B, A+B) or "OFF" for headphone listening. If "A+B" is selected, two pairs of speakers must be connected for sound to be heard.
  3. Source Selection: Press the appropriate function selector (e.g., PHONO, TUNER, CD, TAPE, VIDEO) to choose your audio source.
  4. Play Program: Start playback on your selected audio component.
  5. Volume Adjustment: Adjust the VOLUME control to your desired listening level.
  6. Sound Customization: Use the GRAPHIC EQUALIZER controls to fine-tune the sound. Boost or cut frequencies to enhance bass (100 Hz), adjust spaciousness (330 Hz), add presence to vocals (1 kHz), brighten sound (3.3 kHz), or highlight instrumental quality (10 kHz).
  7. Bass Enhancement: Engage the DBFB switch to reinforce bass, particularly effective at lower volumes.
  8. Balance Adjustment: If needed, adjust the BALANCE control to equalize the sound output between the left and right channels.
  9. Headphone Listening: For private listening, connect headphones to the HEADPHONES jack and set the SPEAKERS selector to "OFF."

Tape Recording:

  1. Power On: Turn on the SYSTEM POWER.
  2. Source Selection: Select the program source you wish to record (other than TAPE).
  3. Play Program: Start playback on the source component.
  4. Tape Deck Setup: Set your connected tape deck to the recording mode.

Remote Commander (TA-AX390):

The supplied remote commander provides wireless control over various amplifier functions, including power, function selection, volume, and DBFB. It also offers control over other compatible Sony components like CD players and tape decks. The remote requires two AA (R6) batteries.

Maintenance Features

Maintaining the TA-AX390/TA-AX391 is simple and focuses on ensuring longevity and optimal performance.

Cleaning:

  • The cabinet should be cleaned periodically with a soft, dry cloth.
  • For stubborn stains, a cloth moistened with a mild detergent solution can be used.
  • Crucially, avoid using solvents such as alcohol, benzine, or thinner, as these can damage the finish.

Battery Maintenance (Remote Commander):

  • Batteries typically last about half a year with normal use.
  • When batteries are exhausted, the remote commander will cease to function, requiring replacement of both batteries.
  • To prevent damage from battery leakage and corrosion, remove the batteries from the remote commander if it will not be used for an extended period.

General Precautions:

  • Electrical Safety: Operate the unit only on 120 V AC, 60 Hz. If any solid object or liquid falls into the cabinet, immediately unplug the unit and have it checked by qualified personnel before further operation to prevent electric shock or fire hazards. Unplug the unit from the wall outlet if it is not to be used for an extended period, always pulling the plug itself, not the cord.
  • Ventilation: Ensure adequate air circulation around the unit to prevent internal heat buildup.
  • Repacking: Retain the original carton and packing materials, as they are ideal for safely transporting the unit if needed.

By following these guidelines, users can ensure the safe and effective operation of their Sony Integrated Stereo Amplifier TA-AX390/TA-AX391 for many years. For any issues not covered in the manual, consulting a Sony dealer is recommended.

Sony TA-AX390 Specifications

Power IconPower
power output135 watts per channel minimum RMS power
total harmonic distortion0.9%
power requirements120 V AC, 60 Hz
power consumption235 W
Audio IconAudio
graphic equalizer boost/cut range 100 Hz, 330 Hz, 1 kHz, 3.3 kHz+8 dB
graphic equalizer boost/cut range 10 kHz+6 dB
frequency response PHONORIAA equalization curve
frequency response TUNER, CD, VIDEO, TAPE30 Hz - 30 kHz +3 dB
Physical Characteristics IconPhysical Characteristics
dimensionsApprox. 430 x 130 x 355 mm (w/h/d)
weightApprox. 8.5 kg

Related product manuals