1-12
BVM-D9H1U/D9H5U/D9H1E/D9H5E/D9H1A/D9H5A
18
(E)
Chapter 1 Overview
Location and Function of Parts
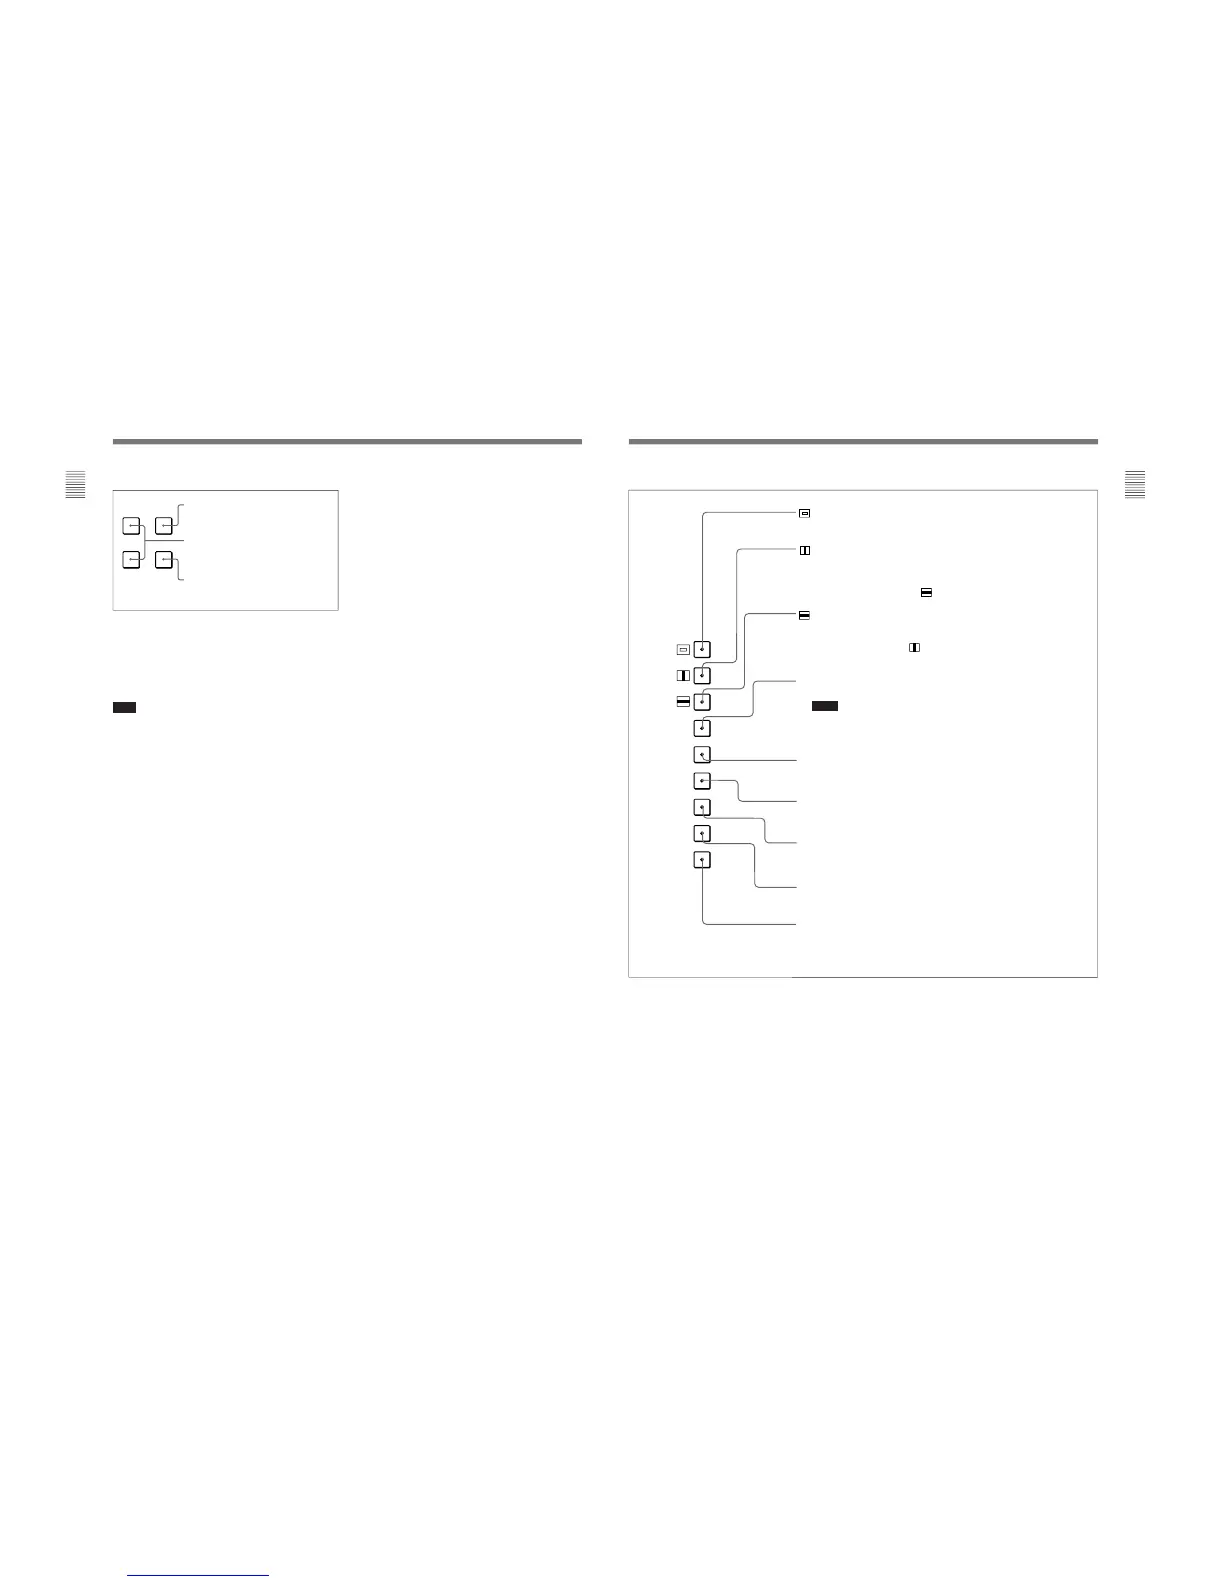
6 Menu operation buttons
For more information about menu operation, see “Basic
Menu Operations” on page 25(E).
7 POWER lamp
Lights when the monitor is put into operation mode
from standby mode (see STANDBY lamp 8) by
pressing the POWER switch 2.
Note
When the STANDBY lamp 8 is blinking, the monitor
cannot be put into operation mode (internal data
initialization is taking place). Wait until the
STANDBY lamp 8 is steadily lit.
8 STANDBY lamp
Lights when the monitor is in standby mode. The
monitor will be in standby mode under the following
conditions:
•The MAIN POWER switch (on the rear panel) is
turned on when the STANDBY MODE menu of the
SYSTEM CONFIG menu is set to ON (the
STANDBY lamp will blink for a few moments after
the switch is turned on, then will light).
•The monitor is changed from operation mode to
standby mode by external control.
For information about the SYSTEM CONFIG menu, see
“[E] Setting the Power-Up Conditions and Data about the
Screen Display — SYSTEM CONFIG Menu” on page
39(E).
9 OVER LOAD lamp
Lights when some malfunction has occured.
When the OVER LOAD lamp is lit, consult your
nearest Sony service facilities.
MENU button: Press to display the monitor
menus.
ENTER button: Press to confirm the items
and values entered (Ent button on the
numeric keypad 4 has the same function).
UP/DOWN buttons: Press to select the
items and setting values.
0 SHIFT button
Press to select one of the two functions designated to
the function buttons !¡.
Each time the SHIFT button is pressed, the LED turns
on (SHIFT ON: lits in umber) and off (SHIFT OFF.)
SHIFT OFF: The functions indicated above the
function buttons can be used (the LED of the
function button lits in green.)
SHIFT ON: The functions indicated below the
function buttons can be used (the LED of the
function button lits in amber.)
!¡ Function buttons
Change the operation conditions for the monitor.
Each time the button is pressed, the LED turns on and
turns off, and the operation conditions are changed.
Each button has two functions. Select one of the two
functions by pressing the SHIFT button 0. When the
SHIFT button is set to ON, the LED lights in umber,
and when the SHIFT button is set to OFF, the LED of
each button lights in green.
For the functions of the function buttons in case of SHIFT
OFF and SHIFT ON, see pages 19(E) and 20(E).
!™ OPTION connector
Used to connect the BKM-11R Monitor Control Unit
or Auto Setup Probe (BKM-14L, etc.)
19
(E)
Chapter 1 Overview
(Underscan) button: When this button is pushed in (ON), the picture is
underscanned by 3%, and four ends of the raster is displayed on the screen.
(H delay) button: When this button is pushed in (ON), the picture moves
horizontally, and a horizontal sync signal appears approximately one quarter in the
left edge of the screen.
• The brightness of the picture increases automatically, and it makes it easy to check
the sync part.
• If it is pressed together with the
button, a pulse cross picture is displayed.
(V delay) button: When this button is pushed in (ON), the picture moves vertically,
and a vertical sync signal appears approximately in the center of the screen.
• The brightness of the picture increases automatically, and it makes it easy to check
the sync part.
• If it is pressed together with
button, a pulse cross picture is displayed.
MONO button: When this button is pushed in (ON), a monochrome picture is displayed.
When the buttons is off, the monitor switches automatically color mode.
Notes
• The MONO button does not function with the RGB signal input.
• When the NTSC or PAL color signals are received and color burst signals are not
input, the monitor does not switch to color mode.
APT (aperture) button: When this button is pushed in (ON), the frequency response
can be modified. The degree of modification is set with the menu. (When RGB
signals are input, the button does not function.)
COMB button: This button does not function with this monitor.
However, when the BKM-127W NTSC/PAL Input Adaptor (optional) is installed and the
NTSC or PAL color signals are received, the monitor can be used with the comb filter
turned on.
F1 button: When this button is pushed in (ON), the characters disappear from the
monitor on the MANUAL menu of the level 1 of the CONTROL PRESET ADJ menu, the
MANUAL menu of the level 1 of the COLOR TEMP ADJ menu, and the ALIGNMENT
menu.
F2 button: When this button is pushed in (ON), you can access directly the MANUAL
menu of the level 1 of the COLOR TEMP ADJ menu, if the short-cut function is assigned
to this button.
ADDRESS button: When this button is pushed in (ON), the ADDRESS menu appears
on the screen. By using the ADDRESS menu, operation conditions for multiple
monitors are set.
For more information about the ADDRESS menu, see “Selecting the Monitor to
Control — ADDRESS Menu” on page 45(E).
Function buttons in SHIFT OFF mode (LEDs of function buttons in green)
MONO
APT
COMB
F1
F2
ADDRESS
16 : 9
SYNC
BLUE
ONLY
R
G
B
F3
F4
MARKER