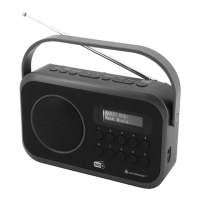
DAB112 / English Instruction Manual
7
Minute one by one and confirm each with “SCAN/SELECT”.
The display will automatically jump one step back in the menu.
5. Use “ ” to select “Set Hour System” and confirm with “SCAN/SELECT”.
6. Use “ ” to select “24 hour system” or “12 hour system” and confirm with SCAN/SELECT”.
The display will automatically jump one step back in the menu.
7. Use ” ” to select “Set Date Format” and confirm with “SCAN/SELECT”.
8. Use ” ” to toggle between dd-mm-yyyy, mm-dd-yyyy and yyyy-mm-dd, and confirm with
“SCAN/SELECT”.
The display will automatically jump one step back in the menu.
9. Use “ ” to select the “Clock style” (view on the standby display) and confirm with
“SCAN/SELECT”.
10. Use ” ” to select between “Analog” and “Digital” and confirm with “SCAN/SELECT”.
The display will automatically jump one step back in the menu.
11. Use “ ” to select “Auto. Update” and confirm
with “SCAN/SELECT”.
12. Use “ ” to select between “No Update” and “Update from Radio” (the DAB+ station will
set the time automatically if reception is good enough) and confirm with “SCAN/SELECT”.
The display will automatically jump one step back in the menu.
SETTING THE DISPLAY BACKLIGHT
1. Press and hold “MENU/INFO” button to open the system menu, select “system” and confirm
with “SCAN/SELECT”.
2. Use “ ” to select “Backlight” and confirm with “SCAN/SELECT”.
3. Use “ ” to select “Timeout” and confirm with “SCAN/SELECT”.
4. Use “ ” to select between “Always On” and a switch-off time for the lighting between 10
and 180 seconds and confirm with “SCAN/SELECT”.
The display will automatically jump one step back in the menu.
5. Use “ ” to select Level and confirm with “SCAN/SELECT”.
6. Use “ ” to select the brightness of the display
between Low, Medium, High and confirm with “SCAN/SELECT”.
The display will automatically jump one step back in the menu.
RESTORING FACTORY SETTINGS
1. Press and hold the “MENU/INFO” button to open the system menu, select “system” and
confirm with “SCAN/SELECT”..
2. Use “ ” to select “Factory Reset” and confirm with “SCAN/SELECT”.
3. Use “ ” to select “No” or “Yes” and confirm with “SCAN/SELECT”.
SOFTWARE VERSION
Here you can view the software version installed.
1. Press and hold the “MENU/INFO” button to open the system menu, select “system” and
confirm with “SCAN/SELECT”.
2. Use “ ” to select “System Version” and confirm with “SCAN/SELECT”.
The currently installed software version is displayed.
Press “MENU/INFO” to quit the menu item.
LIGHT