ANT IN
DTV
ANT IN Coaxial Earphone Mini YPbPr
Mini AV
PC AUDIOCISAT
CVBS
LINE OUT
ARC IN
OUT
There are two selections: ONand OFF,when you choose ON,you can operate a compatible HDMI-CEC
controlled device.
There are two selections: ON or OFF, it is avaliable when the Speaker Preference is set to Amplifier. When
selected to ON, sound from will be heard, when selecting OFF, no sound from the Amplifier will be heard.
This TV is fitted with the worldwide standard IC solution for ARC compatibility. There may be some slight
compatibility issues in head units with non-standard IC solutions installed. You may need to switch the
Head Unit off/on again in order for ARC to reconnect in some cases.
C
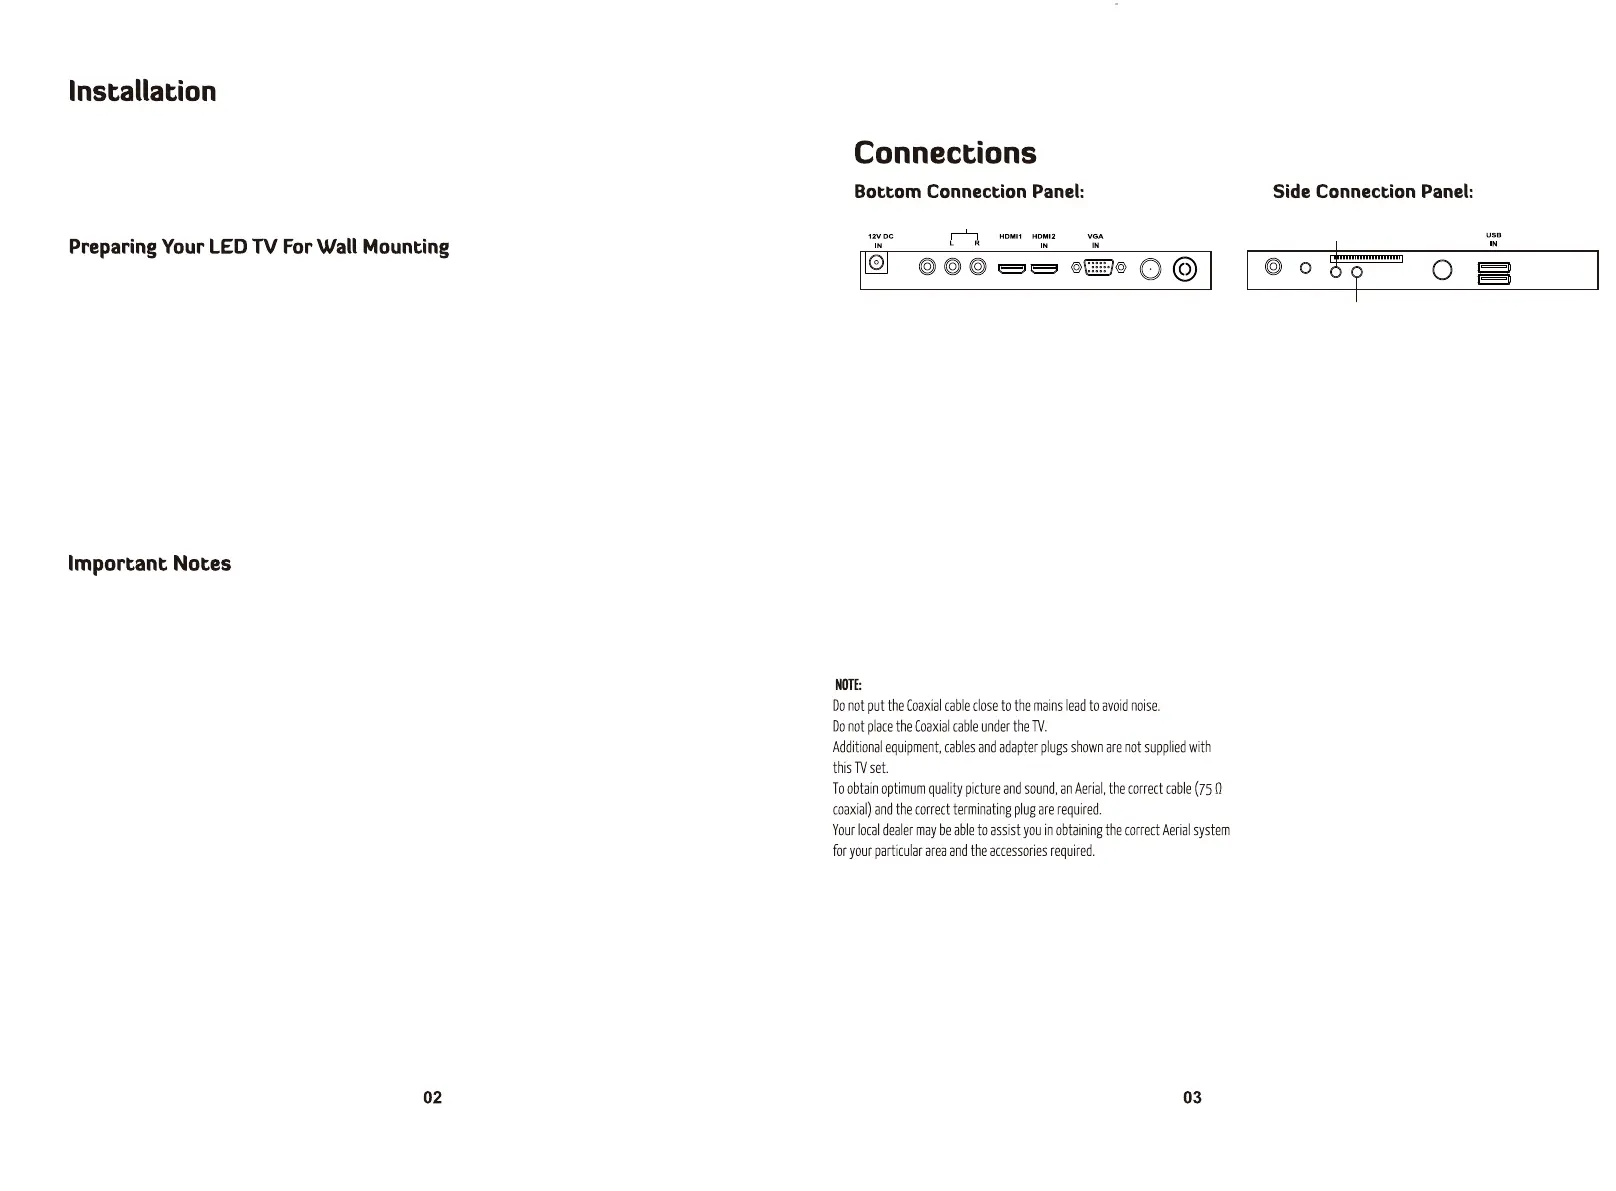
Digital Audio output for surround sound/sound bars etc.
Coaxial:
Digital Audio output for surround sound/sound bars etc.
Earphone:
Component Video in.
Mini YPbPr:
Connect the PC audio output of the PC to the Audio input
jack on the TV.
PC audio:
Common Interface Input
CI:
Insert the USB flash drive into the USB slot on the TV.
This slot can also be used to supply power for HAKO
Android TV box.
USB:
Composite Video & Audio in.
Mini AV:
Power:
Connect the AC power pack or 3M 12V RV lead to
the 12VDCIN connection on the TV.
CVBS OUT:
This mirrors the Video Signal from Input 12 (A/V) ONLY.
The output is Video only.
LINE OUT:
Audio output for external devices such as Head Units, amplifiers etc.
HDMI:
Connect the HDMI output of the accessory device to the HDMI
input on the TV. Select the HDMI input source using the
INPUT button on the remote.
VGA:
Connect the RGB output of the PC to the VGA input on the TV.
ANT IN:
Connect the antenna to the RF IN connection. Please refer to the
QRWHV below.
EC:
AmpliĮer Support ARC:
Thank you very much for your purchase of this product. Please read this manual carefully and keep it safe for reference.
Please use the power cord designated for the product. When an extension cord is required, use one with the correct
power rating. The cord must be grounded. The product should be installed on a flat surface to avoid tipping. Space
should be maintained between the back of the product and the wall for proper ventilation.If you would like to mount
the TV to the wall, please see “Preparing the LED for Wall Mounting”below for additional information. Avoid installing
the product in the kitchen, bathroom or other places with high humidity.
The HDTV can either be kept on the stand or mounted to the wall for viewing. If you choose to
mount the HDTV to the wall, please follow the instructions below.
Unplug all the cables and cords from your LED TV.
Place the LED TV face down on a soft and flat surface(blanket,foam,cloth,etc) to prevent any
damage to the display.
Remove the stand screws allowing the stand to be removed.
The mounting bracket is made up of two parts-the wall bracket and the TV bracket. Attach the TV bracket to the TV via
the included screws.*ncluded with your wall mount kit(Please check the instruction manual of the wall mount for further
information)Attach the wall bracket to the wall with appropriate screws. Ensure the wall issuitable to hold the weight of
the TV. (Please check the instruction manual of the wall mount for further information)
Slide the TV bracket into the wall bracket
Ensure the wall mount is secured and locked in travel position when the RV is in transit
RESET:
Like any product controlled by microprocessors this TV may hang or becomeunresponsive.*n the unlikely
event this occurs simple disconnect the power and reconnect after 10 seconds.
REMOTE:
To prevent leakage which may result in bodily harm or damage to the remote:
1. Install AAA batteries correctly, and make sure polarities are correctly aligned with the battery
compartment markings.
2. Do not mix batteries (OLD and NEW or CARBON and ALKALINE,etc)
3. Remove batteries when the remote is not used for a long time.
DLJŵƵƐŝĐŵŽǀŝĞŽƌŝŵĂŐĞĮůĞƐĚŽŶŽƚĚŝƐƉůĂLJ
Due to the large variation of file sizes, compression formats and codec available,playback of all files
cannot be guaranteed.
/ĐĂŶŶŽƚƌĞĐŽƌĚŽŶƚŽŵLJh^ŇĂƐŚĚƌŝǀĞ
FAT 32 formatted flash drive is required.
dŝŵĞ^ŚŝŌĨƵŶĐƟŽŶĂůŝƚLJĚŽĞƐŶŽƚǁŽƌŬ
FAT 32 formatted flash drive is required
tĂƌŶŝŶŐŽŶŽƚŬĞĞƉŝŵĂŐĞƐŽŶƚŚĞƐĐƌĞĞŶĨŽƌĂůŽŶŐƟŵĞ
To prevent the screen from burn in, do not leave static images including menu screens displayed for a period of time.
Burn in is not covered under warranty provision.
ATTENTION:
Do not try to update the TV unless directed by a service technician. Product misconfigured by an
incorrect update is not covered under warranty.
 Loading...