NOTE: You may need to twist BB-8’s head to lock it into place. If BB-8’s head is
not locked into position it will lean to the side and the head may fall off easily.
6. Charge around 1 hour, or until
charge light turns GREEN.
7. Unplug the micro USB cable
from the Charging Port.
8. Unplug the USB Cable
from its source.
9. Close the Charging Port Door.
NOTE: Cable is for charging
only and will NOT transfer data.
2. Open the Charging Port Door.
3. Move the Power Switch to the OFF Position. Charging indicator light will go OFF.
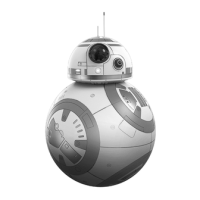
1. Connect the Antenna to the Top of BB- 8.
2. Place BB-8 head on top of the body.
3. Assembly complete.
4. Plug the micro USB cable into the Charging Port.
5. Plug the USB Cable into an appropriate source.
RED Light will indicate charging is in progress. GREEN Light will indicate full charge.
*The RC CHANNEL SELECTOR must be in the same position as on the REMOTE CONTROL. It may be
changed to a different channel when playing with a friend who has another BB-8, or similar
product. This will let you maintain control of your BB-8 and not interfere with the other BB-8.
1
1
2 3
4
5
CHARGING PORT
POWER INIDCATOR LIGHT
RED = ON
NO LIGHT = OFF
CHARGING INDICATOR
LIGHT
POWER SWITCH
CHARGING INDICATOR LIGHT:
2 3
ON POSITION
OFF POSITION
POWER SWITCH
CHARGING PORT
ON POSITION
OFF POSITION
1. Locate the Charging Port Door on the BB-8 head section.
CHARGING (BB-8 HEAD) ASSEMBLY
CHARGE PORT FUNCTIONS (BB-8 DROID BODY)
CHARGE PORT FUNCTIONS (BB-8 DROID HEAD)
CHARGING
INDICATOR LIGHT
RED = CHARGING
GREEN = FULLY CHARGED
NO LIGHT = NOT CHARGING
RED = CHARGING
GREEN = FULLY CHARGED
NO LIGHT = NOT CHARGING
RC CHANNEL SELECTOR*
A POSITION
B POSITION
C POSITION
6 7