IM-IBR16-03 Issue 128
4. Commissioning
After installation or maintenance ensure that the system is fully functioning. Carry out tests on
any alarms or protective devices.
5. Operation
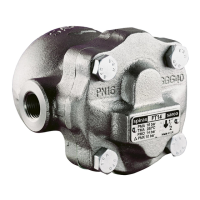
T h e f l o a t t r a p i s a c o n t i n u o u s d i s c h a r g e t r a p , r e m o v i n g c o n d e n s a t e t h e i n s t a n t i t f o r m s .
On start-up, the thermostatic air vent allows air to bypass the main valve preventing the system air
binding. Hot condensate will close the air vent tightly, but as soon as it enters the main chamber
of the trap, the float rises and the lever mechanism attached to it opens the main valve - keeping
the system drained of condensate at all times. When steam arrives, the float drops and closes
the main valve. Float traps are renown for their high start-up load handling capability, clean
tight shut-off and resistance to waterhammer and vibration.
6. Maintenance
Note: Before actioning any maintenance program observe the 'Safety information' in
Section 1.
Warning
The cover gasket contains a thin stainless steel support ring which may cause physical
injury if not handled and disposed of carefully.
6.1 General information:
Before undertaking any maintenance on the trap it must be isolated from both the supply line
and return line and any pressure allowed to safely normalise to atmosphere. The trap should
then be allowed to cool. When reassembling, ensure that all joint faces are clean.
6.2 How to fit the main valve assembly:
- Undo the cover bolts (2) and lift off the body (1).
- Remove the complete float assembly by undoing the two screws (7).
- Remove the main valve seat (5) and replace with a new one supplied with new gasket.
Note: A valve spring (item 28) is fitted to the DN25 (1") traps only.
- Fit a complete new float assembly by tightening the assembly set screws (7) to the
recommended torque (see Table 1).
- Refit the body (1) using a new gasket (3).
6.3 How to fit the air vent assembly:
- Remove the spring clip, element and spacer plate (17).
- Unscrew the seat.
- Fit a new gasket, seat and frame.
- Assemble the spacer plate, fit element and clips.
- Align the complete air vent horizontally so that the frame clears the cover.