SECTION FOUR – Routine Maintenance and Professional Servicing
SS
SS
aa
aa
ff
ff
ee
ee
tt
tt
yy
yy
PP
PP
rr
rr
ee
ee
cc
cc
aa
aa
uu
uu
tt
tt
ii
ii
oo
oo
nn
nn
ss
ss
::
::
Risk of fire, explosion, and electrical
shock. Heater service and repair must be performed by
a qualified installer, service agency, or the gas supplier.
Burn hazard. If heater has been operat-
ing, allow it to cool for at least half and hour before
touching the Flue Collar or the plastic Vent Body.
Carbon monoxide hazard. Check all flue
and vent pipe joints for leaks.
PP
PP
rr
rr
oo
oo
bb
bb
ee
ee
II
II
nn
nn
ss
ss
tt
tt
aa
aa
ll
ll
ll
ll
aa
aa
tt
tt
ii
ii
oo
oo
nn
nn
RRiisskk ooff ffiirree,, eexxpplloossiioonn,, aanndd eelleeccttrriiccaall sshhoocckk..
Heater service and repair must be performed by a qualified
installer, service agency, or the gas supplier.
TT
TT
oo
oo
oo
oo
ll
ll
ss
ss
RR
RR
ee
ee
qq
qq
uu
uu
ii
ii
rr
rr
ee
ee
dd
dd
::
::
You will need the following tools to make this
installation:
1 Reciprocating saw with a 6"x24t Bi-metal blade
1 Propane torch
1 Putty knife
1 Phillips screwdriver
1 Straight-blade screwdriver
1 Electric drill with 5/32 "and 3/8"bits
1 Wire brush
1 5"capacity C-clamp
180 grit (or finer) sandpaper
Isopropyl alcohol
NN
NN
OO
OO
TT
TT
EE
EE
::
::
You must purchase the appropriate Appliance
Adapter Kit for your venting installation. Do not try to
save and reuse the Appliance Adapter you are remov-
ing from the heater.
RR
RR
ee
ee
tt
tt
rr
rr
oo
oo
ff
ff
ii
ii
tt
tt
PP
PP
rr
rr
oo
oo
cc
cc
ee
ee
dd
dd
uu
uu
rr
rr
ee
ee
1. Turn off the filter pump and all electrical power to
the heater.
2. Allow the heater to cool for at least half an hour
before proceeding.
3. Unbolt and remove the Upper Left and Upper Right
Jackets from the heater.
4. Disconnect the wires from the Stack Flue Switch.
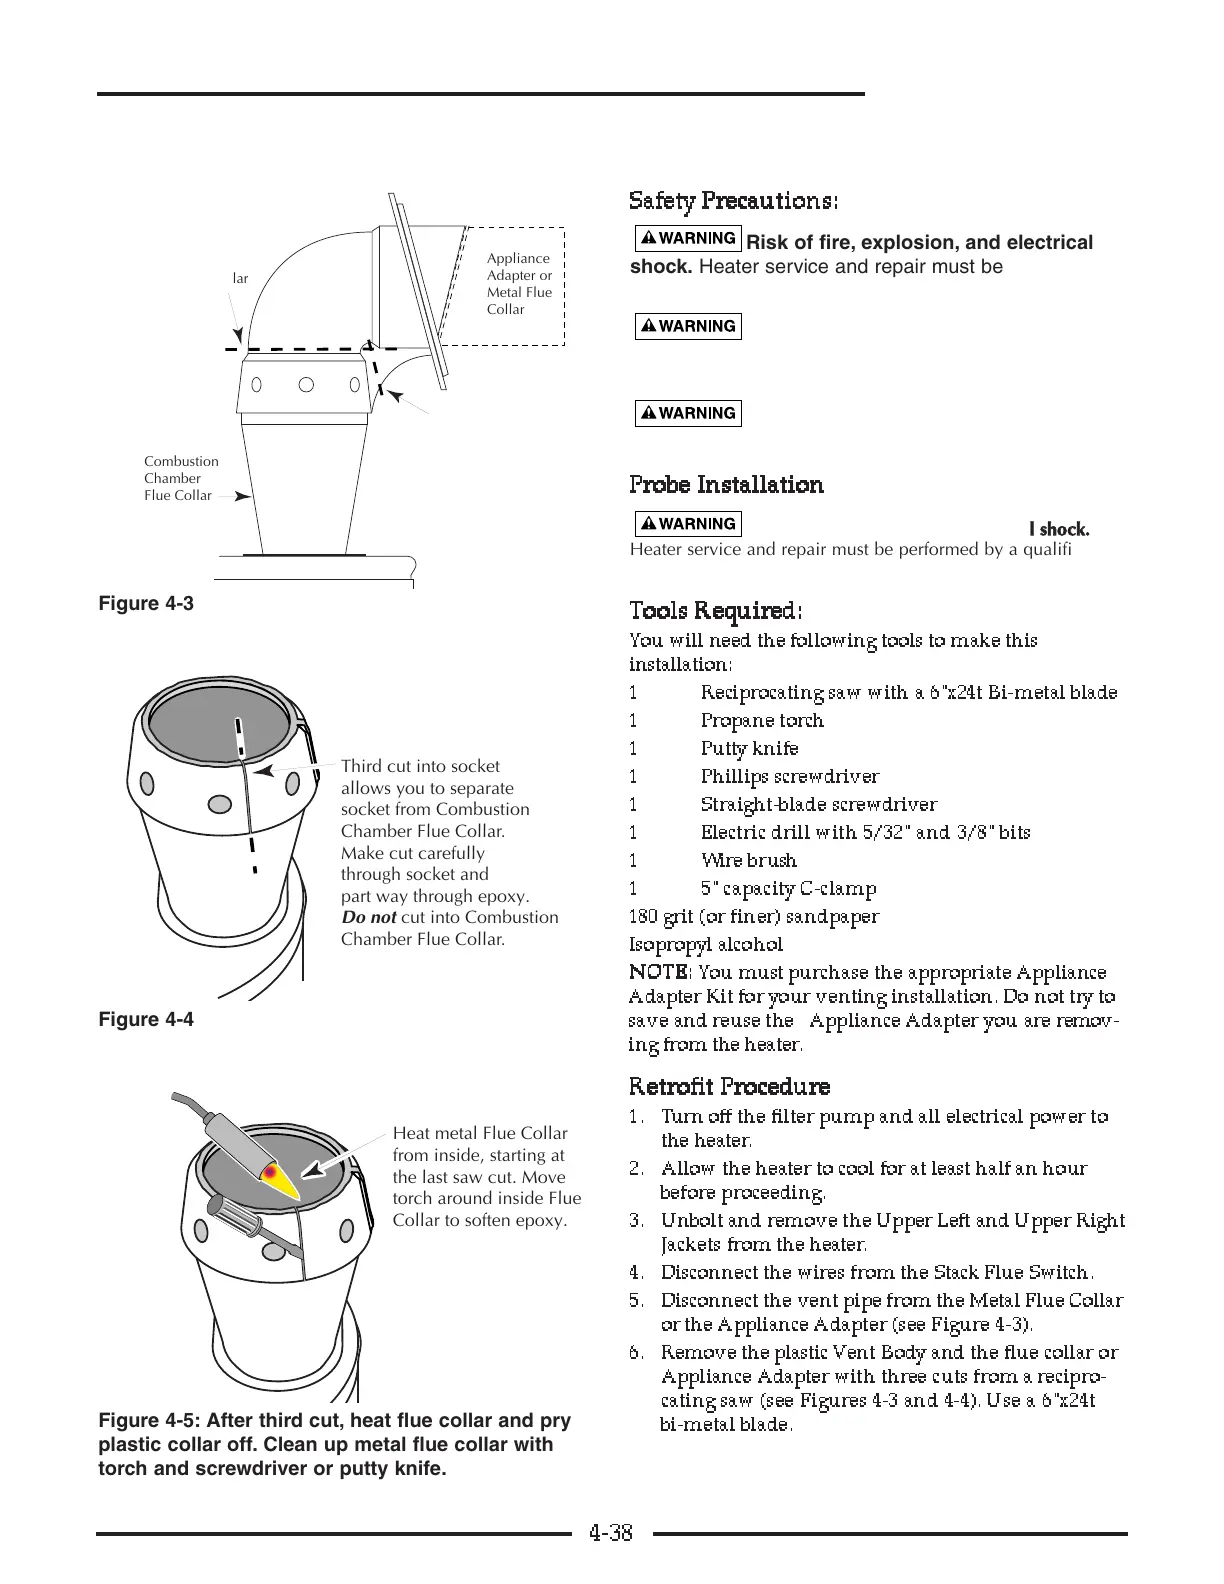
5. Disconnect the vent pipe from the Metal Flue Collar
or the Appliance Adapter (see Figure 4-3).
6. Remove the plastic Vent Body and the flue collar or
Appliance Adapter with three cuts from a recipro -
cating saw (see Figures 4-3 and 4-4). Use a 6"x24t
bi-metal blade.
(Continued on the next page)
4-38
Vent Body Retrofit For Enclosed Installations