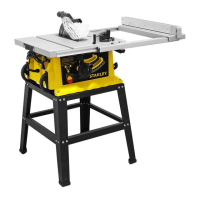
- Meja ekstensi (16) dapat digunakan untuk benda kerja
yang sangat lebar.
- Longgarkan gagang pengunci (14) dan tarik keluar
ekstensi lebar meja.
Saw blade assembly/replacement (Fig E, H, I)
1. WARNING: Ensure the machine is disconnected from the
power source. Wear the safety gloves.
2. Disassemble the saw blade guard (2) (Fig. H.)
3. Remove the table insert (20) (Fig. E).
4. Loosen the nut by placing the spanner wrench (17) on the
nut and countering with another spanner wrench (17) on
the flange (Fig. I).
5. WARNING! Turn the nut in the rotational direction of the
saw blade.
6. Remove the outer flange and take out the saw blade from
the inner flange, with diagonally downwards movement.
7. Carefully clean the flange with a cloth before fixing the
new saw blade.
8. Insert the new saw blade and fasten the outer flange. The
outer flange has a Φ25.4mm raised boss which fits in side
the blade bore.
WARNING! The teeth of a new blade are very sharp and can
be dangerous. Make sure the teeth point down at the front of
the table, aligned with the arrow marked on the saw blade
guard (2).
9. Attach the table insert (20) and the saw blade guard (2)
again and set them.
10. Before working, check the functionality of the guards.
On/Off switch (Fig. J)
- To switch the machine on, press the green start “I” button.
- To switch the machine off, press the red stop “O” button.
Cutting depth (Fig J)
Turn the blade elevation handle (11) to set the blade to the
required cutting depth.
4. The gap between the saw blade (4) teeth and the riving
knife should be around 3mm to 5mm (Fig.G)
5. R-tighten the mounting screw (f) and fix the table insert
(20)
WARNING! Ensure the machine is disconnected
from the power source. Never use the machine
without the table insert; Immediately replace the
table insert when worn or damaged
Saw blade guard assembly (Fig H)
1. Fasten the saw blade guard (2) to the riving knife (3) with
the bolt (g).
2. Disassembly in reverse order.
f
34
F
G
MAX 3-5
17
17
I
8
11
10
J
2 3
g
H
When the cutting width less than 300mm, means table no
extended, refer to scale (k). The red mark of sight-glass (m)
shows the required cutting width setup;
When cutting width more than 300mm need table extended,
refer to scale (l). Ensure the red mark of sight-glass (m) at
300mm and lock the rip fence, then the pointer (aa) aim at
scale (l) value shows the required cutting width setup.
Extension table (Fig N)
- The extension table (16) could be used for particularly
wide workpieces.
- Loosen the locking handle (14) and pull out the table width
extension.
- Turn anti-clockwise; to increase the cutting depth
- Turn Clockwise; to reduce the cutting depth
After each new adjustment it is advisable to carry out a trial
cut in order to check the set dimensions.
Setting the angle (Fig J)
Set the required bevel angle from 0 to 45 degree Before cutting,
ensure the saw blade (4) and mitre gauge (6) no collision
- Loose the Bevel adjustment locking knob (10).
- Set up the desired angle then lock the knob again.
Sawdust Collection (Fig K)
The machine is provided with a dust collection port at the rear
side for dia 35mm nozzle.
The blade guard assembly also features a dust collection port
for dia 35mm nozzle.
Rip fence mounting (Fig L)
- Fix the rip fence (5) at the back side and press the locking
handle (15) downwards.
- When disassembling, pull the locking handle up and
remove the rip fence (5).
- The rip fence could be locked setting with the rear knurled
nut.
Setting the cutting width (Fig. M)
- The rip fence (5) is used for lengthwise cutting of wood.
- Place the rip fence (5) on the guide rail (18) to the right or
left of the saw blade.
- 2 scales (k/l) on the guide rail (18) to show the gap
between fence rail and saw blade (4)
L
515
N
14 16
Hentian silang (Gbr O)
- Dorong pengukur sambungan (6) ke dalam slot (21 a/b)
di atas meja gergaji.
- Longgarkan kenop pengunci (n).
- Putar pengukur sambungan (6) sampai sudut yang
diperlukan diatur. Skala (p) menunjukkan sudut
pengaturan.
- Longgarkan ulang gagang pengunci (n)
12
ENGLISH
Caution: (Fig Q)
- Always use the push stick (19) when ripping small
workpieces (fig. Q)
- Do not cut excessively small workpieces.
Cross Cutting
- Lock the miter gauge (6) at 0 degree
- Set the bevel angle to 0 degree
- Adjust the saw blade (4) height
- Hold the workpiece flat on the table (1) and against the
fence. Keep the workpiece away from the blade.
- Keep both hands away from the path of the saw blade.
- Switch the machine on and allow the saw blade to reach
full speed.
- Hold the workpiece tightly again the fence and slowly
move the workpiece together with the fence assembly until
the workpiece comes underneath the upper blade guard.
Allow the teeth to cut, and do not force the workpiece
through the saw blade. The saw blade speed should be
kept constant.
After completing the cut, switch the machine off, allow the saw
blade to stop and remove the workpiece
- Push the and the workpiece toward the blade in order to
make the cut.
Important: Never push or hold the cut-off-side
workpiece.
Cross stop (Fig O)
- Push the miter gauge (6) into a slot (21 a/b) on the saw
table.
- Loosen the locking handle (n).
- Rotate the miter gauge (6) until the required angle is set.
The scale (p) shows the set angle.
- Re-tighten the locking handle (n)
USE
Working instructions
After each new adjustment it is advisable to carry out a trial in
order to check the set dimensions. After switching on the saw,
wait for the blade to reach its maximum speed of rotation
before commencing with the cut.
Secure long workpiece against falling off at the end of the cut
(e.g. with a roller stand etc.) Take extra care when starting the
cut! Never use the equipment without the suction function.
Regularly check and clean the suction channels.
Making longitudinal cuts (Fig P)
Longitudinal cutting (also known as slitting) is when you use
the saw to cut along the grain of the wood. Press one edge of
the workpiece against the parallel stop (5)” to be replaced to
“rip fence (5) while the flat side on the saw table (1).
The blade guard (2) must always be lowered over the
workpiece. When you make a longitudinal cut, never adopt a
working position that is in line with cutting direction.
- Set the in accordance with the workpiece height and the
desired width.
- Switch on the saw.
- Place your hands (with fingers closed) flat on the
workpiece and push the workpiece along the and into the
blade (4).
- Guide at the side with your left or right hand (depending
on the position) only as far as the front edge of the saw
blade guard (2).
- Always push the workpiece through to the end of the riving
knife (3)
- The offcut piece remains on the saw table (4) until the
blade (4) is back in its position of rest.
- Secure long workpiece against falling off at the end of the
cut ) with a roller stand etc.
6 21an
p
O
PENGGUNAAN
Petunjuk pengoperasian
Setelah masing-masing penyesuaian yang baru, sebaiknya
lakukan uji coba untuk memeriksa dimensi yang ditetapkan.
Setelah menyalakan gergaji, tunggu bilah mencapai kecepatan
putaran maksimum sebelum memulai pemotongan.
Kencangkan benda kerja yang panjang agar tidak jatuh di ujung
potongan (mis., dengan penyangga rol, dll.) Berhati-hatilah saat
memulai pemotongan! Jangan sekali-kali menggunakan
peralatan tanpa fungsi hisap. Periksa dan bersihkan saluran
hisap secara teratur.
Membuat potongan memanjang (Gbr P)
Pemotongan memanjang (juga dikenal sebagai pembelahan)
adalah saat Anda menggunakan gergaji untuk memotong
sepanjang serat kayu. Tekan satu ujung benda kerja ke hentian
paralel (5) “untuk diganti dengan” pembatas sobekan (5) saat
sisi yang datar di atas meja gergaji (1).
Pengaman bilah (2) harus selalu diturunkan di atas benda
kerja. Saat Anda membuat potongan memanjang, jangan
pernah menghadap sejajar dengan arah pemotongan.
- Atur sesuai dengan tinggi benda kerja dan lebar yang
diinginkan.
- Nyalakan gergaji.
- Tempatkan tangan Anda (dengan jari rapat) di atas benda
kerja dan dorong benda kerja di sepanjang dan ke dalam
bilah (4).
- Kendalikan sisi samping dengan tangan kiri atau kanan
Anda (tergantung pada posisi) hanya sejauh ujung depan
pengaman bilah gergaji (2).
- Selalu dorong benda kerja hingga ujung pisau pembelah
(3)
- Bagian yang terpotong tetap berada di meja gergaji (4)
sampai bilah (4) kembali ke posisi istirahat.
- Kencangkan benda kerja yang panjang agar tidak jatuh di
ujung potongan dengan penyangga rol, dll.
12
ENGLISH
Caution: (Fig Q)
- Always use the push stick (19) when ripping small
workpieces (fig. Q)
- Do not cut excessively small workpieces.
Cross Cutting
- Lock the miter gauge (6) at 0 degree
- Set the bevel angle to 0 degree
- Adjust the saw blade (4) height
- Hold the workpiece flat on the table (1) and against the
fence. Keep the workpiece away from the blade.
- Keep both hands away from the path of the saw blade.
- Switch the machine on and allow the saw blade to reach
full speed.
- Hold the workpiece tightly again the fence and slowly
move the workpiece together with the fence assembly until
the workpiece comes underneath the upper blade guard.
Allow the teeth to cut, and do not force the workpiece
through the saw blade. The saw blade speed should be
kept constant.
After completing the cut, switch the machine off, allow the saw
blade to stop and remove the workpiece
- Push the and the workpiece toward the blade in order to
make the cut.
Important: Never push or hold the cut-off-side
workpiece.
Cross stop (Fig O)
- Push the miter gauge (6) into a slot (21 a/b) on the saw
table.
- Loosen the locking handle (n).
- Rotate the miter gauge (6) until the required angle is set.
The scale (p) shows the set angle.
- Re-tighten the locking handle (n)
USE
Working instructions
After each new adjustment it is advisable to carry out a trial in
order to check the set dimensions. After switching on the saw,
wait for the blade to reach its maximum speed of rotation
before commencing with the cut.
Secure long workpiece against falling off at the end of the cut
(e.g. with a roller stand etc.) Take extra care when starting the
cut! Never use the equipment without the suction function.
Regularly check and clean the suction channels.
Making longitudinal cuts (Fig P)
Longitudinal cutting (also known as slitting) is when you use
the saw to cut along the grain of the wood. Press one edge of
the workpiece against the parallel stop (5)” to be replaced to
“rip fence (5) while the flat side on the saw table (1).
The blade guard (2) must always be lowered over the
workpiece. When you make a longitudinal cut, never adopt a
working position that is in line with cutting direction.
- Set the in accordance with the workpiece height and the
desired width.
- Switch on the saw.
- Place your hands (with fingers closed) flat on the
workpiece and push the workpiece along the and into the
blade (4).
- Guide at the side with your left or right hand (depending
on the position) only as far as the front edge of the saw
blade guard (2).
- Always push the workpiece through to the end of the riving
knife (3)
- The offcut piece remains on the saw table (4) until the
blade (4) is back in its position of rest.
- Secure long workpiece against falling off at the end of the
cut ) with a roller stand etc.
6 21an
p
O
P
5 2
4
3
1
Perhatian: (Gbr Q)
- Selalu gunakan tongkat pendorong (19) saat merobek
benda kerja kecil (gbr. Q)
- Jangan memotong benda kerja yang terlalu kecil.
12
ENGLISH
Caution: (Fig Q)
- Always use the push stick (19) when ripping small
workpieces (fig. Q)
- Do not cut excessively small workpieces.
Cross Cutting
- Lock the miter gauge (6) at 0 degree
- Set the bevel angle to 0 degree
- Adjust the saw blade (4) height
- Hold the workpiece flat on the table (1) and against the
fence. Keep the workpiece away from the blade.
- Keep both hands away from the path of the saw blade.
- Switch the machine on and allow the saw blade to reach
full speed.
- Hold the workpiece tightly again the fence and slowly
move the workpiece together with the fence assembly until
the workpiece comes underneath the upper blade guard.
Allow the teeth to cut, and do not force the workpiece
through the saw blade. The saw blade speed should be
kept constant.
After completing the cut, switch the machine off, allow the saw
blade to stop and remove the workpiece
- Push the and the workpiece toward the blade in order to
make the cut.
Important: Never push or hold the cut-off-side
workpiece.
Cross stop (Fig O)
- Push the miter gauge (6) into a slot (21 a/b) on the saw
table.
- Loosen the locking handle (n).
- Rotate the miter gauge (6) until the required angle is set.
The scale (p) shows the set angle.
- Re-tighten the locking handle (n)
USE
Working instructions
After each new adjustment it is advisable to carry out a trial in
order to check the set dimensions. After switching on the saw,
wait for the blade to reach its maximum speed of rotation
before commencing with the cut.
Secure long workpiece against falling off at the end of the cut
(e.g. with a roller stand etc.) Take extra care when starting the
cut! Never use the equipment without the suction function.
Regularly check and clean the suction channels.
Making longitudinal cuts (Fig P)
Longitudinal cutting (also known as slitting) is when you use
the saw to cut along the grain of the wood. Press one edge of
the workpiece against the parallel stop (5)” to be replaced to
“rip fence (5) while the flat side on the saw table (1).
The blade guard (2) must always be lowered over the
workpiece. When you make a longitudinal cut, never adopt a
working position that is in line with cutting direction.
- Set the in accordance with the workpiece height and the
desired width.
- Switch on the saw.
- Place your hands (with fingers closed) flat on the
workpiece and push the workpiece along the and into the
blade (4).
- Guide at the side with your left or right hand (depending
on the position) only as far as the front edge of the saw
blade guard (2).
- Always push the workpiece through to the end of the riving
knife (3)
- The offcut piece remains on the saw table (4) until the
blade (4) is back in its position of rest.
- Secure long workpiece against falling off at the end of the
cut ) with a roller stand etc.
6 21an
p
O
P
5 2 4
3
1
19
Q
BAHASA INDONESIA
38
 Loading...