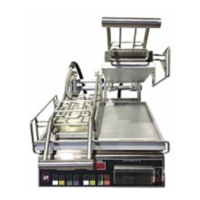
The device is a Pro-Max® Split Lid Table Top Two-Sided Grill, model PSC14D, designed for commercial use in food service locations. It is a tabletop unit with two independently operating cooking surfaces.
Function Description
The Pro-Max® PSC14D grill is designed for two-sided grilling, allowing simultaneous cooking on both the top and bottom surfaces of food items. It features a split lid design, enabling independent operation of each side. The unit is equipped with a temperature/timer controller to manage cooking processes, offering preset time and temperature settings. The grill is intended for efficient and consistent cooking in a commercial environment.
Important Technical Specifications
Electrical Specifications (Model PSC14D):
The PSC14D series offers various electrical configurations to suit different regions and power supplies:
- PSC14DDT: 120V, 2300 Watts, 19.2 Amps
- PSC14DK: 120V, 2300 Watts, 19.2 Amps
- PSC14DK-UK: 230V, 2110 Watts, 9.2 Amps
- PSC14DK-CUL: 120V, 2300 Watts, 19.2 Amps
- PSC14DKL-CUL: 120V, 2300 Watts, 19.2 Amps
- PSC14DTB:
- 120V, 2300 Watts, 19.2 Amps
- 208V, 1725 Watts, 8.3 Amps
- 230V, 2110 Watts, 9.2 Amps
- 240V, 2300 Watts, 9.6 Amps
- PSC14DTB-CUL: 120V, 2300 Watts, 19.2 Amps
- PSC14DTB-JPN: 200V, 1600 Watts, 8.0 Amps
Physical Dimensions:
- Width: 16.8 inches
- Depth: 23.2 inches
- Height (with lid open): 29.7 inches
Power Requirements:
- 120-volt units require a dedicated 120 VAC line with a 20 Amp receptacle.
- 230-240-volt units do not require a dedicated 240 VAC circuit with a 15 Amp receptacle.
- The unit must only be connected to the voltage specified on its nameplate to prevent damage and void the warranty.
Temperature Range:
- The grill can reach temperatures up to 573°F (301°C).
- Temperature display shows "Lo F" if below 273°F (134°C) and "Hi F" if above 573°F (301°C).
Usage Features
Initial Setup:
- The unit should be leveled using the adjustable feet.
- Before first use, the exterior and toasting area should be wiped with a damp cloth.
- The grill requires an initial burn-off period of approximately 30 minutes in a well-ventilated area, during which it may emit a small amount of smoke as cooking surfaces reach 450°F (232°C).
Seasoning (Non-Chrome Surfaces):
- First-time seasoning: Bring the grill to 300°F (149°C). Brush cooking surfaces with a SALT-FREE release agent (applied into a cup if aerosol), let sit for 20 minutes, then wipe clean with a warm damp cloth.
- Daily seasoning: A light coating of SALT-FREE baking release agent in the morning and occasionally throughout the day is generally sufficient to prevent sticking. Pre-grilling brushing is not necessary for each item.
Operating Instructions:
- Power On: Turn the unit on using the "ON" switch. The "Heat On" indicator, program number, and display will flash while heating. Once the preset temperature is reached, the indicators stop flashing, and the unit beeps three times. Initial heating takes approximately 30 minutes.
- Cooking: Place the product on the bottom cooking surface and close the lids.
- Start Program: Press the program button to start the timer countdown. The unit will beep when the time reaches "0". Press the program button again to silence the beeper.
- Food Removal: Raise lids to the first indent and remove food. Use a spatula to scrape residue into the grease catcher tray. Metal utensils with rounded corners are acceptable, but non-metal utensils prolong cooking surface life.
- Power Off: Turn the unit off when not in use.
Temperature/Timer Controller Operation:
- Startup: Preset time flashes until the preset temperature is reached. Once the temperature is reached, the time display, "Heat On" indicator, and program indicator stop flashing, and the alarm beeps three times.
- Viewing Actual Temperature: Press and hold the "Temp Button" to view the actual temperature.
- Programming Time and Temperature:
- Press and hold "TEMP".
- While holding "TEMP", press and hold any program button on the Left side for one second. The LED above the program number will light, and the display will show "____".
- Enter the four-digit security code: 4, 3, 2, 1 (code will not show on display).
- The preset time will display, and the LED for that program will flash.
- Set the time using the "+ or -" buttons.
- Press the "TEMP" button to save the time.
- Set the desired temperature using the "+ or -" buttons.
- Press the "TEMP" button to save the temperature and exit programming. The LED will stop flashing but remain lit.
- To continue programming other programs without re-entering the security code, press any other program button within 15 seconds.
- If no input is received for 15 seconds during programming, the unit reverts to normal operation, and the security code must be re-entered.
- Note: Temperature settings are only done with the left side buttons and apply to both sides. Time settings programmed on the left buttons are also programmed onto the right side.
- Right Side (Timer only) Programming:
- To change the time on the right side, press and hold the "TEMP" button, and press and hold any program button on the right for one second. The LED above the program button will light, and the Right Display will read "____".
- Enter the four-digit security code sequence: 4, 3, 2, 1.
- The preset time will be displayed, and the LED for that program will begin to flash.
- Set the time with the "+ or -" buttons.
- Press the "TEMP" button to save the time.
- The LED will stop flashing but will remain lit.
- Press any other program button within 15 seconds to continue programming without re-entering the security code.
- If no input is received for 15 seconds during programming, the unit reverts to normal operation, and the security code must be re-entered.
- °F/°C Conversion: To change the temperature display, hold the TEMP button while the unit is turned off, then turn the unit on while still holding the TEMP button. Repeat the procedure to change back.
- Independent Operation: The right and left sides operate independently. Both timers can be in operation simultaneously. The "00:00" display indicates which side is timed out.
Maintenance Features
General Cleaning (Non-Chrome Surfaces):
- Daily: Scrape off any food particles adhering to the cooking surface with a spatula. At the end of the day, wipe down all surfaces with a warm, damp cloth and mild detergent, then dry.
- Carbon Cleaning: If carbon buildup occurs (a black matter from cooked-on release agents, oils, and food particles), use a carbon removal agent safe for aluminum and chrome surfaces, following the cleaner's instructions. After carbon cleaning, re-season the grill.
- Grease Catcher Tray: Empty and clean the grease catcher tray as required using detergent and water after removing it from the unit.
- Burned-on Grease/Food Residue: For stubborn residue, use a mixture of 1 tablespoon liquid dish detergent and 1 cup warm water. Apply this mixture to a cold or warm top cooking surface with a sponge or plastic scrubbing pad. Wipe clean with a sponge or towel.
Important Cleaning Warnings:
- DO NOT immerse or let the unit stand in water.
- DO NOT hose down the unit.
- Keep the unit away from running water.
- DO NOT splash the control housing or the conduit connecting the top and bottom of the grill.
- DO NOT use ice on the cooking surface.
- Before cleaning, ensure power is turned off, and the unit is unplugged.
Monthly Inspection:
- Check all bolts/screws and tighten if necessary.
Maintenance and Repairs:
- Contact a local authorized service agent for service or required maintenance.
- Record the model number, serial number, voltage, and purchase date for faster service.
- Using non-genuine Star factory-supplied parts voids the manufacturer's liability.
- Star Manufacturing reserves the right to change specifications and product design without notice.