10
INSTRUCTIONS FOR USE
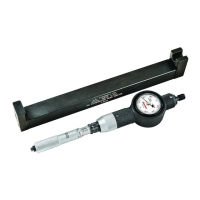
1. Remove the bore gage from its wooden case
2. Remove the two Allen head cap screws located below the
indicator and remove the shroud assembly prior to setting
the tool. (A gentle tap may be required to loosen the shroud
assembly from the indicator).
3. Select the appropriate extension and thread this into the tool's base
4. Insert the bore gage measuring head into an appropriate
setting master. The hardened steel centralizer will precisely
locate the moveable plunger against one side of the master.
Opposite to centralizer is the carbide contact position which
is rests against the opposite side of the master. The carbide
contact is threaded and can be lengthened to touch the master
wall when setting the gage. Good general dial practice is to set
the dial at its mid-range. When setting this gage, progress the
needle 1 complete revolution and locate the needle at the 12
o'clock vertical zero position. The small revolution counter on
the dial should also rest at the 12 o'clock vertical zero position.
5. If zero positioning is not possible then use the open ended
wrench to release the nut holding the indicator (see below) and
move it up or down to align to zero position.
6. Retighten and replace the shroud assembly.
7. Note: For very fine adjustments the indicator has a black bezel
surrounding its clear crystal. This can also be rotated to align
the zero via the bezel locking screw.
8. Insert the bore gage measuring head into the hole to be
measured by tilting it at an angle. Once in the hole straighten
the bore gage and proceed beyond vertical to an angle of
approximately 15 degrees. Now pull the gage toward you, while
watching the needle on the indicator. The needle will advance
and reach a point, and then reverse. Repeat the exercise by
pushing the gage back beyond vertical and again pull back
toward you, observing the point where the needle stops and
reverses. This is the dimension you are looking for. Always read
the gage in the positive direction pulling towards you.