284
FR
ES
PT
IT
EL
PL
RU
KZ
UA
RO
EN
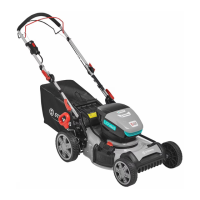
5. Grass Collection Box Indicator Plate
6. Grass Collection Box
7. Quick Clamp
8. Rear Wheels
9. Front Wheels
10. Battery Cover
11. Motor Cover Handle
12. Rear Discharge Door
13. Blade Height Adjustment Handle
14. Grass Collection Box Handle
15. Lower Handle
16. Switch Bar
• Wear gloves when unboxing.
• Do not use cutter, knife, saw or any other similar tool for unboxing.
• Carry the tool only by the handles.
• Keep the box for further reuse (transport and storage).
• Keep instruction manual in a dry area for further consultation.
4.2 INSTALLATION
Set up the lawn mower : illustration
2.1
to
2.2
Set up the lawn mower on at and rm ground to ensure safe and sturdy operating.
Release the quick clamp of the lower handle, hold the lower handle to the operation position. Fix the
upper 3 and lower handles 15 with the quick clamp 7.
Adjust the handle height : illustration
Adjust the lower handle to the correct position for comfortable height, by aligning the line on end of the
lower handle with one of the four lines on the mower body. Fit the quick clips through the lower handle,
then tighten it.
Installing/Removing the grass collection box : illustration
2.3
to
2.5
Before installing, make sure the grass box has been properly attached to the metal grass collection box 6
frame via the clips around the mouth of the box.
Lift the rear discharge door 12. While holding the door open, place the grass collection box 6 with handle
side up into the grooves under the hinge of the rear discharge door 12, making sure that the hooks rest
properly inside their respective grooves. After stopping, lift the rear discharge door 12, take the grass
collection box 6 away.
If the position of indicator opening is very dirty, the indicator
will not inflatein this case, clean the position of indicator
opening immediately.
Installing/Removing the battery pack : illustration
3.3
WARNING : Make sure the latch on the bottom of the battery pack snaps in place and the battery pack is
fully seated and secure in the product’s battery docking port before beginning operation.
Failure to securely seat the battery pack could cause the battery pack to fall out, resulting in serious
personal injury.
To install : Raise the battery cover, and insert the battery pack. Push battery pack into the bottom of the
battery cover, and make sure that battery pack is secured in the product before beginning operation.
Close battery cover.
3.8
 Loading...