INSTALLATION
Installation
ENGLISH
www.stiebel-eltron.com PEO 18/21/24 | PEO 27 | 7
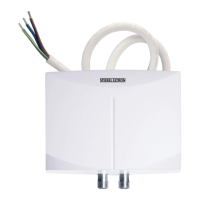
Oversink installation
12
26�02�02�1344
1 Cold water inlet
2 DHW outlet
Note
Mount the appliance on the wall. The wall must have
sufficient load bearing capacity.
9.2 Water installation
- No safety valve is required.
- Safety valves are not permissible in the DHW pipe.
Flush the water line thoroughly.
Ensure that the flow rate for switching on the appliance is
achieved (see chapter "Specification/ Data table", On). If the
flow rate is not achieved, remove the flow limiter (see chap-
ter "Installation/ Removing the flow limiter").
Increase the mains water pressure if the required flow rate is
not achieved with the draw-off valve fully opened.
Taps
Use appropriate pressure taps. Open vented taps are not per-
missible.
Note
Never use the shut-off valve in the cold water inlet to
reduce the flow rate. It is intended for shutting off the
appliance.
Permissible water line materials
- Cold water inlet pipe:
Pipes made from galvanised steel, stainless steel, copper or
plastic
- DHW outlet line:
Pipes made from stainless steel, copper or plastic
!
Material losses
If plastic pipework systems are used, take into account
the maximum inlet temperature and the maximum pres-
sure (see chapter "Specification/ Data table").
Flexible water connection lines
If the appliance is installed with flexible water connection
lines, ensure that the pipe bends with bayonet fittings do not
become twisted inside the appliance.
Secure the back panel at the bottom with two additional
screws.
10. Installation
10.1 Standard installation
- Electrical connection from above; installation on unfinished
walls
- Water connection on unfinished walls
- PEO 18/21/24: Medium connected load is selected
For further installation options, see chapter "Alternative instal-
lation methods":
- Electrical connection from below on unfinished walls
- Electrical connection on finished walls
- Connecting a load shedding relay
- Water installation on finished walls
- Water connection on unfinished walls for appliance
replacement
- Operation with preheated water
- Temperature limit
Opening the appliance
D0000041615
Open the appliance by releasing the snap lock.
26�02�02�0762
Remove the back panel by pressing the two locking tabs and
pulling the lower section of the back panel forwards.
 Loading...