Do you have a question about the StyleWell Stanwich and is the answer not in the manual?
Critical safety information regarding TV weight limits and unit stability.
Details on product warranty coverage and duration.
Steps to plan assembly, compare parts, and contact customer service if needed.
Lists the necessary tools for assembly, noting what is not provided.
Lists all hardware components provided for assembly with quantities.
Lists all furniture parts included in the package with quantities.
Instructions for preparing the media shelf and base components for assembly.
Guide for properly applying glue to wood dowels before insertion.
Steps to attach the middle crossbar to the media shelf using cam locks.
Instructions for attaching the rear skirting between the side skirtings.
Steps to align and attach the front skirting to the side skirtings.
Attaching the assembled unit to the bottom panel using dowels and cam locks.
Securing cam bolts into the designated holes on the bottom panel.
Gluing dowels and fastening middle trims to the lower partition panels.
Applying glue to dowels for lower side panels and partition panels.
Attaching lower side panels to the bottom panel using cam locks.
Fastening lower partition panels to the bottom panel using screws and dowels.
Placing and fastening the media shelf onto vertical panels using cam locks.
Securing cam bolts for upper side panels and partition assembly.
Securing cam bolts for the top panel and upper moldings.
Applying glue to dowels for upper front moldings and side panels.
Attaching upper front moldings and partition molding to panels.
Attaching the top reinforcement to the top panel using cam locks.
Attaching assembled upper side panels and partition panel to the top panel.
Securing the top reinforcement to moldings and the top panel.
Placing and fastening assembled upper panels onto the media shelf.
Instructions for installing the upper and side back panels.
Attaching door hinges and handles to the doors.
Fastening the doors to the side panels and adjusting alignment.
Inserting shelf supports and shelves, then securing them.
Applying decorative stickers and protective rubber bumpers to the unit.
Fastening the upright arms to the heater unit.
Inserting the left and right logs into the ember bed.
Placing the ember bed onto the heater and positioning the USB cable.
Folding and inserting the wall panel into the heater unit's channels.
Plugging the ember bed's USB connector into the heater's back port.
Sliding the glass panel into the U-channels on the upright arms.
Placing the top connector strap over the glass and upright arms.
Fastening the connector strap to the upright arms using screws.
Indicates the firebox assembly is ready for the next step.
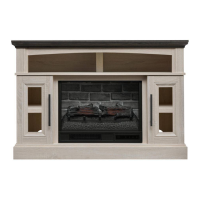
Lifting and centering the fireplace insert into the mantel opening.
Attaching an acrylic stopper to the top panel to prevent TV tipping.
Instructions for attaching anti-tip hardware to the unit and wall.
Tips for maintaining wood furniture in a climate-controlled environment.
How to clean the metal trim using specific cleaning agents.
| Brand | StyleWell |
|---|---|
| Model | Stanwich |
| Category | Indoor Fireplace |
| Language | English |