8 Hyponic® Operating and Maintenance Manual
Hyponic® Operating and Maintenance Manual 9
www.SumitomoDrive.com
1. Mount the gearmotor onto the driven shaft that has sufficient rigidity.
2. Ensure there is no restriction for the mounting angle.
3. Mounting Procedures:
b. Mounting the Hyponic® unit
......Spacer ......Thrust Bearing ......Nut ......Double end threaded bolt
a. Connecting a Driven Shaft
Fig. 6: Method of fixing in which the product does not move to the machine side.
Fig. 7: Method of fixing in which the product does not move in the opposite direction of the
machine.
Stepped Shaft Option Spacer Option Set Screw Option
The hollow shaft is made according to ISO H8 tolerances. Following installation, ensure that the fitting
between the hollow and the driven shaft is tightened correctly. We recommend ISO js6 or k6 as the
tolerance for the driven shaft.
Be sure to fix the gearmotor onto the driven shaft. Fixing options are shown on Figures 6 and 7.
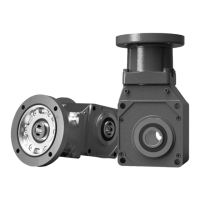
Hollow Shaft Type
Keyed Hollow Bore
Precautions for Mounting the Hollow Shaft Type
1) Driven Shaft Size
2) Mounting on the Driven Shaft
3) Fixing on the Driven Shaft
4) Torque Arm Retainer
• If the driven shaft dimension is small and there is a space from the hollow shaft, abrasion from fretting tends to
occur. The resulting abrasion powder may get pinched in the oil seal, causing the grease to leak.
• Furthermore, vibrations due to the space may damage the parts inside the drive.
• If the driven shaft length is short, excessive force is applied on the hollow shaft, possibly causing vibration or
grease leak.
• If the effective length of driven shaft is short, the key and the keyway may be damaged.
• If the hollow shaft end face is hit with a metal hammer or the driven shaft was biting on the hollow shaft when
assembled, the hollow shaft may become deformed and the oil seal contact may become uneven, causing the
grease to leak.
• If the case or the oil seal is hit, the damaged or deformed case or oil seal may cause the grease to leak.
• If the hollow shaft is not fixed, it may vibrate in the thrust direction due to the vibration from the operation or
from the machine side, possibly causing the oil seal performance to become uneven and the grease to leak.
• The vibration may also damage the parts inside the drive.
• Fixing the torque arm retainer may prevent the case from following the driven shaft movement, and as a result of
excessive force being applied on the hollow shaft, the grease may leak through the oil seal.
• It may also damage the parts inside the drive.
When using the hollow shaft type, be sure to refer to the mounting procedure on pages 8 to 14.
Apply customer-supplied anti-seize grease to the surface of the driven shaft and the inner surface of the
hollow shaft. Slide the Hyponic® unit onto the driven shaft. To make the installation smoother if the fit
is too tight, lightly tap the end of the hollow output shaft with a wooden hammer. Avoid hitting the
casing. To ensure smooth installation of the drive, we recommend the use of a jig shown in Figure. 5.
a
b
c
d
Spacer and Plate Option End Plate Option
Fig. 5
Inappropriate installation will result in shaft fretting. Fretting will cause shaft wear, jamming,
and misalignment between the gearmotor and driven shaft.