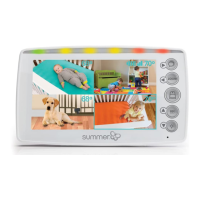
Time
Lullabies & White Noise
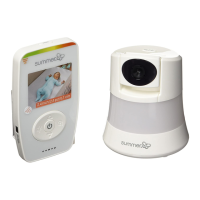
VOX
Zoom (6 levels)
Temperature
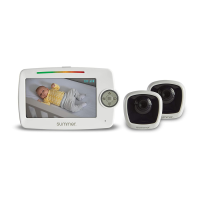
Camera Selection
Reception
Battery Life/Plugged In
MONITOR OWNER’S GUIDE
36046
Keep this instruction manual for future reference.
Please read the following instructions and warnings carefully.
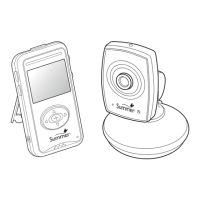
tabletop wall mount
SETTING UP THE CAMERA & HANDHELD SCREEN
1
or
0.9m
7hr.
STRANGULATION HAZARD:
Children have strangled in
cords. Keep this cord out of the
reach of children (more than
0.9m away in all directions).
WARNING
Read all warnings prior to using this product.
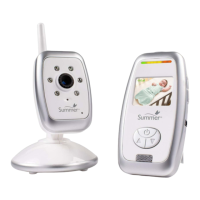
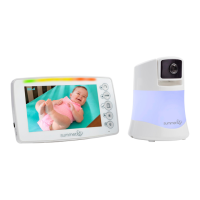
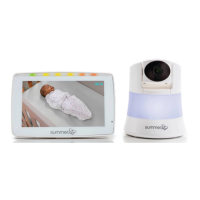
5.0 inch high definition colour video monitor
Install the Nursery Camera
NOTE: For best picture focus,
place camera 0.9m from cot.
1. Plug in nursery camera.
2. Place camera on a flat
surface, such as a dresser or
shelf.
3. Or, mount the camera on a
wall using the screw and wall
anchor provided.
Secure the Camera Cord
NEVER place the camera or cords within
0.9m of the cot. Secure the cord to your
wall using the 6 security clips included to
keep the cord away from baby’s reach.
Charge the Handheld
Charge for 7 hours before first use.
After the initial charge, recharge when
necessary for 7 hours. We recommend
charging overnight.
NOTE: While powered off, you will not see
an indicator that the handheld is charging.
LED will light up for 5 seconds to let you
know it is charging, then shut off.
SleepZone
®
virtual boundary
box
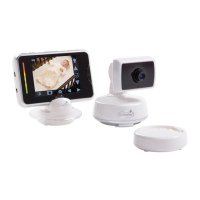
SEE, HEAR, AND KNOW
THAT BABY IS OK
™
remote
camera
steering
digital
privacy
up to
250m
range
VOX
voice-activated
screen wake-up
talk-back
to baby &
temp display
Moonlite
®
HD night
vision boost
lullabies/
white noise
& clock
BABY
PIXEL ZOOM HD
™
digital
zoom,
6 levels
®
Congratulations! You are now ready to use
your Baby Pixel
®
Zoom HD
™
Digital Color
Video Monitor!
3 sec.
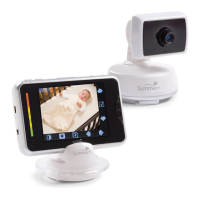
Screen Icons
Function Buttons
SleepZone
®
Power/Video
Moonlite
®
Zoom
Volume
Menu/Select
Up/Down/Left/Right
Talk-Back
VOX Menu
SleepZone
®
Menu
Camera Menu
Settings Menu
Lullabies/ White Noise Menu
GETTING TO KNOW YOUR HANDHELD
2
Menu Options
Press the MENU/SELECT button to access the menu options.
Use the LEFT/RIGHT ARROW buttons to highlight the Menu items.
Press MENU/SELECT to confirm a selection.
To exit menu, tap the power button once. Menu also exits after 8 seconds of inactivity.
green
indicator
light.
Flip out the kick-stand and place
the monitor on a stable, level
surface.
Power on the Nursery Camera &
Parent Handheld
1. Press and hold the camera POWER
button for 3 seconds.
A small green indicator light will appear
above the lens.
2. Press and hold the handheld POWER
button for 3 seconds.
The handheld will automatically pair with
the camera.
NOTE: The handheld unit and the camera are
paired at the factory for privacy reasons.
(If the handheld and camera are not paired
with each other for any reason, see "Adding
a Camera" section.)
6
6
Tools required for wall mount: Screwdriver and drill (not included).
ADJUSTING THE HANDHELD SETTINGS
3
Volume
Press VOLUME button to
increase/decrease sound level.
Improve Reception
Flip up antenna to improve reception.
Handheld Screen Brightness
1. Press MENU/SELECT button.
2. Press the RIGHT ARROW button to
highlight the Settings icon.
3. Press MENU/SELECT.
4. Press the RIGHT ARROW button to
highlight the brightness icon.
5. Press MENU/SELECT.
Handheld Screen Brightness (continued)
6. Press the RIGHT/LEFT ARROW buttons to
adjust the screen brightness.
7. Press MENU/SELECT to confirm.
Temperature Display
1. Press MENU/SELECT.
2. Press the RIGHT ARROW button and
highlight the Settings icon.
3. Press MENU/SELECT.
4. Press the RIGHT ARROW button to
highlight the Temperature icon.
5. Press MENU/SELECT.
6. Press the LEFT/RIGHT ARROW button to
select ºF or ºC.
7. Press MENU/SELECT to confirm and exit
temperature settings.
Clock
1. Press MENU/SELECT.
2. Press the RIGHT ARROW button to
highlight the Settings icon.
3. Press MENU/SELECT.
4. Press the RIGHT ARROW button and
highlight the Clock icon.
5. Press MENU/SELECT.
6. Use the LEFT/RIGHT/UP/DOWN ARROW
buttons to adjust time.
7. Press MENU/SELECT to confirm.
10 50 AM 12
Video On/Off Power Save Mode
This feature helps conserve battery life by automatically turning off the screen when
the handheld is not plugged into an A/C adapter (after 2 minutes, or 30 seconds if
VOX or SleepZone
®
is on).
1. To turn VIDEO OFF and conserve battery
power, press the POWER/VIDEO button.
• The screen will go dark.
• The audio feature will remain activated,
allowing you to monitor sounds.
• If VOX feature is on, video will turn on
automatically when sound is detected.
2. To turn VIDEO ON, press the
POWER/VIDEO button.
HEARING & SOOTHING YOUR BABY
5
Sound-Activated Lights
The LED light bar on the side of the
handheld will light up as it picks up noises,
even in power save mode.
(When the battery is low, the first LED flashes
red and the handheld beeps.)
2. To adjust the baby boundary area,
press and hold the SleepZone
®
button for
3 seconds.
• Adjust the camera view with the
UP/DOWN/LEFT/RIGHT ARROW buttons.
• Use the ZOOM button to bring the image
closer.
• Press MENU/SELECT to confirm.
• Adjust the Baby Boundary ALARM volume
with the UP/DOWN ARROW buttons.
• Press MENU/SELECT to confirm.
1. To activate, press the SleepZone
®
button
(automatically set to a default area).
NOTE: All buttons except for SleepZone
®
,
POWER, and MENU/SELECT will become
inactive.
• To shut off SleepZone
®
, press the
SleepZone
®
or MENU/SELECT button.
• SleepZone
®
can only be used on one
camera at a time.
You can also access SleepZone
®
feature
through the MENU.
1. Press MENU/SELECT button to enter the
menu screen.
2. Press the RIGHT ARROW button to
highlight SleepZone
®
. and press
MENU/SELECT button to confirm.
To extend battery life, we recommend
plugging in your handheld while using the
SleepZone
®
feature.
SleepZone
®
Virtual Boundary Box
The SleepZone
®
feature creates a virtual
boundary box within your screen.
This feature alerts you with a sound on
your handheld if baby crosses the virtual
boundary or an object enters the
boundary area you've set.
VIEWING YOUR BABY
4
Remote Camera Steering
Remotely control the camera angle from the handheld.
Use the UP/DOWN/LEFT/RIGHT ARROW buttons to move the camera angle up, down,
and side to side.
Digital Zoom
1. Press the ZOOM button to zoom in.
• A zoom icon will appear briefly in the
screen’s bottom right corner.
• The zoom icon will appear at the top of
the screen.
• There are 6 levels of zoom.
3 sec.
Talk-back to Baby
Reassure and soothe baby with the sound of your voice and the press of a button.
1. Press and hold the TALK-BACK button to talk to your baby.
The talk-back icon will appear briefly in the screen’s bottom right corner.
2. Release the button to end talk-back mode.
• Adjust the size of the SleepZone
®
with
the LEFT/RIGHT ARROW buttons.
• There are two box size options to choose from.
20
20
20
20
20
20
20
20
20
20
20
20
20
20
20
20
20
20
20
20
20
20
20
20
20