MONITOR OWNER’S GUIDE
36154
Summer Infant (USA), Inc. | 1275 Park East Drive | Woonsocket, RI 02895 | 401-671-6551
4/19
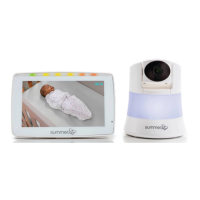
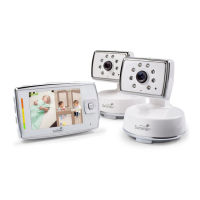
Thank you for purchasing the LookOut™Duo with No-Hole
PrestoMount™ Digital Color Video Monitor by Summer
Infant. Keep this instruction manual for future reference.
Please read the following instructions and warnings
carefully.
Install the Nursery Camera
on tabletop
LookOut™Duo comes with 2 camera stands for use on tabletops or dressers.
This can also be handy for travel.
NOTE: For best picture focus, place camera 6 ft. from crib.
For tabletop use:
1. Attach camera to the stand. Make
sure it securely clicks into the stand.
Plug in camera and follow
instructions in the Secure the Camera
Cord section.
2. Place camera on a flat surface,
such as a dresser or shelf.
tabletop
wall mount
SETTING UP THE CAMERA & HANDHELD SCREEN
1
Secure the Camera Cord
NEVER place the camera or cords within 3-feet of the crib. Secure the cord
to your wall using the 6 security clips included to keep the cord away from
baby’s reach.
6 ft.
Power on the Nursery Camera
& Parent Handheld
1. Press the POWER button on the
camera and hold for 3 seconds. A
green light will appear near the lens.
2. Press and hold the POWER/VIDEO
button on the handheld unit for 3
seconds.
The handheld will automatically
sync with the camera.
NOTE: The handheld unit and the camera
are paired at the factory for privacy
reasons.
(If the handheld and camera are not
paired with each other for any reason,
see "Adding a Camera" section.)
STRANGULATION HAZARD:
Children have strangled in
cords. Keep this cord out of
the reach of children (more
than 3 ft. (0.9m) away).
WARNING
Read all warnings prior to using this product.
Charge the Handheld
Charge for 7 hours before first
use. After the initial charge,
recharge when necessary for
7 hours. We recommend
charging overnight.
NOTE: While powered off, you
will not see an indicator that
the handheld is charging.
TALK
BACK
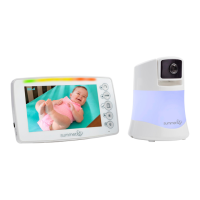
Congratulations! You are now ready to use your LookOut™
Duo with No-Hole PrestoMount™ Digital Color Video Monitor!
Setting Nursery Temperature
Units (°F or °C)
1. Press the MENU/SELECT button .
2. Select TEMP UNIT from the menu
and press the MENU/SELECT button .
3. Press the UP and DOWN buttons
to select °F or °C. Temperature units
will change to selected unit in the
upper bar.
4. Navigate to EXIT in the menu, then
press the MENU/SELECT button .
Menu screen will return to camera
mode after 8 seconds of inactivity.
For most accurate measurement of room
temperature, MAKE SURE to move the
temperature sensor away from the
nursery camera.
Adjusting the Handheld
Screen Brightness
1. Press the MENU/SELECT button .
2. Select BRIGHTNESS from the
menu and press the MENU/SELECT
button .
3. Press the UP and DOWN arrow
buttons to increase or
decrease brightness.
VIEWING YOUR BABY
3
Screen Icons
GETTING TO KNOW YOUR HANDHELD
2
Nursery Temperature
Display
Talk-back
Zoom
Reception
Current Viewing Camera (1-4)
Battery Life/Plugged In
Function Buttons
Power/Video
Menu/Select
Volume Up
Volume Down
Talk-back
Zoom
Flip out the
kick-stand and place
the monitor on a
stable, level surface.
Video On/Off Power Save Mode
This feature helps conserve battery life
when not plugged into an A/C adapter.
The audio feature will remain activated,
allowing you to monitor sounds.
1. To activate POWER SAVE, turn off the
handheld’s video by pressing the
POWER/VIDEO button .
The screen will go dark.
2. Press the POWER/VIDEO button
again to wake up the screen.
When the handheld is not plugged in, the
screen will automatically enter power
save mode after 30 seconds.
Zoom In and Out
1. Press the ZOOM button to
zoom in.
2. Press the button again to zoom
out.
Volume
Press the UP/DOWN arrow buttons
to increase and decrease the
volume.
Sound-Activated Lights
The LED light bar on top of handheld
will light up as it picks up noises,
even in power save mode.
When battery is low, the first LED
flashes red and the handheld beeps.
HEARING & SOOTHING YOUR BABY
4
Talk-back to Baby
Reassure and soothe baby with the
sound of your voice and press of a
button.
1. Press and hold the TALK-BACK
button to talk to your baby.
2. Release the button to end
talk-back mode.
with No-Hole PrestoMount™
To remove wall mount:
1. Remove camera from the mount
and pull tab at bottom of mount and
remove from the wall.
Caution: keep one hand on mount
while pulling tab with other hand.
Install the Nursery Camera
on wall
NOTE: For best picture focus, place
camera 6 ft. from crib.
For wall mount use:
1. Before mounting your wall-mount to
the wall, check to make sure that you
like the view on your handheld screen.
2. Peel the paper backing from the
back of the wall mount, discard paper,
and then push mount for 30 seconds
against wall. For best performance, let
the adhesive cure for 24 hours before
putting the camera onto the wall
mount.
3. Slide camera onto mount until it
clicks into place.
4. Plug cord into left side of camera.
proceed to next page to the Secure the
Cord section.
OPTIONAL:
Remove tab from mount and use wall
anchor and screw provided to attach
mount.
6 ft.
Table top use:
Wall mount use:
7hr.
3 sec.
SELECT
VIEW CAM
BRIGHTNESS
SCAN
ADD CAM
DELETE CAM
EXIT MENU
TEMP UNITS
EXIT MENU
SELECT
VIEW CAM
BRIGHTNESS
SCAN
ADD CAM
DELETE CAM
EXIT MENU
TEMP UNITS
Place one clip close to the camera and at same height as camera,
approximately 3-4 inches away, going away from the camera and from the crib.
This clip will serve as an added measure to help prevent the camera from
falling. Remove and discard the paper backing from the back of the security
clip and press for 30 seconds against wall.
If you ever need to remove the security clips, the clips remove by pulling on
the exposed tab. Caution: keep one hand on security clip while pulling tab
with other hand. You can order more security clips or wall mounts through
our Customer Relations.
Left Facing Camera
mount position.
Right Facing Camera
mount Position.
Important Tips/Caution for Wall Mount and Cord Clip Installation:
Failure to follow instructions carefully may cause damage or incorrect
installation
•Wait 7 days after painting before use.
•Do not hang over crib or on wallpaper.
•Use on painted walls or painted/varnished wood.
•Not approved for use on textured walls, wallpaper, brick, fabric,
other rough and non-stick surfaces.
•Use indoors 50 degrees F to 105 degrees F.
•Do not use in humid environments.
•Wipe wall with rubbing alcohol.
•Do not use household cleaner or water.
•Remove liner from wall mount / cord clip.
•Press firmly on wall for 30 seconds.
•Wait 24 hours before adding camera to wall mount.
•To remove wall mount or cord clips, stretch pull tab down slowly
downward against wall at least 15 inches (38 cm) to release.
•Keep other hand on wall mount / cord clip to keep secure while
removing from wall.
•If using camera on a dresser or shelf with the camera stand,
recommended to use a cord clip close to the camera to help
prevent the camera stand from sliding