27
Chapter 2: Installation
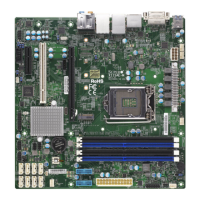
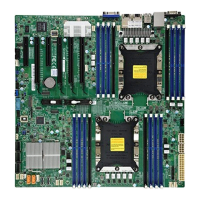
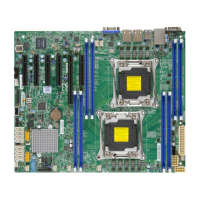
DIMM Module Population Sequence
When installing memory modules, the DIMM slots should be populated in the following order:
DIMMA2, then DIMMB2, DIMMA1, and then DIMMB1.
• Always use DDR4 DIMM modules of the same type and speed.
• Mixed DIMM speeds can be installed. However, all DIMMs will run at the speed of the
slowest DIMM.
• The motherboard will support odd-numbered modules (one or three modules installed).
However, for best memory performance, install DIMM modules in pairs to activate memory
interleaving.
DIMMB1
DIMMB2
DIMMA1
DIMMA2
BAR CODE
BMC
AST2500
J1
SGPIO1
JBM1
JBM2
JD1
JPV1
J6
PJ1
JF1
LED3
FAN2
FAN1
FANA
M2_SRW1
JBT1
JWD1
JPG1
JVR1
JVRM1
JVRM2
JI2C1
JI2C2
JHDT1
JTPM1
JSTBY1
JSMB
SATA 2
SATA 1
SATA 0
BT1
JPI2C1
DIMMB2
DIMMA2
DIMMB1
DIMMA1
LED2
LEDM1
LED1
COM1
JMD2
JPCIE1
SATA 3
JGP1
M11SDV-4CT-LN4F
REV:1.02
DESIGNED IN USA
i350
1
CPU SLOT7 PCI-E 3.0 X16
SATA POWER
VGA
PCI-E 3.0 X4 M.2-HC
USB 6/7(3.0)
USB 4/5
USB 2/3
USB 0/1
CPU
IPMI_LAN
LAN 1/2
LAN 3/4
VGA
ON
PWR
JF1
RST
UID
X
OH/FF
2
NIC
1
LED
NIC HDD
LED
X
PWR
NMI
1-2:ENABLE
2-3:DISABLE
JPG1:
2-3:NMI
1-2:RST
JWD1:WATCH DOG
4-7:SPEAKER
1-3:PWR LEDJD1:
1-2:ENABLE
2-3:DISABLE
JI2C1/JI2C2:
UID
SUPER DOM
 Loading...